WhatsApp is the most used social media platform in the world. Find out what WhatsApp Web is, how it works, and how you can start using it today.
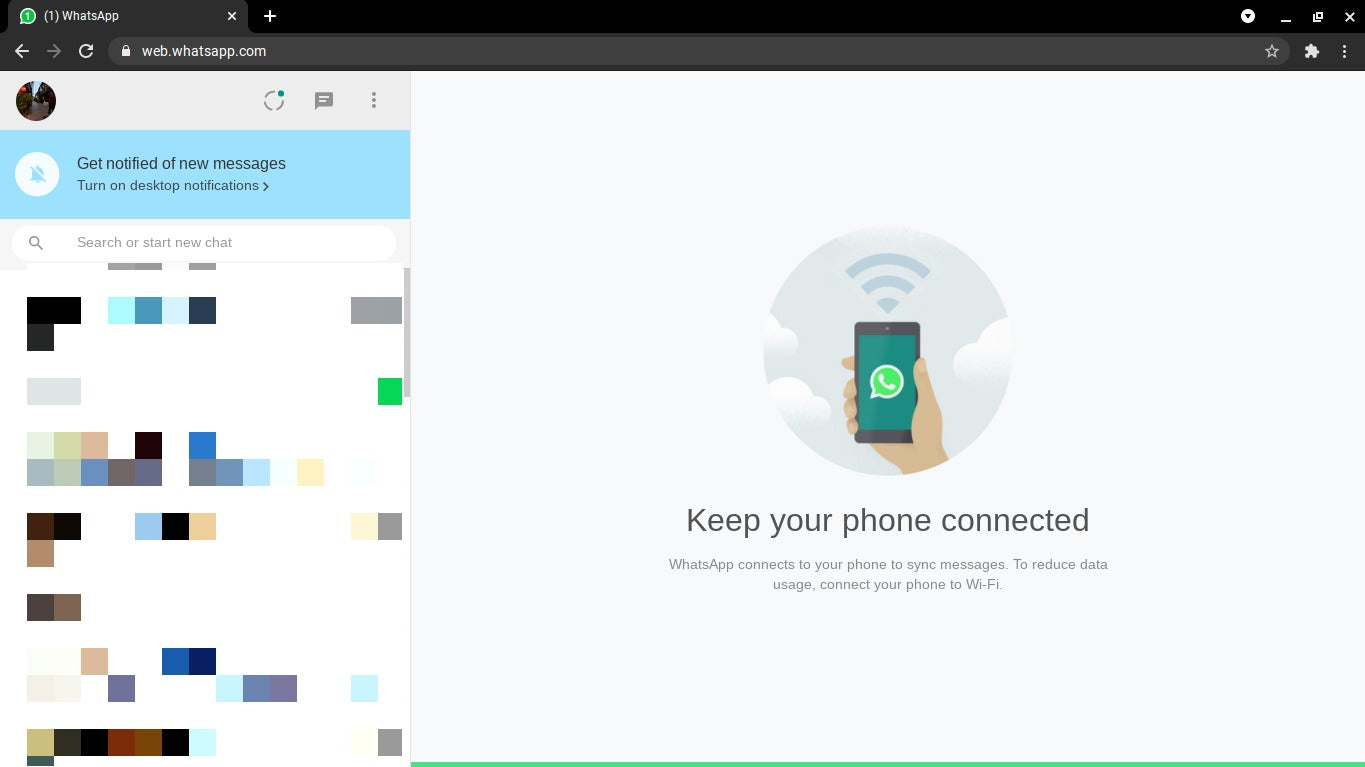
WhatsApp is a cross-platform messaging app that allows users to communicate with each other without incurring SMS charges. WhatsApp Web is the web version of WhatsApp that lets users send and receive messages from their computer browsers.
To use WhatsApp Web, you must have WhatsApp installed on your mobile phone and be signed in to your account. Once you're signed in, you can start using WhatsApp Web on your computer.
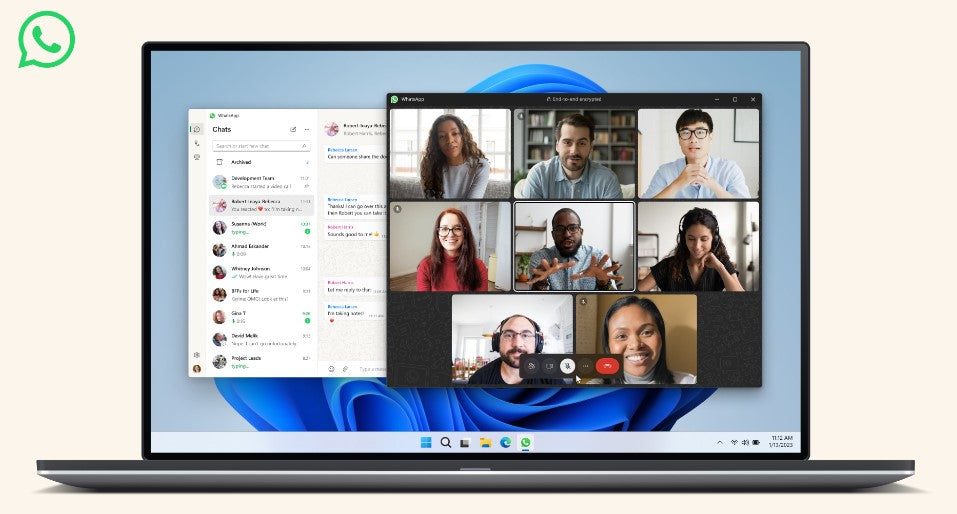
WhatsApp Web is a great way to stay connected with your contacts while at your computer. You can use it to send and receive messages, photos, and videos, and even make voice and video calls.
If you're not sure how to get started with WhatsApp Web, don't worry. We've got you covered. Here's everything you need to know about WhatsApp Web, including how to set it up and start using it.
Table of Contents
What is WhatsApp Web?
WhatsApp Web is the web version of WhatsApp that lets users send and receive messages from their computer browsers. WhatsApp Web is a great way to stay connected with your contacts while at your computer.
WhatsApp is a cross-platform messaging app that allows users to communicate with each other without incurring SMS charges. WhatsApp Web lets users extend their WhatsApp experience to their computer browsers.
To use WhatsApp Web, you must have WhatsApp installed on your mobile phone and be signed in to your account. Once you're signed in, you can start using WhatsApp Web on your computer.
12 Key Things You Need To Know About WhatsApp Web
There are certain features that make WhatsApp web client different from WhatsApp mobile app:
- As of now, Google Chrome and a computer are required to access WhatsApp through the Web; utilizing Chrome on a tablet or smartphone is not supported.
- You must update WhatsApp on your phone to the latest version available from the relevant app store for the web feature to function.
- You must currently have an active WhatsApp account and be an active user. A WhatsApp account cannot be created online.
- Messages cannot be deleted or forwarded via the web version, and you can't create new groups or leave existing ones. To use the app fully, you must first download it.
- The web client is only temporary. Nothing is saved on the computer itself. Attachments can be viewed, but they will only be available later if you download them.
- WhatsApp Web does not allow you to log in to two different WhatsApp web devices (you can only log in to your phone, which must be logged in, plus one WhatsApp web device) or in two different browsers at the same time. Automatically, when you are logged in on one, you are logged out of another.
- You cannot use WhatsApp Web without a good Internet connection. It will not respond.
- WhatsApp Web doesn't allow you to save new contacts. You must first save the contact on the phone.
- WhatsApp Web does not allow Broadcast messages to be sent.
- WhatsApp Web does not allow you to receive either phone or video calls.
- You also cannot post a status on WhatsApp Web. But you can view people's statuses, including yours, on WhatsApp web.
- WhatsApp web does not allow location or map sharing.
How to use WhatsApp Web summary:
- Open WhatsApp on your mobile device.
- Tap on the Settings Icon (gear icon) and open WhatsApp Web/Desktop.
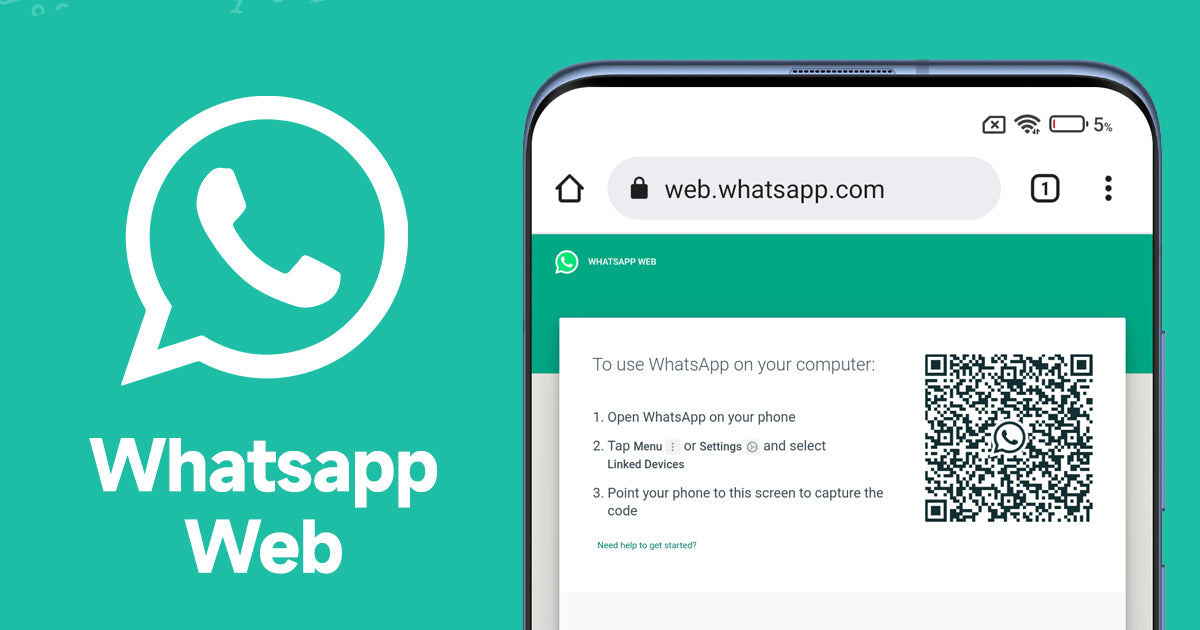
- Now, open web.whatsapp.com on a web browser on your PC.
- Scan the on-screen QR Code using the WhatsApp Scanner from your mobile phone.
- As you scan the QR Code, your WhatsApp account will now be accessible through your PC.
- All the messages will be synced across, and anything you do on one device will apply to both.
How to Set Up WhatsApp Web step-by-step
Setting up WhatsApp Web is easy. However, there are some prerequisites. You'll need the following things before you can start setting up WhatsApp Web:
- An iPhone or Android phone with a working rear camera.
- The latest version of WhatsApp on your phone.
- A computer with a supported web browser such as Google Chrome. You can also download WhatsApp app client on Windows PC or Mac because it works almost the same as the WhatsApp web client.
- A working connection to the internet (a must).
If you meet the prerequisites, setting up WhatsApp Web is simple. Just follow these steps:
-
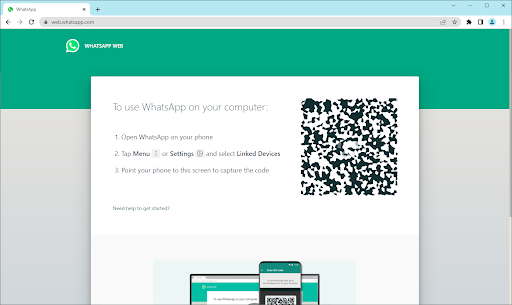
Open your web browser on your computer, and navigate to the https://web.whatsapp.com/ page.
-
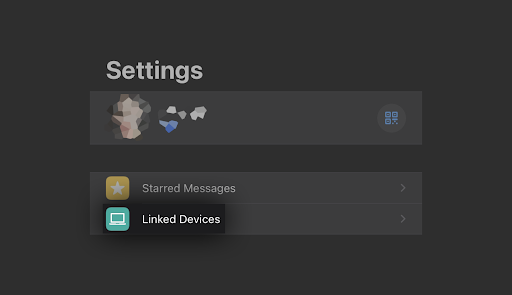
Next, open WhatsApp on your mobile phone. When the application opens, ensure you're signed in with the correct account, then navigate to Menu > Settings > Linked Devices.
-
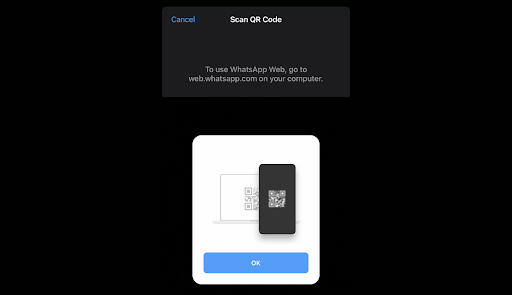
Tap on the Link a Device button. You may be prompted by your phone to give WhatsApp temporary access to your camera — make sure to grant this permission to proceed.
-
Point your rear camera at the computer screen and scan the QR code shown on the WhatsApp Web site.
- You should see the website automatically log you into WhatsApp Web. This may take several minutes, depending on how many messages you have.
That's it! Now you can use WhatsApp in your web browser through the WhatsApp Web service. View your messages, send new messages, and stay in touch with your peers from anywhere in the world through your computer.
Alternatively, you can also download the WhatsApp Desktop application. While the limitations are similar, this is perfect for users who don't want to switch web browsers to use WhatsApp web.
How to log out from WhatsApp Web?
Once you are done using WhatsApp Web, you may want to log out from WhatsApp. Follow this guide to learn how to log out from WhatsApp Web:
- Open WhatsApp on your mobile device.
- Tap on the Settings Icon (gear icon at the bottom-right side of the screen)
- Tap on WhatsApp Web/Desktop.
- It will show all the active sessions there. Scroll and tap on Log out from all devices.
- Confirm by tapping on Log Out.
- You have now logged out from all the active sessions.
Alternatively, you can directly log out from Whatsapp Web by clicking on the Menu icon (3 dots at the upper-left side of the screen) > Log out.
WhatsApp Web features
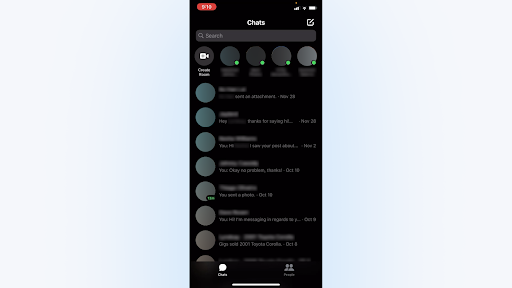
After scanning the QR code, you can view your WhatsApp chat list directly on the web page. On the left, you can see your chats by clicking a contact to open the chat and your message history, if you saved it.
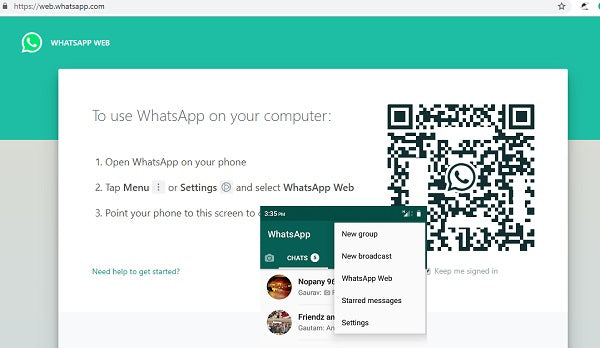
On the top left of the Web page, three icons are available: Status, New chat, and Menu, which offers a list of nested options. The Status option reveals all statuses posted by your contacts along with the ability to respond from the reply area at the bottom of the pane. Clicking New chat opens the contacts list on the left side of the page. From here, you can create a new group or begin a conversation.
The three-dot drop-down menu lets you create a new group, change information in your profile, search archived chats, view starred messages, change settings like notifications and chat wallpaper, or log out.
How to use WhatsApp for Android 12
If you're using Android 12, here are the steps to follow after you open the WhatsApp website on your computer:
Step 1: On Android phones, launch WhatsApp and select the three dots at the upper right from the Chat pane.
Step 2: Select Linked devices and then select Link a device.
Step 3: Hold your phone up to the QR code on your computer to pair it.
Step 4: Your smartphone account is now linked to the app's web version.
Step 5: From there, you can send and receive messages from your computer’s desktop browser.
How to use WhatsApp Web for iOS 15
Using WhatsApp for iOS 15 is easy; just follow these steps.
Step 1: To launch WhatsApp Web, just click on its URL in Chrome, Firefox, Opera, Safari, or Edge and scan the QR code on the page with the WhatsApp mobile app from your phone. WhatsApp Web automatically launches in the browser and remains active until you log out on your computer or phone.
Step 2: Go to the WhatsApp website to link WhatsApp Web with your mobile phone app.
Step 3: Launch WhatsApp on your iPhone or Android mobile phone.
Step 4: Scan the QR code that appears on the site with your phone open to WhatsApp.
Step 5: On the iPhone, select Settings > WhatsApp Web/Desktop.
Step 6: Choose Scan QR code and hold your phone up to the code to pair it.
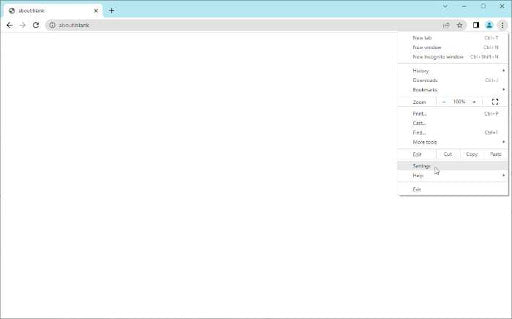
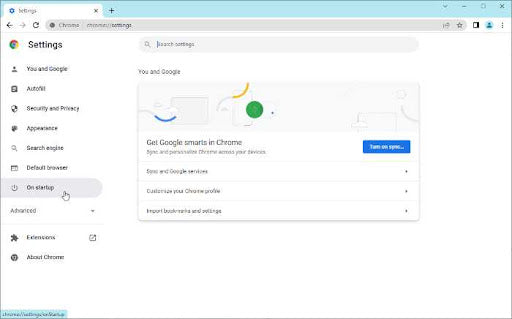
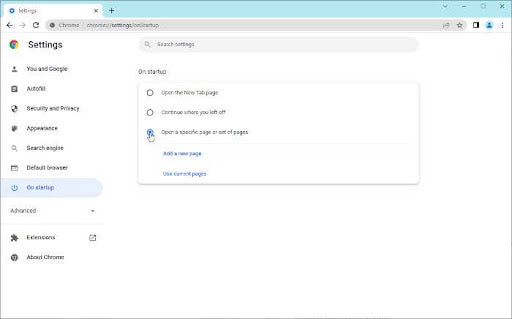
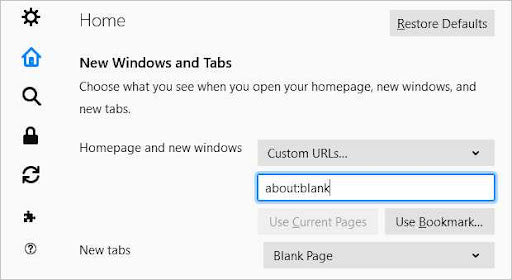
Install WhatsApp on your system
WhatsApp allows users to have a Windows or Mac desktop client to download directly from the app’s website and use it on their system.
- Follow the installer’s instruction prompts once you download the app (which is essentially just a replica of the web-based app) on Windows. If you’re using a Mac, you can launch WhatsApp once you drag the icon to your Applications folder.
- Launch it, and you’ll receive a message asking you to scan a QR code on both the web browser version and the web app. Remember that WhatsApp keeps you signed in until you manually sign out.
- When you’re ready to sign out, navigate to the WhatsApp menu on your cell phone and select Log out from all devices.
- If you’re on a computer, you can click the three-dot icon at the top of the message and select the Log out button.
Benefits of using the WhatsApp Web app
I've used WhatsApp Web for some time now, and I could think of so many reasons why you, too, should use it.
-
No more phone. Once you’ve scanned your WhatsApp Web QR code and opened up the WhatsApp web app, you may longer need to use the phone to send messages and files unless you're on the go and yu really need to use your phone.
-
Keep top of your conversation. WhatsApp web helps you keep on top of your conversations from your computer. There’s no need to switch between the PC and the phone whenever a new message comes in. You can read and reply to them from the web browser.
-
Use your PC/Mac keyboard to type messages. The biggest benefit of WhatsApp Web is using your PC’s keyboard to type out messages. This means that you can type considerably faster than you would on your phone’s keyboard. It makes typing lengthy formal messages very easy.
-
Share files from your PC/Mac. Need to share files from your computer quickly? You can easily send contacts, photos, documents, and other files through WhatsApp Web. Select as many as you want and send them on their way. If you receive a lot of files through WhatsApp, keep in mind that the web app won’t automatically save them on your computer. You will need to download the incoming files on the computer manually, unlike Whatsapp on the phone, which downloads media automatically.
-
Overall productivity. Overall, WhatsApp web gives you more productivity. You can type on your PC/Mac keyboard, respond to messages without looking at your phone and avoid distraction while working.
-
Make calls. Although WhatsApp Web doesn’t let you make voice/video calls to individual contacts like WhatsApp mobile app does, you can still make group video calls on the web version through the Messenger Rooms feature. Once you create a room, simply share the link with the people you want to invite to the group video chat. They’ll be able to join even if they don’t have WhatsApp or Messenger. It also doesn’t require you or the participants to log into Facebook. It’s important to remember that Messenger Rooms aren’t end-to-end encrypted.
WhatsApp Web Tips and tricks: Keyboard Shortcuts on WhatsApp Web
If you are using WhatsApp Web, let me show you some important keyboard shortcuts for Windows PC and Mac your benefit and increased productivity:
1#Find messages
When chatting with someone and you need to search for important information, WhatsApp Web displays all your previous chats with people just the same way it is stored on your WhatsApp mobile. And you can search any information.
- on Mac: press CMD + SHIFT + F key combinations to search the info
- on Windows PC; press the key combinations CTRL + SHIFT + F.
#2 Find unread messages
If you're caught in a situation where you want to see messages a friend/colleague/family sent you but couldn't reply, try the unread feature of WhatsApp Web.
- On Mac: input CMD + CTRL + SHIFT + U;
- On Windows PC: input the keyboard shortcut combination is CTRL + ALT + SHIFT + U.
#3. Archive chats
- Mac: CMD + CTRL + E
- Windows: CTRL + ALT + E.
#4. Create Group
Just as you can access groups and send messages through WhatsApp Web, it also allows you to create a new group on the WhatsApp server.
- Mac: CMD + CTRL + SHIFT + N
- Windows PC: CTRL + ALT + SHIFT + N
#5. Initiate new chat
Although WhatsApp Web does not allow you to save new contacts, you can create or initiate a new chat.
- Mac: CMD + N
- Windows PC: CTRL + ALT + N.
These combinations will direct you to the contact list, where you can find the contact you what to chat with.
#6. Customize your account
You may be one of the people who enjoy setting up or customizing WhatApp accounts on Mac/PC. You can also do it on WhatsApp web. To do this, open settings on WhatsApp Web with:
- Mac: CMD + CTRL +
- Windows PC: CTRL + ALT +
#7. Mute notifications - Stop receiving notifications
To stop receiving notifications from a chat partner or a specific group, the next line of action is to mute notifications from such a person or group.
- Mac: CMD + CTRL + SHIFT + M
- Windows PC: CTRL + ALT + SHIFT + M
#8. Delete chats
Due to privacy reasons or because you need to free up space, you may need to delete particular chats on your WhatsApp chat lists. Here are the keyboard shortcuts to delete chats:
- Mac: CMD + SHIFT + Backspace
- Windows PC: CTRL + ALT + Backspace
#9. Search in chat lists
You can also search in chat lists. This is important when you need to pick out a specific chat from your chat lists.
- Mac: CMD + CTRL + /
- Windows PC: CTRL + ALT + /
Check out: Key keyboard features for Computer Keyboards and Gaming Keyboards.
WhatsApp Web and Desktop updates
WhatsApp Web and Desktop have received a slew of exciting updates that are sure to enhance the user experience. The series of updates for Whatsapp web and desktop versions provide users with new features, improved functionality, and better user experiences. With the latest WhatsApp Web and Desktop updates, users can expect to enjoy improved functionality and features that make communicating with friends and family easier and more convenient.
Multi-Device Support
The latest WhatsApp Web and Desktop updates include multi-device support, a much-awaited feature that allows users to access their WhatsApp account on multiple devices simultaneously. This update means that you can now use WhatsApp on your laptop, desktop, or tablet without having to disconnect from your primary device.
End-to-End Encrypted Voice and Video Calls
WhatsApp's end-to-end encryption is now available for voice and video calls on WhatsApp Web and Desktop. This update ensures that your calls remain secure and private, just like your messages. With this feature, users can communicate with each other without worrying about their conversations being intercepted.
View Once
The 'View Once' feature is another new addition to WhatsApp's web and desktop versions. This feature allows users to send photos and videos that disappear after being viewed once. This is a great feature for sharing sensitive information or sending temporary updates to your friends or family.
Improved Video Calls
WhatsApp's latest update to its video call feature includes improvements to the video call window, allowing users to switch between landscape and portrait modes during calls. Additionally, the update includes a new video call window that allows users to resize the window and move it around the screen as needed.
Desktop Notifications
WhatsApp Web and Desktop updates also include desktop notifications, making it easier for users to stay up to date with their conversations. This feature means that you'll receive notifications for new messages and calls even when WhatsApp is not open in your browser. This feature is particularly useful for those who use WhatsApp Web or Desktop as their primary messaging platform.
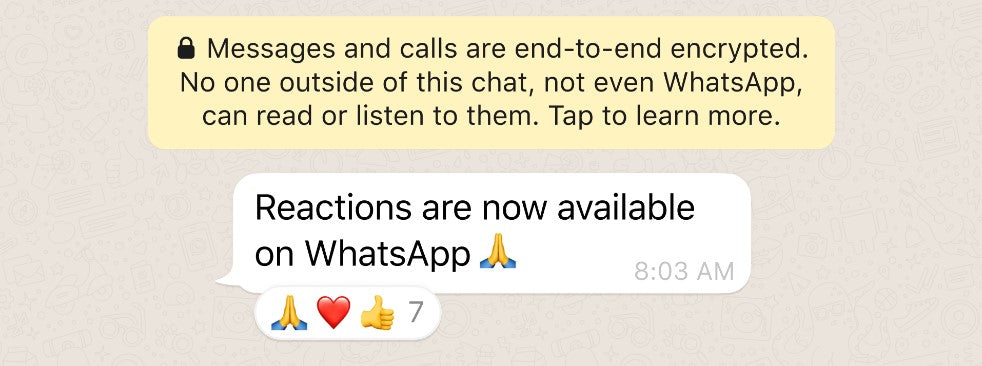
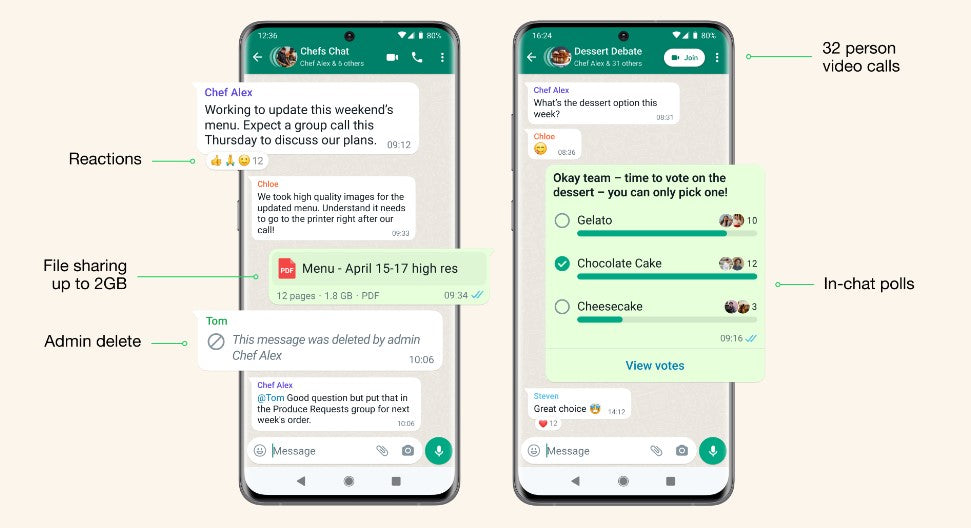
Reactions, 2GB File Sharing, and 512 Groups
WhatsApp now supports reactions, allowing users to respond to messages with emojis. Additionally, the platform now allows for 2GB file sharing, making it easier to send large files to friends and family. The number of participants in a WhatsApp group has also been increased to 512.
Emoji reactions are now available on the latest version of the app. Reactions are fun, fast, and they reduce overload in groups too.
In addition, you can now send files within WhatsApp up to 2GB in size at a time, protected by end-to-end encryption. This is an increase from the previous limit of 100MB and we think will be helpful for collaboration among small businesses and school groups. We recommend using WiFi for larger files and we’ll display a counter while uploading or downloading to let you know how long your transfer will take.
WhatsApp is also slowly rolling out the ability to add up to 512 people to a group. Building private, safe, and secure communities takes work, and this series of improvements will help people and groups stay close to one another.
Faster Speeds and Improved Calling for WhatsApp Desktop
WhatsApp Desktop has received an update that improves its performance, resulting in faster speeds and smoother operation. The update also includes improved calling functionality, making it easier for users to make calls from their desktop.
The new Windows desktop app loads faster and is built with an interface familiar to WhatsApp and Windows users. You can host group video calls with up to 8 people and audio calls with up to 32 people. We’ll continue to increase these limits over time so you can always stay connected with friends, family, and work colleagues.
The WhatsApp web still keeps end-to-end encryption that allows cross-platform communication between mobile phones, computers, tablets, and more to protect personal messages, media, and calls are always end-to-end encrypted across all your devices.
Since introducing new multi-device capabilities, we’ve listened to feedback and made improvements, including faster device linking and better syncing across devices, as well as new features such as link previews and stickers.
Getting More Out of Groups on WhatsApp
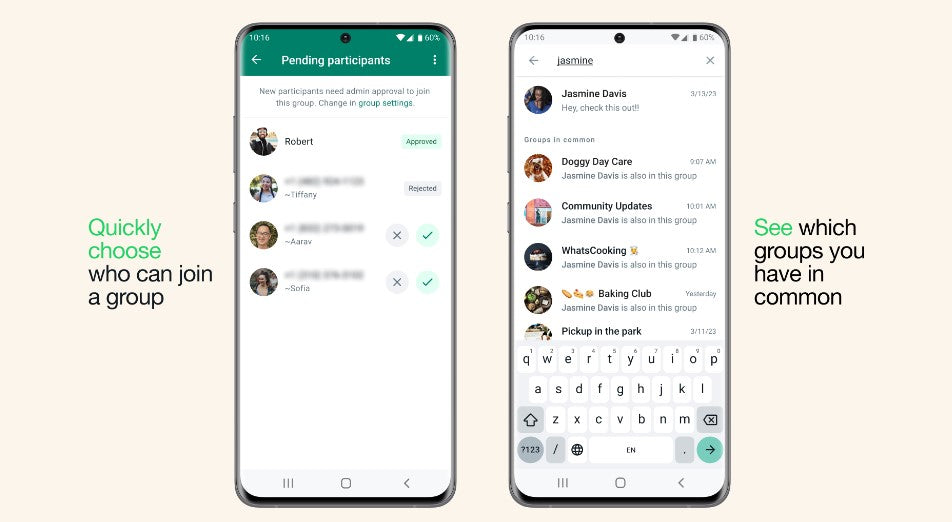
WhatsApp has introduced new controls for group admins, allowing them to restrict who can change the group's subject, icon, and description. Additionally, users can now see which groups they have in common with their contacts.
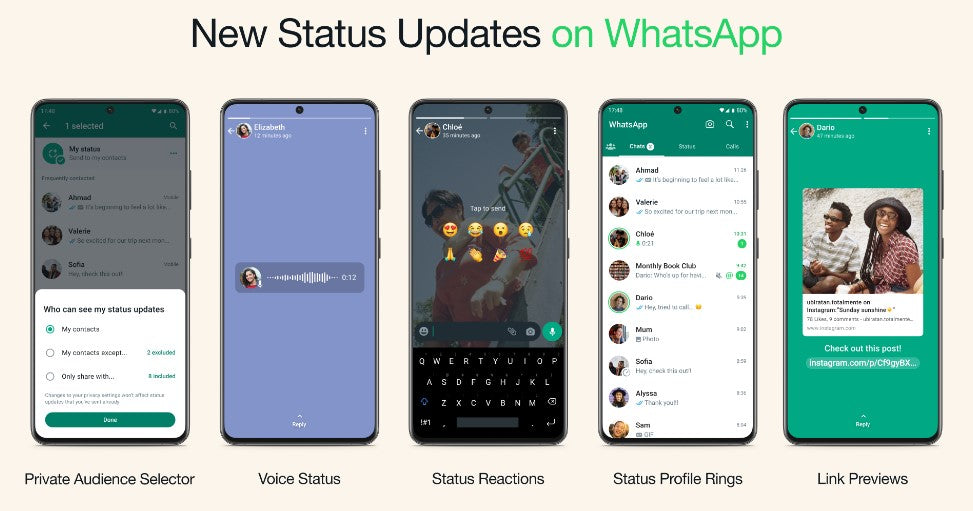
New Ways to Enjoy WhatsApp Status
WhatsApp has introduced new features for Status, including the ability to add text to photos and videos, and the option to mute or unmute Status updates from specific contacts. Other ways to enjoy WhatsApp status include:
-
Private Audience Selector: Every status you share may not always be right for all of your contacts. We’re providing you with the flexibility to update your privacy settings per status so you can choose who views your status each time you update it. Your most recent audience selection will be saved and used as the default for your next status.
-
Voice Status: We’re introducing the ability to record and share voice messages up to 30 seconds on WhatsApp status. Voice status can be used for sending more personal updates, especially if you feel more comfortable expressing yourself by talking rather than typing.
-
Status Reactions: We’re adding status reactions to provide a quick and easy way to respond to status updates from your friends and close contacts. This was the #1 feature users wanted, following the launch of Reactions last year. You can now quickly reply to any status by swiping up and tapping on one of eight emojis. You can of course still reply to a status with text, voice message, stickers and more.
-
Status Profile Rings for New Updates: With the new status profile ring you’ll never miss a status from a loved one. This ring will be present around your contact’s profile picture whenever they share a status update. It will be visible in the chat lists, group participant lists, and contact info.
-
Link Previews on Status: Now when you post a link on your status, you’ll automatically see a visual preview of the link content, just like when you send a message. Visual previews make your statuses look better, and also give your contacts a better idea of what the link is before they click.
Connecting to WhatsApp by Proxy
WhatsApp now supports connecting to the platform via proxy, allowing users to access WhatsApp even in regions where the platform is blocked or disrupted.
Choosing a proxy enables you to connect to WhatsApp through servers set up by volunteers and organizations around the world dedicated to helping people communicate freely. If you can help others connect, you can learn how to set up a proxy here.
Improved Calling on WhatsApp
WhatsApp's calling feature has received an update that improves call quality, particularly in areas with poor network connectivity. The update also includes a new feature that allows users to join group calls even after they have started.
New features for better connecting as a group on calls:
-
32-person calls: Just like with voice calls, you can now do video calls on your mobile with up to 32 people, four times the number of people than before
-
Message or mute call participants: Long pressing on a participant will enlarge the video or audio feed and allow you to either mute or message them separately while keeping the calls going
-
Call links: Whether making a last-minute call or planning ahead, you can easily invite people to a group call by sharing a call link
Design changes for a more seamless calling experience:
-
Colorful waveforms: Now you can easily see who is speaking if their camera is off
-
In-call banner notifications: See when someone new joins a group call
-
Picture in Picture on iOS: Now in beta testing and rolling out in the new year, easily multitask while on a call thanks to a minimized in-call video screen
As always, all calls on WhatsApp are end-to-end encrypted by default to protect people’s privacy and safety.
Avatars on WhatsApp
Users can now customize their WhatsApp profile with avatars, allowing them to express their personality and style.
Your avatar is a digital version of you that can be created from billions of combinations of diverse hairstyles, facial features, and outfits. On WhatsApp, and WhatsApp web, you can now use your personalized avatar as your profile photo or choose from one of 36 custom stickers reflecting many different emotions and actions.
Sending an avatar is a fast and fun way to share feelings with friends and family. It can also be a great way to represent yourself without using your real photo so it feels more private.
Find, Message, and Buy on WhatsApp
WhatsApp has introduced new features that make it easier for businesses to connect with their customers. Users can now search for businesses on the platform, message them, and even make purchases directly through WhatsApp.
-
Find a business: You can find a business right on WhatsApp when you browse by categories – such as travel or banking – or search by the business name. This will save people from having to find phone numbers off websites or type a number into their contacts.
- Message: As more businesses use WhatsApp, they control their conversations. People can chat with you on WhatsApp, including Whatsapp web, once they find your business.
- Buy: Ultimately, people can buy directly from your business through WhatsApp. This seamless checkout experience is a game-changer for people and businesses looking to buy and sell on WhatsApp without having to go to a website, open another app or pay in person.
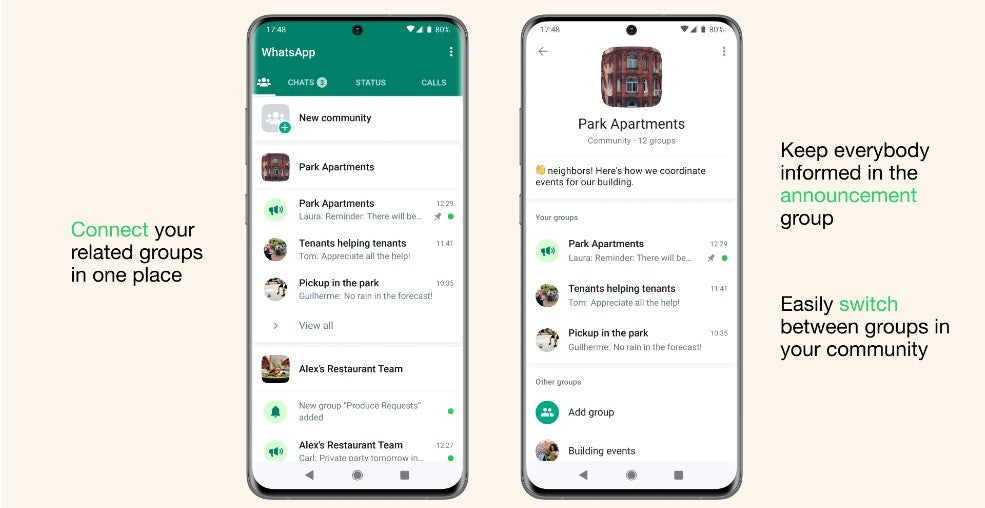
WhatsApp Communities Now Available
WhatsApp now supports Communities, a new feature that allows users to join groups based on shared interests and hobbies.
WhatsApp shared earlier this year [2023] that they were building Communities, a major update to how people will be able to connect on WhatsApp in the groups that matter to them.
Communities like neighborhoods, parents at a school, and workplaces can now connect multiple groups together under one umbrella to organize group conversations on WhatsApp. To get started, tap on the new communities tab at the top of your chats on Android and at the bottom on iOS. From there you can start a new Community from scratch or add existing groups.
Once you’re in a community, you can easily switch between available groups to get the information you need when you need it, and admins can send important updates to everyone in the Community.
Other key WhatsApp updates that also work on WhatsApp web include:
- The ability to create in-chat polls
- 32 person video calling
- Groups with up to 1024 users
- Larger file sharing
- Admin delete
These features can be used in any group but will be particularly helpful for Communities.
WhatsApp New Features for More Privacy, More Protection, More Control
WhatsApp has introduced a series of new features that prioritize user privacy and protection. These features include disappearing messages, two-step verification, and the ability to block and report suspicious accounts.
WhatsApp values Privacy and strives to create private and secure conversations to imitate having face-to-face conversations.
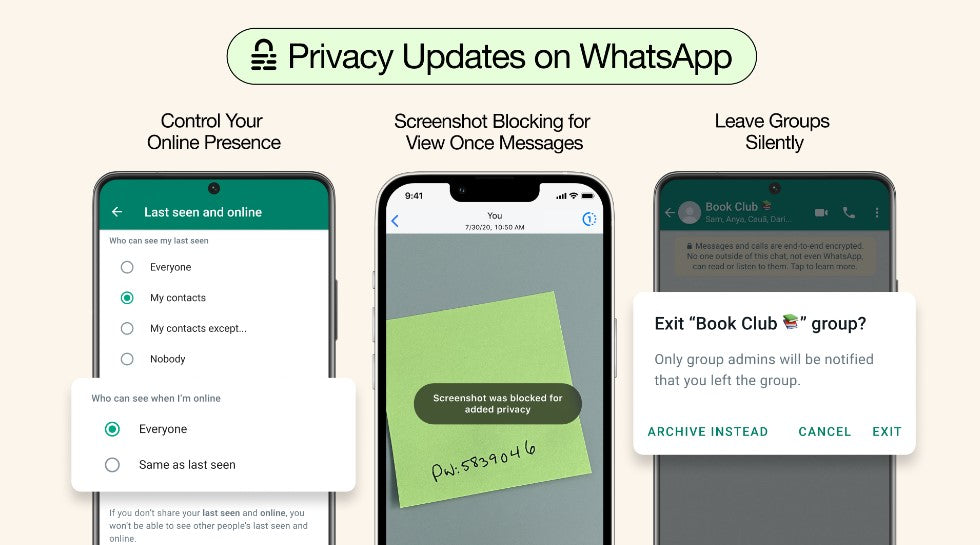
On key WhatsApp update is the default end-to-end encryption, so no one but the intended recipient can hear or see them. This has been updated with several new privacy features that provide even more layers of protection and give you more control over your messages. These include:
-
Leave Groups Silently: You can now exit a group privately without making it a big deal to everyone. Only the admins will be notified.
-
Choose Who Can See When You're Online: You can choose who sees you online in WhtasApp, and this extends to WhatsApp web.
-
Screenshot Blocking For View Once Messages: View Once is already an incredibly popular way to share photos or media that don’t need to have a permanent digital record. Now WhatsApp has enabled screenshot blocking for View Once messages for an added layer of protection.
Final Thoughts
WhatsApp Web on Mac or Windows PC is a great way to stay connected with your contacts while at your computer. Setting up WhatsApp Web is easy, and the service is free. With WhatsApp Web, you can send and receive messages from your computer without incurring SMS charges.
We hope you found this article helpful. If you have any questions, feel free to leave a message using the Live Chat or contact information below. Thanks for reading!
One More Thing
Looking for more tips? Check out our other guides in our Blog or visit our Help Center for a wealth of information on how to troubleshoot various issues.
Sign up for our newsletter and access our blog posts, promotions, and discount codes early. Plus, you'll be the first to know about our latest guides, deals, and other exciting updates!
Recommended Articles
» How To Fix Discord Is Stuck on the Connecting Screen
» Android System UI Stopped Working: Quick Fixes
» Will Windows 11 Get These New Emojis?
» What is MIDI: 9 Best MIDI players for Windows 10/11?
Feel free to reach out with questions or requests you'd like us to cover.
]]>