

A feature in Windows 10 that many users fell in love with for its usefulness is the print to PDF function. It allows you to print a web page, file, .jpg image or Word file as a PDF with the help of the integrated PDF Printer by Microsoft. This printer is called the Microsoft Print to PDF.
As many users depend on this feature to get high-quality PSF files, it becomes a large issue when the Print to PDF tool stops working. Reports say that some users experience issues such as their web browser becoming unresponsive and no download process starts, nor does a save prompt appear.
In our article, we’ll be taking a look at the top solutions to fix the Microsoft Print to PDF feature not working. Without any further ado, let's troubleshoot the error.
Jump to Solution
- Before fixing: Check your user folder for PDFs
- Disable and re-enable the Microsoft Print to PDF feature
- Set Microsoft Print to PDF as the default printer
- Reinstall Microsoft Print to PDF drivers
- Update Windows 10
- (Bonus tip) Don’t use commas when saving a PDF
Why is Microsoft Print to PDF not Working?
There could be several reasons why Microsoft Print to PDF is not working. Here are some possible solutions to troubleshoot the issue:
- This can only work in Windows 10 and later. If you are using Windows 7 or 8, it is practically impossible for you to be able to do this. The feature is only available for Windows 10 or later. So if you want to print to PDF in Microsoft, you have to upgrade to Windows 10 or Windows 11.
-
Check if the Print to PDF feature is enabled: Go to "Settings" > "Devices" > "Printers & scanners" and select "Microsoft Print to PDF." Ensure the option "Let Windows manage my default printer" is turned off.
-
Restart the Print Spooler service: Press Windows + R keys and type "services.msc" in the Run dialog box. Scroll down and find the "Print Spooler" service. Right-click on it and select "Restart."
-
Update your printer driver: Check if there are any updates available for your printer driver. Go to "Settings" > "Devices" > "Printers & scanners," select your printer, and click on "Manage." Then, click "Printer properties" and go to the "Advanced" tab. Click "New Driver" and follow the on-screen instructions to update your printer driver.
-
Clear the print queue: If there are any pending print jobs, clear the print queue by going to "Settings" > "Devices" > "Printers & scanners," select your printer, and click on "Open queue." Then, select all the pending print jobs and click "Cancel."
-
Reinstall the Print to PDF printer: Go to "Settings" > "Devices" > "Printers & scanners," and click on "Add a printer or scanner." Then, select "The printer I want isn't listed" and click "Add a local printer or network printer with manual settings." Select "Microsoft" as the manufacturer and "Microsoft Print to PDF" as the printer model.
If none of these solutions work, you may want to seek further assistance from Microsoft support or a professional technician.
How to Use Print to PDF in Microsoft in Word, Excel, and PowerPoint
Each one of these three Microsoft applications allows for printing to PDF in its own way. Let's look at how to do this for each one individually.
How to Use Microsoft Word Print to PDF
To print Microsoft Word to PDF, you first need to open the file you would like to print in Microsoft Word, then follow these simple steps:
- Step 1: Hit "Ctrl + P" on your keyboard or click on "File" and then select "Print."
- Step 2: This will open the print window.
- Step 3: Click on the drop-down menu under "Printer," and from the options presented, select "Microsoft Print to PDF".
- Step 4: You can also select other settings, such as the number of pages to print. This will print Word to PDF and, in essence, create another file that is in PDF format.
How to Use Microsoft Excel Print to PDF
To Print Microsoft PDF in Excel, you essentially have to follow the same process. First, begin by opening the Excel file you wish to print to PDF, and then follow these simple steps:
- Step 1: Again, click "File" and then choose "Print." Or even hit Ctrl + P on your keyboard to open the "Print" menu.
- Step 2: In the pop-up window, after clicking "Printer," find "Microsoft Print to PDF" and select it.
- Step 3: The Excel file could be created into a PDF document.
How to print Microsoft PowerPoint as a PDF
PowerPoint Presentation (PPT) can also be printed as a PDF with the same method. It could be done even without your PPT file opened.
- Step 1: Select the PPT file you want to print, then right-click and select the "Print" item on the drop-down menu.
- Step 2: In the new window, choose "Microsoft Print to PDF".
- Step 3: Once you are done, you will have created a PDF of your PowerPoint Presentation that you can now save or print.
6 Methods to Fix Microsoft Print to PDF
Note: You might be required to have access to an administrator account to perform all of the steps described below. If the account you’re currently using doesn’t have administrative permissions, make sure to change this in your settings.
Method 1: Before fixing: Check your user folder for PDFs
Many users don’t know this, but in some cases, the PDF files you’re saving might be going into the default user folder instead of the usual destination. This can make it seem like the Print to PDF feature is not working, when in reality it is. Before you start troubleshooting, we recommend checking if your PDFs are stored here.
- Press the Windows + R keys on your keyboard. This is going to open the Run application, where you can reach any place or software by typing.
- Type in the following line and hit the Enter key: C:\users\%username%
- Check if you find any of the PDF files you’ve been saving in this folder. If you still don’t find anything, try the following folder: C:\users\%username%\Documents
- If you still can’t find the PDFs you’ve been saving, proceed with the methods below.
Method 2: Disable and re-enable the Microsoft Print to PDF feature

Sometimes a simple restart to the service can fix issues. Try this quick fix and get rid of errors related to the Microsoft Print to PDF feature not working.
- Press the Windows + R keys on your keyboard to launch the Run application. Using this, you can launch any app by simply typing, as long as you know its name.
- Type in the word “appwiz.cpl” and hit the OK button. Doing so will launch the classic Control Panel application on the Programs and Features page.
- Click on the Turn Windows features on or off-link.
- Scroll down and uncheck Microsoft Print to PDF. Press the OK button to make the change and temporarily disable the feature.
- Restart your computer and repeat steps 1 — 3.
- Check the box next to Microsoft Print to PDF. Press the OK button to finalize the change. You successfully restarted the feature!
- Restart your computer and attempt using the Microsoft Print to PDF feature again to see if the error is still present.
Method 3: Set Microsoft Print to PDF as the default printer
If you have a different printer connected to your device, it might interfere with the Print to PDF in Windows 10. To avoid this issue, simply follow the steps below to make Print to PDF your default printer and start saving PDFs with ease again.
- Press the Windows + R keys on your keyboard to launch the Run application. Using this, you can launch any app by simply typing, as long as you know its name.
- Type in the word “control printers” and hit the OK button. You should be able to see the Devices and Printers window.
- Right-click on Microsoft Print to PDF and select Set as default printer from the context menu.
- Restart your computer and attempt using the Microsoft Print to PDF feature again to see if the error is still present.
Method 4: Reinstall Microsoft Print to PDF drivers
It’s important to keep your drivers up to date to ensure no outdated codes cause conflict with your system other once Windows 10 rolls out a newer version. To update drivers related to the Print to PDF feature, simply use the guide below.
- Press the Windows + R keys on your keyboard to launch the Run application. Using this, you can launch any app by simply typing, as long as you know its name.
- Type in the word “control printers” and hit the OK button. You should be able to see the Devices and Printers window.
- Right-click on Microsoft Print to PDF and select Remove device from the context menu.
- If prompted, enter an administrator password or give administrator confirmation to complete the step.
- Click on the Add printer button in the top region of the window. Alternatively, right-click any empty space in the window and click Add devices and printers.
- Click on the “The printer that I want isn’t listed” link at the bottom of the window.
- Select “Add a local printer or network printer with manual settings” and click Next.
- Select “Use an existing port” and choose PORTPROMPT: (Local Port) from the dropdown menu, then click Next.
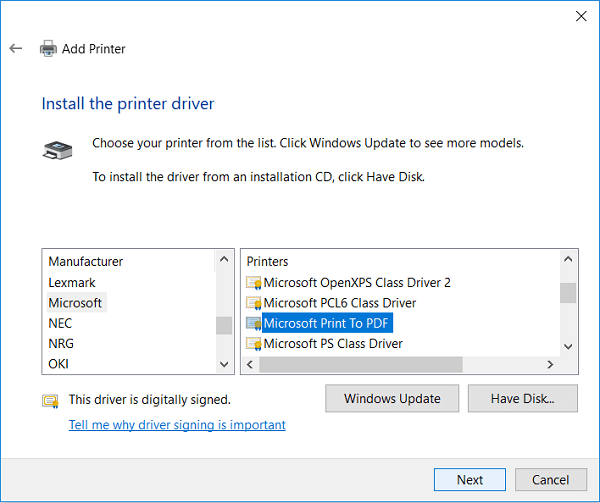
- Select Microsoft from the left column, then scroll down and select Microsoft Print to PDF from the right column. Click Next.
- Select “Replace the current driver” and click Next.
- Name the printer Microsoft Print to PDF and click Next.
- Restart your computer and attempt using the Microsoft Print to PDF feature again to see if the error is still present.
Method 5: Update Windows 10

Upgrading to the newest Windows 10 release may be able to restore some system issues on your device. Many users report that an update was able to resolve known bugs, and it also brings you new and exciting features, patches up security holes, and much more.
Here are the steps to guide you when updating Windows 10.
- Click on the Start menu and choose Settings. You can alternatively use the Windows + I keyboard shortcut as well.
- Click on the Update & security tile.
- Make sure to stay on the default Windows Update tab.
- Click on the Check for updates button.
- When an update is found, click on the Install button and wait for Windows 10 to download and apply the update.
Method 6: (Bonus tip) Don’t use commas when saving a PDF
If you notice that no matter what you do, PDF files simply don’t download anymore, make sure that you never use commas or other specific notations in the file name when saving. These symbols can cause the Print to PDF feature to fail properly, converting the website, image, or document you’re trying to make into a PDF.
Conclusion
We hope that this guide was able to help you troubleshoot the Microsoft Print to PDF feature not working properly on your Windows system.
If you notice in the future that your system is experiencing similar issues, feel free to return to our article and apply some other fixes. If nothing works, we recommend turning to either Microsoft’s customer support team or looking for an IT specialist in regards to your PC’s health.