http://oktec.kr/?big=es-sp/blogs/consejos-y-trucos.atom SoftwareKeep - Consejos y trucos 2024-06-20T02:21:30-07:00 SoftwareKeep http://oktec.kr/?big=es-sp/blogs/consejos-y-trucos/tech-stack-for-startups 2024-06-20T02:21:30-07:00 2024-06-26T22:39:09-07:00 Tech Stack for your Startup in 2024 Rick Akura Learn about the right tech stack you need for your startup for adaptability, longevity, and competitive advantage in the tech-lead startup world.

Más

]]>
In today’s dynamic digital landscape, technology isn’t only the backbone of business innovation, but also the main driver of success. The rapid evolution of technology has encouraged every startup to change the way they operate and start choosing the right tech stack for them. 

Making a decision on which tech stack is right for you doesn’t only determine your startup’s adaptability and longevity, but will help your startup stand out from competitors. In the earlier stages of your startup, having the right tech stack can make a serious difference. 

Therefore, in this article, we’ll dive deeper and show you which steps to follow to create the right tech stack for your startup this year. 

JavaScript stacks 

JavaScript stacks

A JavaScript stack includes a backend and frontend framework or library, and a database. As of now, nearly 64% of developers use JavaScript. All components are used for developing powerful applications, which include a cloud platform, package manager, module bundler, and a version control system. Now, let’s dive deeper and learn more about JavaScript stacks: 

  • Front-end: These are used for client-side development. Popular options include React.js, Angular.js, and Vue.js. React.js is used for building user interfaces (UIs), allowing developers to reuse UI components. Angular.js is used for creating dynamic web applications, while vue.js is a JavaScript framework that builds UIs. Vue.js can be used for integration with other projects and libraries. 
  • Back-end: There are two popular options which include Node.js and Django. They are both used for server-side scripting. Node.js allows developers to run JavaScript on the server side, while Django is used for handling asynchronous tasks. 
  • Database: The most common databases used in the JS stack include MySQL and MongoDB. MongoDB stores data in a JSON-like format and is commonly used with Express.js and Node.js. In other cases, depending on what the project requires, developers will use MySQL or PostgreSQL when they need to use a NoSQL database. However, as projects grow and analytical needs evolve, developers might find it beneficial to migrate data from MongoDB to BigQuery.

There are many advantages when using the JavaScript stack. One of the main advantages is using the same language and using both frontend and backend coding. Also, the great news is that JavaScript has a highly active community that is always improving and this can help you and your team as well. 

Financial reporting software stack

Use financial reporting software stack to comply with the International Financial Reporting Standard (IFRS) 2

Financial reporting software

The IFRS 2 is the accounting standard that deals with share-based payments. It shows you how you are supposed to expense share-based payments in your financial reporting. Businesses of all sizes should comply with these standards, so you must do so from the beginning. 

All businesses that use the IFRS 2 are doing so to establish a fair value of share-based payments. There are two types of share-based payment transactions: 

  • Equity-settled transactions: This includes transactions where goods or services are exchanged for any equity instrument (a share or option) 
  • Cash-settled transactions: Goods and services are exchanged for cash or any other valuable asset. 

While there are plenty of pricing models to choose from, the most popular one is the Black-Scholes model. This model how much stock options are worth based on five inputs: 

  • Volatility: How much the stock’s value increases and decreases throughout time, which is determined by the standard deviation of log returns
  • Stock price: The stock price when you are doing the calculation
  • Exercise price: The price of the stock when it’s exercised
  • The validity time frame of the option: How long the option is valid for
  • The risk-free interest rate: The amount of interest that is going to be accumulated if the stock is subject to no risk

While it might sometimes be challenging to comply with the IFRS 2, your best bet is to use a financial reporting software that will automatically generate reports with instant IFRS 2 expensing. The financial reporting software can automatically automate error flags, documents, and calculations, ready to export and share at all times. 

Going the extra mile with logistic startups and your preventive maintenance checklist 

Logistic startups are becoming highly popular with the right software, you can aid your startup in no time. 

This counts for fleet managers the most and technology has come so far that it makes your preventative maintenance checklist much more advanced. Your preventive maintenance checklist should include: 

  • State and federal compliance regulations
  • Internal goals for maintenance
  • OEM warranties and guidelines 

If you want to make your PM checklists effective, here’s what you need to do: 

  • Follow OEM recommendations for service intervals
  • Conduct daily driver-vehicle inspection reports 
  • Decide to outsource your PM or handle it in-house
  • Endorse record-keeping to calculate Total Cost of Ownership (TCO) and track other expenses
  • Have a system for tracking your inventory and parts

Other than that, to make your logistics start-up a successful one, you need to make a choice on which software you need to use. However, before you make a decision in choosing which software is right for you, you need to first consider a few key factors: 

  • The software’s flexibility and scalability
  • Its integration capabilities 
  • How user-friendly it is 
  • Its reporting and analytics capabilities
  • Data sharing abilities 

Other than that, if you want your logistic startup to run effectively, here is the type of software you need to use: 

  • Cloud-based logistics software provider 
  • Supply chain management software
  • Freight management software
  • Route planning and optimization software
  • Transportation Management System (TMS) platform

The type of software you use will depend on what your business requirements are. It’s always important to do more research on them to learn more so you can succeed in the long term. 

Microsoft’s Tech stack

Microsoft’s Tech stack

Microsoft’s tech stack is a robust framework supporting a wide range of apps and tools. Overall, Microsoft has a range of products that are designed to meet the needs of businesses of all industries and sizes. In other words, it’s a one-stop shop for all enterprises: 

  • Microsoft Office: This is a top choice that easily integrates with other products like Word, Excel, PowerPoint, and Teams. Cloud-based collaboration features encourage effortless communication and document sharing, making it much easier for teams to communicate and collaborate. 
  • Windows Server: Provides you with essential services such as storage, networking, and virtualization. 
  • Microsoft Dynamics 365: Combines Customer Relationship Management (CRM) and Enterprise Resource Planning (ERP) applications. The solution is that you get an all-in-one platform for managing your sales and all customer interactions. 
  • Power BI: A business analytics tool that transforms raw data into visualizations. 

Moreover, you have the key technologies in the Microsoft tech stack for developers that include: 

  • ASP.NET: Used for building web applications, from simple to complex ones. It easily integrates with other Microsoft technologies and supports multiple programming languages. 
  • Microsoft.NET: Supports different programming languages. Key components include Common Language Runtime (CLR), and Base Class Library (BCL). 
  • Microsoft SQL: Makes sure that your data storage, retrieval, and management is as efficient as possible. 
  • Microsoft Web API: A framework that is used for building HTTP services that can be consumed by mobile devices, desktop apps, website browsers, and consumers. Many modern apps are strongly dependent on Web APIs for establishing communication between components. 

Truly office 

As an alternative to Microsoft’s products, many startups also turn their attention to Truly Office. It’s specially designed for startups and freelancers. The Suite includes many productivity applications for analyzing data, editing documents, and creating presentations. 

Similar to Microsoft products, Truly Office provides Truly Word, sheets, slides, and is compatible with all operating systems. All users can save their work offline and synchronize their files across all of their devices by using the Truly cloud. 

Moreover, Truly Office is compatible with Microsoft Office applications and Google Suite file formats. The advantage you have is that you are offered a one-time purchase model with no hidden fees. 

Ruby on Rails (RoR) 

Ruby on Rails (RoR)

Ruby on Rails is popular since it always follows the Convention over Configuration (CoC) principle. This principle makes the development process much easier for developers. Additionally, a Ruby on Rails developer can use a Model-View-Controller (MVC) design pattern. This pattern is great for programmers since they can work on different app components independently. 

Ruby is used as a programming language and Rails is the Web application framework. The advantages of using RoR include: 

  • Easy to modify
  • Many resources and tools to use that are created from a community of developers
  • Thanks to the CoC principle, your development phase is fastened 

The only thing to know about RoR is that its learning curve is steeper, so if you are just getting started, you need to be patient. 

The flutter tech stack 

The flutter tech stack is used in the cross-platform development industry. It was initially developed by Google and uses Dart as its programming language. It has four key components, which include: 

  • Dart 
  • The Flutter engine
  • The Foundation Library 
  • Design-specific frameworks 

Flutter is an excellent option if you are focusing on B2C or C2C projects. Key advantages include:

  • Offers easy cross-platform updates
  • Not as difficult to learn as RoR
  • Ready-made UI design and elements 
  • Has a really powerful community of developers 

Popular companies like eBay Motors and Toyota use the Flutter tech stack. However, if you are focused on complex apps, it’s best not to use it. 

Choose the right tech stack for your startup 

We mentioned many different options for you to choose from. It’s now your time to choose the right tech stack that blends in with your startup needs, both in the present and in the future. When it comes to financial compliance, you can use financial reporting software that complies with the IFRS 2. 

Your main goal is to build a scalable and secure tech stack that will help your startup in all ways possible. As we said before, the final decision is up to you and what your business requirements are.

]]>
http://oktec.kr/?big=es-sp/blogs/consejos-y-trucos/raci-web-templates-benefits 2023-08-23T20:12:00-07:00 2024-03-19T06:37:12-07:00 RACI Templates for Websites: Importance and Advantages Rick Akura Más

]]>
El desarrollo exitoso de un sitio web exige una asignación clara de tareas en el acelerado panorama digital actual. Sin él, los proyectos pueden convertirse en confusión, retrasos y frustración. Aquí ofrecemos la prueba: la hoja de ruta para el trabajo en equipo organizado y resultados exitosos del proyecto. Con las plantillas RACI, la confianza surge a medida que los equipos se alinean y saben exactamente quién hace qué.

¿Listo para revolucionar su proceso de desarrollo web? Nuestra guía explica la importancia de las plantillas RACI y lo guía a través de su implementación. Descubra el arte de la delegación y el empoderamiento eficientes. Únase a nosotros mientras analizamos el por qué, el cómo y los beneficios ilimitados de integrar plantillas RACI en sus proyectos de sitio web. Su viaje hacia una colaboración mejorada comienza ahora.

RACI Templates for Websites

Índice

  1. Por qué las plantillas RACI son importantes para proyectos de sitios web
  2. Beneficios de implementar plantillas RACI en proyectos web
  3. Implementación de plantillas RACI: guía paso a paso
  4. Prácticas recomendadas para una implementación exitosa de la plantilla RACI
  5. Plantillas RACI: su proyecto Supercharger
  6. Pensamientos finales

Por qué las plantillas RACI son importantes para proyectos de sitios web

En el desarrollo de sitios web, los roles poco claros pueden generar una maraña de confusión y oportunidades perdidas. Imagine un proyecto en el que nadie sabe quién está a cargo de qué: los plazos se retrasan, las tareas quedan en el olvido y comienzan las acusaciones. Aquí es donde el marco RACI entra como un héroe.

Why RACI Templates Matter for Website Projects

¿Cuál es el trato con RACI?

RACI significa Responsable, Responsable, Consultado e Informado: una forma elegante de determinar quién hace qué en un proyecto. Es como una señal de tráfico para tareas: quién conduce, quién vigila, quién aconseja y quién simplemente está al tanto.

Cielos despejados por delante

La claridad de roles es donde ocurre la magia. Con RACI, todos conocen su papel en la obra. Esto significa menos disputas sobre quién es el trabajo de quién y más energía dirigida al trabajo real. La reducción de los conflictos es como un soplo de aire fresco. Cuando las personas no se molestan unas a otras, la colaboración florece.

Aumento de la eficiencia en abundancia

Piense en una máquina perfectamente engrasada: eso es lo que RACI puede hacer por su proyecto. Al designar roles, se minimiza el tiovivo de la toma de decisiones. Las cosas no se estancan esperando aprobaciones. Además, los números de la vida real respaldan esto: los equipos que utilizan RACI informan una finalización de tareas más rápida y con menos contratiempos.

Bondad de la vida real

Tome este ejemplo: el lanzamiento de un sitio web. El desarrollador, el diseñador Dan, es responsable de la codificación, mientras que Content Chris es responsable de la escritura. Se consulta a Mary de marketing sobre la marca y se mantiene informado al director ejecutivo Alex. Con RACI, todos están sincronizados y el lanzamiento se realiza sin problemas.

Beneficios de implementar plantillas RACI en proyectos web

¿Alguna vez has oído hablar de las plantillas RACI? Son como el superpegamento que mantiene unidos los proyectos web, garantizando una navegación fluida de principio a fin. A continuación se explica por qué cambian totalmente las reglas del juego:

Responsabilidad clara: Desechar el juego de la culpa

Imagínese esto: un proyecto descarrilado por acusaciones y confusión. Las plantillas de RACI arrojan ese caos por la ventana. Asignan claramente la propiedad de cada tarea para que todos sepan quién conduce el barco. No más "¡Pensé que estabas manejando eso!" Momentos: pura claridad.

Flujos de trabajo eficientes: fluidos como la mantequilla

Roles definidos significan acciones definidas. Las plantillas RACI establecen quién hace qué, agilizando todo el proceso. Las tareas fluyen a la perfección, como un baile bien coreografiado. Cuando todos están sintonizados con sus roles, los obstáculos desaparecen y la productividad se dispara.

Efficient Workflows

 Toma de decisiones oportuna: no más juegos de espera

Esperar aprobaciones puede ser como ver cómo se seca la pintura. Las plantillas RACI presentan a las personas adecuadas en el momento adecuado, lo que reduce drásticamente el tiempo de toma de decisiones. Es como tener un pase VIP para tomar decisiones rápidas, algo fundamental para mantener el rumbo.

Comunicación mejorada: no más pérdidas en la traducción

¿Alguna vez has sentido que las actualizaciones importantes se pierden en la confusión? Las plantillas RACI acaban con eso. Mejoran la comunicación al definir quién necesita saber qué. Todos se mantienen informados, asegurándose de que ningún detalle quede en la sombra.

Implementación de plantillas RACI: guía paso a paso

Crear y usar plantillas RACI puede parecer una jerga técnica, pero créanos, es más sencillo que ensamblar muebles de IKEA. Aquí tienes una guía práctica para que funcione en tus proyectos de sitio web:

1. Identificar tareas y procesos: preparar el plan de acción

Imagine el proyecto de su sitio web como un rompecabezas. El primer paso es ordenar las piezas. Enumere cada tarea y proceso que involucra su proyecto. Esto podría abarcar desde el diseño y la codificación hasta la creación y prueba de contenido.

2. Asignar roles de RACI: ¿Quién va primero?

Ahora, dividamos las tareas. Los roles de RACI son como asignar asientos en un teatro: todos saben a dónde pertenecen. Descompóngalo así:

  • Responsable (R): ¿Quién interviene y realiza la tarea?
  • Responsable (A): ¿Quién dirige el barco y se asegura de que se haga bien?
  • Consultado (C): ¿A quién acudir en busca de consejos o aportaciones?
  • Informado (I): ¿Quién necesita estar informado pero no está directamente involucrado?

3. Documentar y compartir: el plan para el éxito

Como cualquier buen plan, es necesario anotarlo. Cree su matriz RACI: un gráfico que muestra roles frente a tareas. Es como la hoja de ruta de tu proyecto. Compartirlo es vital. Piense en ello como una receta que todos siguen para obtener un plato fantástico.

Pero ¿cómo se hace realmente?

Paso 1: enumerar roles y tareas

Piensa en los roles como actores y las tareas como escenas. ¿Quién es el personaje principal de cada escena? Anótelo.

Paso 2: unir los jugadores

Asigne roles (R, A, C o I) a cada tarea. ¿Quién lidera, quién apoya y quién simplemente observa?

Paso 3: Aprobación del equipo

Obtén el visto bueno de tu escuadrón. ¿Los roles están alineados con las fortalezas de cada persona? Ajústelo si es necesario.

Paso 4: Verificación de las partes interesadas principales

Muéstralo a los grandes jugadores. ¿Están a bordo? Es como una lectura de guión: todos están de acuerdo antes del espectáculo.

Paso 5: Manténgalo a mano

Pegue su gráfico RACI donde todos puedan verlo. Es como el mapa del proyecto: nadie se pierde.

Prácticas recomendadas para una implementación exitosa de la plantilla RACI

Implementar plantillas RACI no es un trato único: es más como cuidar un árbol bonsái. Estas son las estrategias probadas y verdaderas para aprovechar al máximo esta herramienta revolucionaria:

Actualizaciones periódicas: manténgalo actualizado

Piense en su matriz RACI como un documento vivo. A medida que su proyecto se transforma y crece, sus roles también podrían hacerlo. No dejes que tu gráfico acumule polvo; asegúrate de que esté actualizado para reflejar el estado actual del juego. Es como afinar un instrumento para lograr una armonía perfecta.

Comunicación clara: no se permiten secretos

¿Alguna vez has jugado al teléfono? En terrenos de proyectos, la falta de comunicación no es un juego. Mantenga a todos en sintonía compartiendo su matriz RACI en todas partes. Esta no es una receta secreta: es la receta que todos deberían seguir.

Entrenamiento y familiaridad: Entrenamiento Jedi RACI

No conducirías un coche sin aprender a manejarlo, ¿verdad? Lo mismo ocurre con RACI. Entrena a tu equipo para que sean estrellas de rock de RACI. Explique el ABC de quién hace qué y por qué. Es como darles a todos un superpoder para hacer que los proyectos se disparen.

Plantillas RACI: su proyecto Supercharger

Tienes un proyecto de sitio web en el horizonte y las plantillas RACI son tus armas secretas. Pero espera, ¿qué son estas plantillas y cómo pueden potenciar tu trabajo? Vamos a desglosarlo:

Creately

Creately: lanzamientos de sitios web de creación

Creately es tu paraíso creativo. Ofrecen una plantilla de matriz RACI editable, que le brinda el poder de planificar el lanzamiento de su sitio web como un maestro. Orquestarás una sinfonía armoniosa del proyecto con funciones asignadas a la planificación, el diseño, la codificación, las pruebas, la revisión y el lanzamiento.

WPS Office

Oficina WPS: Proyecto Harmony, potenciado

WPS Office tiene que ver con la eficiencia. Sus plantillas RACI son su brújula para proyectos optimizados. Te conectan con plantillas de calidad que mejoran tu juego. Desde la planificación hasta la ejecución, espere una mayor productividad con sus herramientas fáciles de usar.

Miro

Miro: Manteniendo la confusión a raya

La plantilla de gráfico RACI de Miro es su boleto para un viaje de proyecto sin confusiones. Esta herramienta actúa como su capitán en el mar de roles y responsabilidades. Mantiene a su equipo encaminado y garantiza que todos conozcan su parte. Una herramienta de gestión vital para que el proyecto funcione sin problemas.

Figma

Figma: Matrix Magic para tus proyectos

Figma aporta personalización al juego RACI. Su RACI Matrix le permite gestionar sus proyectos como un profesional. Asigne responsabilidad para cada tarea, hito o decisión. ¿Quieres probar antes de comprometerte? FigJam ofrece una muestra gratuita de sus potentes herramientas.

ProjectManager

ProjectManager: Un mapa para la claridad del proyecto

ProjectManager lo respalda al mapear a sus partes interesadas. Su plantilla de matriz RACI gratuita garantiza que cada miembro conozca su papel en el desempeño de su proyecto. Al utilizar esta herramienta, allana un camino claro hacia la colaboración y el éxito.

Pensamientos finales

En el dinámico mundo del desarrollo de sitios web, las plantillas RACI son el modelo de organización y eficiencia. Desenredan la red de tareas, roles y responsabilidades, proporcionando una hoja de ruta clara para el éxito. Al implementar plantillas RACI, desbloquea el poder de una colaboración fluida, una toma de decisiones rápida y una comunicación precisa.

No permita que el caos de roles indefinidos obstaculice el potencial de su proyecto. Adopte las plantillas RACI como guía para optimizar los flujos de trabajo y reducir los conflictos.

Una cosa más

Si tienes un segundo, comparte este artículo en tus redes sociales; alguien más también puede beneficiarse.

Suscríbase a nuestro boletín y sea el primero en leer nuestros futuros artículos, reseñas y publicaciones de blog directamente en su bandeja de entrada de correo electrónico. También ofrecemos ofertas, promociones y actualizaciones sobre nuestros productos y las compartimos por correo electrónico. No te perderás ninguno.

Artículos relacionados 

» Las 51 mejores plantillas de Excel para aumentar su productividad
» Cómo crear su Plantillas propias personalizadas en PowerPoint
» 5+ plantillas para Excel para realizar un seguimiento de su estado físico

]]>
http://oktec.kr/?big=es-sp/blogs/consejos-y-trucos/toc-template-finder-guide 2023-08-22T20:58:00-07:00 2024-03-18T23:49:52-07:00 Table of Contents Template: Where and How to Find Rick Akura Más

]]>
¿Busca una manera eficiente de mejorar la organización y accesibilidad de sus documentos? Descubra el poder de la "Plantilla de tabla de contenido"." En esta guía completa, profundizaremos en todo lo que necesita saber sobre cómo encontrar y utilizar la plantilla de tabla de contenido perfecta para su contenido.

En un mundo repleto de información, tener un índice bien estructurado es un punto de inflexión. Ya sea escritor, estudiante o profesional, un índice elaborado de forma inteligente puede mejorar significativamente la legibilidad y navegabilidad de su trabajo. Dígale adiós a la confusión y el desorden: estamos aquí para ayudarlo a optimizar la organización de su contenido.

Table of Contents Template

Índice

  1. Los beneficios de un índice bien elaborado
  2. Exploración de diferentes tipos de plantillas de tablas de contenido
  3. Dónde encontrar plantillas de alta calidad
  4. Cómo personalizar e implementar plantillas
  5. Prácticas recomendadas para optimizar el uso de plantillas
  6. Pensamientos finales

Los beneficios de un índice bien elaborado

Un índice bien elaborado aporta muchas ventajas que mejoran considerablemente su experiencia de lectura. Imagínese sumergirse en un libro sin ninguna indicación clara de su estructura o de lo que implica cada capítulo: sería como vagar en la oscuridad.

The Benefits of a Well-Crafted Table of Contents

La tabla de contenido es su luz guía, ofrece una visión inmediata del diseño del contenido y le permite localizar lo que busca rápidamente.

  1. Navegación sin esfuerzo: ¿Alguna vez te has encontrado desplazándote sin cesar en busca de una sección específica? Una tabla de contenido es su atajo.
    Enumerar cada capítulo o sección junto con los números de página correspondientes es como tener un mapa, lo que le ayuda a evitar deambulaciones innecesarias y llegar directamente al corazón de lo que necesita.
  2. Tiempo ahorrado, eficiencia ganada: En el ajetreo de la vida moderna, el tiempo es precioso. Un índice bien estructurado le permitirá ahorrar tiempo. Minimiza el esfuerzo de escanear páginas, permitiéndole saltar a la parte relevante inmediatamente.
    Time Saved, Efficiency Gained

    Esto significa más tiempo para absorber conocimientos y menos tiempo para descifrar dónde están ocultos.
  3. Contenido legible y accesible: imagine un libro repleto de texto, sin interrupciones visuales. Un índice fomenta el uso adecuado de títulos y subtítulos, ofreciendo pausas visuales que hacen que el contenido sea digerible.
    Este formato es como señales en una autopista, que le guían sin problemas a lo largo del viaje.

Exploración de diferentes tipos de plantillas de tablas de contenido

Cuando se trata de plantillas de tablas de contenido, la variedad puede ser emocionante y abrumadora. Estas plantillas son como planos para organizar su contenido, adaptados a diferentes necesidades. Analicemos algunos tipos comunes y cómo pueden beneficiarle: 

Table of Contents
  1. Índice APA: ¿Alguna vez has oído hablar del formato APA? Esta plantilla es un salvavidas para los trabajos de investigación, ya que garantiza que su contenido cumpla con los estándares académicos. Enumera secciones como Resumen, Introducción, Métodos, Resultados y más, lo que hace que su viaje de investigación sea estructurado y creíble.
  2. Contenido del libro: ¿Escribir un libro? Esta plantilla es tu opción. Describe capítulos y secciones, lo que permite a los lectores captar el flujo de su libro sin esfuerzo. Desde ficción hasta no ficción, esta plantilla mantiene su narrativa encaminada.
  3. Contenido del plan de negocios: para emprendedores y mentes empresariales, esta plantilla estructura su plan desde un resumen ejecutivo hasta proyecciones financieras. Es como una hoja de ruta que lo guía a través de las complejidades de su empresa.
  4. Bonito índice: si te gustan los proyectos creativos, esta plantilla añade un toque de personalidad. Con fuentes y diseños extravagantes, es perfecto para contenido ingenioso e infunde un toque de encanto.
  5. Contenido del manual del empleado: Un manual del empleado es crucial en el mundo empresarial. Esta plantilla clasifica políticas, procedimientos y directrices, lo que facilita la orientación a los nuevos empleados.
  6. Contenido del cuaderno de laboratorio: Científicos e investigadores, este es para ustedes. Organiza sistemáticamente experimentos, observaciones y hallazgos, asegurando que su viaje científico esté bien documentado.
  7. Contenido legal: Los documentos legales exigen precisión. Esta plantilla describe cláusulas, secciones y anexos, manteniendo la claridad y la facilidad de referencia en escritos legales complejos.
  8. Contenido del portafolio: Los creativos, artistas y profesionales que exhiben su trabajo se benefician de esto. Organiza las piezas de su portafolio, impresionando a clientes y empleadores con su presentación organizada.

Dónde encontrar plantillas de alta calidad

En la era digital, un tesoro escondido de plantillas de índices te espera en línea. Ya sea que estés escribiendo un libro, un proyecto o un informe, estas plataformas ofrecen varias opciones personalizables para satisfacer tus necesidades. Aquí es donde puede descubrir plantillas de primer nivel:

Canva

El mejor amigo de tu creatividad. Explora la versátil colección de plantillas de tablas de contenido de Canva que se adaptan perfectamente a tu libro, informe o proyecto, elevando el atractivo visual de tu contenido.

Canva

Visme

Sumérgete en la guía de Visme, que muestra 40 diseños de plantillas diversos para una tabla de contenido. Estas plantillas no son solo independientes: se integran perfectamente en proyectos de varias páginas.

Visme

Laboratorio de plantillas

Acceda instantáneamente a las plantillas perfectas de tablas de contenido en formatos como Word, PowerPoint y Photoshop: ¡todo gratis! Un solo clic le otorga un diseño profesional para su contenido.

TemplateLab

Flipsnack

Mejora la estructura de tu publicación con las plantillas de tablas de contenido diseñadas profesionalmente de Flipsnack. Presente su contenido de manera bien organizada.

Flipsnack

Plantilla.neto

Descargue ejemplos de plantillas de tablas de contenido diseñadas profesionalmente aquí. Encontrará una variedad de diseños de páginas de índice en blanco en formatos como DOC y PDF.

Template.net

Mejores colecciones.organización

Una plantilla de tabla de contenido actúa como guía. Es una lista de secciones, capítulos, títulos o descripciones breves, todo junto con sus números de página correspondientes.

Bestcollections.org

EDITAR.organización

Edición fácil. Personalice formatos de tablas de contenido para proyectos, revistas y más en línea, logrando un resultado gráfico pulido y sin complicaciones.

EDIT.org

Recuerde, la fuente importa. Opte por plataformas acreditadas como Microsoft Office, Canva y más para garantizar la calidad y compatibilidad de su plantilla. Una tabla de contenido bien estructurada comienza con una plantilla confiable, que sienta las bases para el éxito de su contenido.

Cómo personalizar e implementar plantillas

Personalizar e implementar plantillas de tablas de contenido puede ser como crear un traje hecho a medida para su contenido. A continuación le mostramos cómo personalizarlo e integrarlo perfectamente:

Personalización paso a paso:

  1. Abra la plantilla: abra la plantilla en el software correspondiente, como Microsoft Word o Canva.
  2. Reemplazar texto del marcador de posición: intercambie los títulos predeterminados de la plantilla con los nombres reales de capítulo o sección.
  3. Ajustar formato: modifique los estilos, tamaños y colores de fuente para que coincidan con la estética de su documento.
  4. Editar números de página: actualice los números de página para reflejar con precisión el diseño de su contenido.

Alinear con el tema y el propósito:

  1. Haga coincidir fuentes y colores: asegúrese de que las opciones de fuentes y paletas de colores armonicen con el tema de su documento.
  2. Reflejar tono: alinee los elementos de diseño de la plantilla con el estado de ánimo y el propósito de su contenido, ya sea formal, creativo o informativo.

Integración perfecta:

  1. Formato coherente: mantenga estilos de fuente, espaciado y alineación coherentes en toda la plantilla y el documento.
  2. Navegación con hipervínculo: si su contenido es digital, cree un hipervínculo en el título de cada capítulo a la sección correspondiente para facilitar la navegación.
  3. Revisar y perfeccionar: revise minuciosamente la plantilla personalizada para detectar cualquier inconsistencia o error de formato.
  4. Actualice según sea necesario: a medida que su contenido evoluciona, actualice la tabla de contenido para reflejar los cambios.

Recuerde, el objetivo es la cohesión. Su índice es una guía, así que haga que la transición sea fluida para los lectores. Con una personalización adaptada a la personalidad y el propósito de su contenido, la plantilla amplía su creación, mejorando la navegación y la participación.

Prácticas recomendadas para optimizar el uso de plantillas

La coherencia, la evolución y la facilidad de uso son los pilares de un índice estelar. He aquí cómo lograrlo:

Mantener la coherencia

  • Coherencia de formato: mantenga las fuentes, los tamaños y los estilos coherentes en todo el documento y en la tabla de contenido. Es como mantener un ritmo suave para los ojos del lector.
  • Alineación: asegúrese de que los títulos, subtítulos y números de página de su plantilla estén perfectamente alineados. Esto crea una apariencia organizada y profesional.

Actualización a medida que evoluciona el contenido

  • Revisiones periódicas: a medida que su documento crece o cambia, actualice la tabla de contenido. Es como darles a tus lectores un mapa actual para navegar por tu contenido.
  • Reflejar cambios: ¿Nuevas secciones? ¿Capítulos renombrados? Reflejalos con precisión en tu índice para evitar confusiones.

Formato y diseño fáciles de usar

  • La claridad es lo primero: priorice la legibilidad sobre la extravagancia. Las fuentes claras y el espacio suficiente crean una experiencia de lectura cómoda.
  • Navegación con hipervínculos: para documentos digitales, establezca un hipervínculo en cada capítulo de la tabla de contenido con su sección correspondiente para lograr saltos fluidos.
  • Atractivo visual: si bien la simplicidad es clave, un toque de diseño puede mejorar la participación. Utilice elementos sutiles que coincidan con el tema de su documento.

Pensamientos finales

En el mundo de la organización de contenidos, las plantillas de tablas de contenido bien diseñadas son tus aliadas. Agilizan la navegación, ahorran tiempo y mejoran la legibilidad, garantizando que los lectores se embarquen en un viaje sin problemas.

Utilizando plantillas como las que ofrecen Canva, Visme y más, puedes estructurar tu contenido sin esfuerzo para que coincida con su propósito y tono. Recuerde, mantener la coherencia, actualizar a medida que evoluciona su contenido y priorizar un diseño fácil de usar son las piedras angulares de una tabla de contenido eficaz.

Así que adopte estos conocimientos y embárquese en una nueva era de contenido organizada y atractiva.

Una cosa más

Si tienes un segundo, comparte este artículo en tus redes sociales; alguien más también puede beneficiarse.

Suscríbase a nuestro boletín y sea el primero en leer nuestros futuros artículos, reseñas y publicaciones de blog directamente en su bandeja de entrada de correo electrónico. También ofrecemos ofertas, promociones y actualizaciones sobre nuestros productos y las compartimos por correo electrónico. No te perderás ninguno.

Artículos relacionados 

» 10 plantillas gratuitas de Excel para gestión de proyectos: manténgase organizado y encaminado
» Plantillas gratuitas de hojas de cálculo de seguimiento de gastos (Excel)
» 5+ plantillas de Excel para realizar un seguimiento de su estado físico

]]>
http://oktec.kr/?big=es-sp/blogs/consejos-y-trucos/ai-ppt-template-makers 2023-08-22T06:11:00-07:00 2024-05-29T08:44:09-07:00 Crafting Presentations: 7 Best AI PPT Template Makers Rick Akura Más

]]>
Introducing the gateway to dynamic presentations: 7 Best AI PPT Template Makers. In an era where visual impact reigns supreme, crafting compelling slides is paramount. Discover the transformative power of AI-driven tools that infuse innovation into every slide, captivating your audience from the first glance.

Unleash your creativity, elevate your content, and leave a lasting impression. Embark on this exploration with us as we delve into the world of cutting-edge design possibilities, ensuring your presentations stand out in an ever-evolving landscape. Embrace the future of presentations today! 

Table of Contents

  1. Why AI-Powered PPT Templates?
  2. Exploring the Top 7 AI PPT Template Makers
  3. Selecting the Perfect AI PPT Template Maker
  4. Final Thoughts

Why AI-Powered PPT Templates?

In a world where presentations are a cornerstone of effective communication, AI-powered PPT templates emerge as a game-changing innovation. These templates, infused with artificial intelligence, elevate the art of presentation design to new heights, ensuring your ideas resonate powerfully with your audience.  

Why AI-Powered PPT Templates

But what exactly makes AI-powered templates worth embracing?

  • Effortless Elegance: Imagine effortlessly translating your ideas into polished visuals. AI-powered PPT templates do just that, turning your concepts into captivating designs with minimal input required.
  • Instant Inspiration: AI templates offer a treasure trove of design ideas. They analyze your content and suggest layouts, color schemes, and graphics that complement your message, injecting instant creativity into your slides.
  • Time-Saving Marvels: Gone are the days of hours spent fine-tuning each slide. AI-powered templates speed up the design process, leaving you with more time to focus on refining your content and delivery.
  • Consistency Reinvented: Maintaining a consistent look across your slides has never been easier. AI ensures that fonts, colors, and styles remain cohesive, lending a professional edge to your presentation.
  • Tailored Brilliance: Whether you're presenting sales figures, research findings, or a creative project, AI templates adapt to your content's unique requirements, enhancing visual impact and engagement.
  • Data Visualization Magic: Engagingly presenting data can be challenging. AI-infused templates transform raw data into dynamic graphs and charts, simplifying complex information for your audience.
  • Future-Ready Flexibility: As AI evolves, so do these templates. They stay updated with the latest design trends and technological advancements, guaranteeing your presentations stay modern and impactful.

Exploring the Top 7 AI PPT Template Makers

When it comes to crafting captivating presentations, harnessing the power of artificial intelligence can be a game-changer. Here's how the top 7 AI PPT template makers are reshaping the landscape of presentation design:

TemplateMakerX

TemplateMakerX

Imagine effortlessly generating templates that fit your exact needs, whether for papercraft, packaging, or learning materials. TemplateMakerX makes this a reality with its user-friendly platform. Here's how it works:

  1. Tailored Templates for Your Content: TemplateMakerX offers a vast collection of customizable templates to fit your content perfectly. No more struggling to resize or adapt generic templates – this tool ensures that the dimensions of your chosen template match your requirements precisely.
  2. AI-Driven Design Suggestions: Not sure how to best design your template? TemplateMakerX takes the guesswork out of the equation. It provides AI-driven suggestions for design elements, helping you create visually appealing and well-structured templates that leave a lasting impact.
  3. Access to Diverse Templates: Whether you're into papercraft, package design, learning materials, or decorations, TemplateMakerX has got you covered. With a vast library of templates, you can explore various designs and styles to find the one that best suits your project.
  4. Hassle-Free Usage: No need to create an account or go through complex sign-up procedures. TemplateMakerX lets you dive right in and instantly use its free printables. The streamlined interface ensures a hassle-free experience from start to finish.
  5. Customized Sizing and Formats: With TemplateMakerX, you can customize sizes according to your preferences. You can tweak the dimensions from length and width to height and angles to match your vision. Once you're satisfied, you can download the templates in various formats, with PDF being the most accessible for immediate printing and crafting.
  6. Immediate Crafting Gratification: Thanks to TemplateMakerX's straightforward process, you can quickly transition from digital design to real-world crafting. Once you've tailored and downloaded your template, you're just steps away from printing, cutting, and folding – bringing your creative ideas to life.
SlideGenius AI

SlideGenius AI

SlideGenius AI, a prominent presentation design agency, has been at the forefront of transforming presentations into compelling narratives since 2012. Boasting a team of over 150 full-time experts, they've served an impressive roster of 4,000 clients worldwide.

  1. Presentation Redefined: SlideGenius believes that a presentation is more than just a sequence of slides—it's an opportunity to weave a captivating story. Their team of adept presentation designers, copywriters, and graphic artists collaborates to help clients maximize the potential of their pitches.
  2. Financial Communications Expertise: In the realm of financial communications, SlideGenius shines. They specialize in presentation design for the financial industry, leveraging the power of data visualization to communicate complex concepts seamlessly. With a firm grasp of the sector's demands, they ensure professionalism and security throughout the design process.
  3. Elevating Conferences and Events: The prowess of SlideGenius extends to the grand stage of conferences and events. They craft cinematic presentations that combine stunning visuals with interactive narratives, capturing the essence of a brand's value. Their real-time design support keeps things smooth on event days, regardless of scale.
  4. Powerful Sales and Pitch Decks: For companies seeking to score big deals, secure funding, or launch new products, SlideGenius crafts high-quality decks that hit the mark. Drawing from a decade of experience with startups and investors, their specialists help clients effectively tell their stories, employing strategies refined over time.
Plus AI

Plus AI

Imagine a tool that effortlessly crafts and refines presentations using cutting-edge Generative AI. That's exactly what Plus AI offers. It's a game-changer within Google Slides, empowering users to generate and edit slides like never before.

Your Personal Presentation Assistant:

Think of Plus AI as your personal presentation assistant powered by AI magic. It's as if you have a creative companion that understands your ideas and transforms them into polished slides. The process is simple: start with a prompt, watch the AI weave a customizable outline, and witness it transforming into slides within minutes.

Versatile Customization at Your Fingertips:

What's remarkable is the level of control you have. You can easily modify the content's tone or remix the slide layout to suit your needs. Plus AI even goes the extra mile by offering a customizable outline that lays the foundation for your presentation. Want a specific visual theme? You got it. This tool seamlessly integrates with Google Slides and PowerPoint, ensuring platform flexibility.

Highlights of Plus AI's Power:

  • Fueled by cutting-edge Generative AI for impeccable results.
  • Bridges the gap between Google Slides and PowerPoint with seamless integration.
  • Detailed prompts lead to presentations that require only minor edits.
  • It revolutionizes content rewriting on slides, a true game-changer.
Beautiful.ai

Beautiful.ai

Beautiful.ai isn't just another presentation tool; it's your intelligent companion in crafting compelling narratives. The uniqueness lies in its ability to be more than a tool – it's a smart assistant that learns your preferences and tailors suggestions accordingly.

Intuitive Enhancements at Your Fingertips:

Imagine a tool that understands your presentation needs as you shape them. Beautiful.ai's genius lies in predicting what you need and offering suggestions for enhancements. This predictive capability revolutionizes design by streamlining the process and eliminating the guesswork, giving you more time to focus on the message.

Voice Narration for Engaging Presentations:

But the innovation doesn't stop there. Beautiful.ai introduces a voice narration feature, adding an extra layer of engagement. Envision being able to narrate your slides, infusing your unique voice into the presentation. This personal touch becomes particularly powerful for remote presentations, bridging the gap in personal connections.

Key Highlights of Beautiful.ai:

  • Understands user needs, anticipating and suggesting enhancements.
  • Simplifies the creation of clear, concise presentations.
  • Introduces voice narration for more engaging communication.
Slidebean

Slidebean

Meet Slidebean, the game-changer in the world of presentation creation. This web-based tool flips the traditional approach on its head, making the process effortless and impactful.

Simple Creation, Powerful Results: What sets Slidebean apart is its remarkable ability to separate the process of content creation from slide design. This means you can channel your energy into shaping your message, while Slidebean handles the design intricacies, resulting in presentations that capture attention.

Design Power for Everyone: Slidebean caters to small to medium businesses, bridging the gap for those without dedicated design teams. It doesn't matter if you're not a design whiz – this tool equips you with the means to create professional-looking slides effortlessly. The secret lies in its treasure trove of design templates, premium fonts, and exquisite color palettes.

Beyond Traditional Tools: Slidebean is more than a substitute for traditional tools like PowerPoint or Keynote; it's an upgrade. It empowers users to craft presentations that transcend the ordinary, leaving a lasting impact on audiences.

Key Features of Slidebean:

  • Decouples content creation from slide design, simplifying the process.
  • Enables even design novices to produce polished, professional slides.
  • Offers a diverse collection of design templates, premium fonts, and elegant color palettes.
Tome

Tome

Meet Tome, the presentation creator that goes beyond the ordinary. It's not just about crafting slides; it's about empowering users with a collaborative AI assistant that designs engaging presentations from the ground up.

The Power of AI Understanding:

Tome leverages the prowess of OpenAI's ChatGPT and DALL-E 2 technology to grasp your needs and generate content that resonates with your audience. It's like having an AI co-pilot that understands your intentions and brings them to life.

Seamless Design, Endless Possibilities:

Tome isn't just about tools; it's about understanding. With ready-made templates, AI-crafted text and images, plus a variety of multimedia tools, it equips you to design presentations that captivate. But here's the magic: you tell the AI what you want, and it does the heavy lifting. This transforms the design process into a breeze, sprinkled with a dash of fun.

Tome's Stellar Features:

  • Harnesses ChatGPT and DALL-E 2 technology for intelligence.
  • Offers a treasure trove of templates, AI-generated content, and multimedia tools.
  • Transforms your instructions into captivating presentations.
Synthesia

Synthesia

Enter Synthesia, the AI presentation maker that captures attention with its blend of simplicity and innovative features. This tool is all about making presentation creation effortless and impactful.

AI Avatars for a Personal Touch:

One of Synthesia's standout features is its ability to let you create your very own AI avatar. Imagine adding a touch of personal flair to your presentation by introducing your virtual self. This not only engages your audience but also makes your presentation more memorable.

Creating Excellence, No Expertise Needed:

Don't fret if you're not a design whiz. Synthesia levels the playing field by offering many professionally designed video templates that serve as starting points. From there, customization is a breeze, ensuring your presentation fits your specific requirements perfectly.

Versatility for All Audiences:

Synthesia caters to presentations of all scales, whether small team meetings or grand audience gatherings. Its user-friendly interface, personalized avatar feature, and customizable templates ensure your message resonates with impact.

Key Synthesia Features:

  • Intuitive, user-friendly interface for effortless navigation.
  • Personalized AI avatars add a unique touch to your presentations.
  • Access to a diverse range of professionally designed video templates.
  • Voiceovers can be created effortlessly with AI voice generator without microphones or voice actors.

Selecting the Perfect AI PPT Template Maker

Choosing the right AI PPT template maker can significantly impact the quality and efficiency of your presentations. Here's how to ensure you make the perfect selection:

  1. Evaluate Features Aligned with Your Needs: Take a moment to assess what you truly require from a template maker. Do you need AI-powered design suggestions, customizable layouts, or data visualization capabilities? Look for features that align with your presentation goals.
  2. Navigate User-Friendly Interfaces: No one wants to get bogged down in a complex tool. Opt for a template maker with a user-friendly interface that allows intuitive navigation. The smoother the experience, the more time you can dedicate to crafting your message.
  3. Look for Customization Options: Templates are great, but the ability to customize them is even better. A good AI template maker should allow you to tweak designs, colors, and styles to suit your brand and content.
  4. Consider Collaboration Capabilities: Collaboration features become vital if you're working in a team. Look for tools that allow seamless sharing, editing, and feedback among team members.
  5. Review AI Performance: The core of an AI template maker is its AI capabilities. Test how accurate and useful its suggestions are. The AI should enhance your creativity, not hinder it.
  6. Responsive Customer Support: Reliable customer support can be a lifesaver if you encounter challenges or have questions. Check if the template maker offers responsive assistance.

Final Thoughts

In the dynamic landscape of presentations, embracing AI-powered tools marks a pivotal step toward innovation and excellence. The infusion of AI prowess into design and content creation is transforming how we communicate ideas. 

The future holds limitless possibilities as we bid farewell to mundane designs and welcome a new era of visually captivating presentations. With AI at our side, we're equipped to craft narratives that resonate, captivate, and leave lasting impressions on our audiences. 

So, let us embark on this exciting journey, where AI becomes our creative ally in shaping presentations that stand at the forefront of impactful communication.

For more such articles subscribe to our newsletter and be the first to read our future articles, reviews, and blog post right in your email inbox.  

Related Articles 

» 11 Best Microsoft PowerPoint Alternatives and Comparisons
» 10 Best Microsoft Visio Alternatives and Competitors
» 10 Best Fonts for Microsoft Excel
» How To Use PowerPoint Design Ideas: A Complete Guide
» 7 Tips to Improve Your Next PowerPoint Presentation

]]>
http://oktec.kr/?big=es-sp/blogs/consejos-y-trucos/it-cost-optimization-5-tips-and-best-practices-to-drive-savings 2023-07-12T11:37:00-07:00 2024-05-24T06:01:10-07:00 IT Cost Optimization - 5 Tips & Best Practices To Drive Savings Rick Akura Más

]]>
Los avances en las soluciones de TI empresariales han generado ganancias sustanciales de eficiencia en organizaciones de todo el mundo y, al mismo tiempo, han otorgado una ventaja competitiva innegable.

Sin embargo, al mismo tiempo, la mayor digitalización de sistemas y procesos conlleva un precio cada vez mayor que pesa sobre los márgenes antes de llegar a un punto en el que ya no valen la pena.

Esto se ve agravado aún más por el cambio hacia un modelo de precios de software como servicio y basado en suscripción, lo que significa que las empresas no son propietarias de las herramientas que compran y tampoco incurrirán en gastos por usarlas. en forma mensual o anual.

Todo esto requiere una estrategia de optimización de costos de TI para organizaciones grandes y pequeñas para garantizar que los costos no aumenten incontrolablemente y que todos los gastos en TI generen valor. Este artículo cubre algunos consejos y mejores prácticas para realizar lo mismo de manera efectiva.

1. Realice una auditoría de TI integral

Cualquier iniciativa de optimización de costos comienza con una comprensión clara del tema en cuestión y sus diversos factores. En el caso de la infraestructura tecnológica de una organización, se recomienda comenzar con una auditoría de TI integral.

Esto incluye evaluar el hardware, las licencias de software y los gastos de mantenimiento, además de identificar cualquier recurso infrautilizado o redundante, para guiar mejor el proceso de optimización de costos.

Dichas auditorías deben ser realizadas preferiblemente por un profesional de TI con experiencia o una agencia externa para informar de manera imparcial y objetiva los hechos y conocimientos relevantes.

Vale la pena señalar que a menudo la optimización de costos de TI implica más que los precios de las diferentes aplicaciones, y preguntas como ¿cuánto cuesta la capacitación? O cómo se ve la curva de aprendizaje es válida y debería ser parte de la ecuación más amplia.

2. Optimizar licencias de software

Después de una auditoría exhaustiva, una organización debe tener un mapa claro de su infraestructura de TI más amplia, incluidos sus principales factores de costo. Para la mayoría de las empresas, las licencias y claves de software probablemente marquen el camino en este sentido, lo que lo convierte en el lugar adecuado para comenzar el proceso de optimización.

El informe de auditoría debe proporcionar una gran cantidad de información sobre las tasas de utilización, los tiempos de inactividad y más relacionados con cada licencia de software, lo que puede revelar oportunidades de ahorro de costos, ya sea renunciando a ciertas licencias o posponiendo la adquisición de licencias adicionales. licencias.

Esto también puede estimular la exploración de soluciones alternativas a un precio más económico o que sean completamente de código abierto y, por lo tanto, gratuitas. En definitiva, esta es un área que puede generar importantes ahorros de costos para las organizaciones cuando se hace correctamente.

3. Centralizar las adquisiciones de TI

Los beneficios de consolidar el poder adquisitivo parecen bastante obvios en casi todos los entornos y, en el caso de los productos y soluciones de TI, ayuda principalmente a las empresas a negociar mejor con los proveedores y los equipos de ventas, respaldados por mayores cantidades de pedidos y poder adquisitivo. .

Además, un equipo centralizado a cargo de las adquisiciones puede instituir varios flujos de trabajo para garantizar que el dinero de la empresa rinda más. Reduce aún más la duplicación, lo que resulta en una estandarización imposible y economías de escala, con equipos individuales que actúan por su cuenta.

No se puede negar que la adquisición centralizada ahorra tiempo y dinero, además de muchos otros beneficios, pero no está exenta de inconvenientes.

El principal es que se parece más a la planificación centralizada, en contraposición a un mercado libre, donde los equipos individuales y sus gerentes eligen las herramientas que mejor se adaptan a sus necesidades. Sin embargo, estrictamente hablando desde una perspectiva de costos, la centralización funciona mejor.

4. Practique una gestión eficaz de los activos de TI

En los últimos años, a medida que la TI comenzó a desempeñar un papel cada vez más crucial en las empresas y representaba una parte importante de los costos, ha surgido un nuevo conjunto de conocimientos destinado a administrar eficazmente los activos de TI <. t104>con ITAM Software y sacar el máximo provecho de ellos.

Hay muchas mejores prácticas probadas a este respecto, suficientes para cubrir un libro de texto completo.

Por el bien de este artículo, simplemente lo dejaremos manteniendo un inventario actualizado de todos los activos de software y hardware, rastreando sus ciclos de vida y garantizando su pronto retiro, renovación y o eliminación, según sea necesario.

5. Revise y optimice periódicamente los costos de TI

La optimización de los costos de TI es un proceso continuo que requiere seguimiento, evaluación y auditorías periódicas para ayudar en la toma de decisiones informadas. El objetivo es mostrar mejoras continuas en lo que respecta a la reducción de costos, la adaptación a tecnologías cambiantes y la alineación de las inversiones en TI con los objetivos comerciales.

Desde entonces han surgido una serie de objetivos, resultados clave e indicadores clave de desempeño con este mismo propósito. Esto incluye reducciones de precios/ahorros duros, evitación de costos/ahorros suaves, costo total de propiedad y retorno de la inversión (ROI), entre otros.

Por ejemplo, si el objetivo es lograr la máxima eficiencia con sus licencias de Zoom, las métricas de optimización incluirían las reducciones de precio obtenidas por el equipo de adquisiciones mientras negociaba con el equipo de ventas de Zoom, seguido de la eliminación del desperdicio mediante el seguimiento de las métricas de uso de forma regular.

Al final, el objetivo de la optimización de los costos de TI es reducir las variaciones entre los gastos planificados y reales en la infraestructura de TI dentro de una organización. El uso de KPI y OKR ayuda a tener una visión más amplia que las simples variaciones, lo que ayuda a identificar mejor las áreas problemáticas para que se puedan tomar las acciones correctivas en consecuencia.

Más consejos para optimizar correctamente los costos de TI

Las organizaciones pueden hacer varias otras cosas para mantener los gastos de TI dentro del presupuesto y al mismo tiempo alcanzar otras metas y objetivos, como la alineación estratégica, el retorno de la inversión e impulsar la eficiencia a través de la tecnología.

  • Adopte la computación en la nube: Aunque ya es la norma hoy en día, muchas aplicaciones heredadas todavía están alojadas en el sitio. Muchas empresas incluso asumen erróneamente que el alojamiento en el sitio es mejor para ellos y más seguro, pero esto está lejos de la realidad hoy en día.
    Con la computación en la nube, los clientes tienen mucha flexibilidad y la capacidad de pagar solo por lo que usan, lo que se traduce en ahorros sustanciales de costos a largo plazo.
  • Implementar Virtualización - Para organizaciones grandes que consumen muchos recursos, tiene sentido consolidar múltiples servidores y aplicaciones en un único servidor físico.
    A través del proceso de virtualización, las organizaciones pueden lograr una mejor utilización de los recursos y, como resultado, ahorros de energía.
    Como resultado, las tareas de optimización de costos de TI deberían implicar la evaluación de la infraestructura más amplia para oportunidades de virtualización y el uso de tecnologías como hipervisores.
  • Considere alternativas de código abierto: Incluso las aplicaciones de software más sofisticadas de la actualidad tienen alternativas de código abierto que pueden adoptarse de forma gratuita y personalizarse según los requisitos de una organización con poco esfuerzo.

Por ejemplo, Blender es tan bueno, si no mejor, que las soluciones premium como AutoDesk Maya y Wings 3D. De manera similar, MySQL y MariaDB hacen un trabajo bastante sólido en comparación con Oracle Database.

Palabras finales 

La optimización de costos de TI es un campo relativamente nuevo que continúa evolucionando a medida que surgen nuevos desafíos y requisitos. Por ahora, implica una comprensión interdisciplinaria de TI, gestión y contabilidad para agregar valor a una empresa, pero rápidamente se está convirtiendo en un campo especializado por derecho propio.

En este artículo, nuestro objetivo es proporcionar una breve introducción a este tema, pero como se analizó anteriormente, para cubrir la verdadera extensión y amplitud de este tema, incluso un libro de texto extenso es apenas suficiente. Sin embargo, esto debería sentar las bases para que la mayoría de las pequeñas empresas optimicen sus gastos de TI en el futuro.

]]>
http://oktec.kr/?big=es-sp/blogs/consejos-y-trucos/excel-square-roots-formulas 2023-06-27T08:03:00-07:00 2024-04-15T14:19:09-07:00 Master Square Roots in Excel: Unleash the Power of Formulas Rick Akura Más

]]>
Square roots play a vital role in mathematical calculations, and Microsoft Excel provides a robust set of tools to tackle them effortlessly. This tutorial will explore how to find square, cube, and even nth roots using Excel's powerful functions. 

Get ready to unlock Excel's mathematical prowess and become a master of square roots in Excel. Let's dive in and discover the power of formulas for precise and efficient calculations.

Table of Contents

  1. How to Find Roots in Excel
  2. How to do square root in Excel using a calculation
  3. How to calculate Nth root in Excel
  4. Why Use Excel for Root Calculations
  5. Tips and Tricks for Efficient Root Calculations
  6. FAQs
  7. Final Thoughts

How to Find Roots in Excel

Finding roots in Excel is straightforward, and the SQRT() function calculates square roots. To calculate the square root of a number, simply use the formula =SQRT(number).

Finding roots in Excel is straightforward, and the SQRT() function calculates square roots. To calculate the square root of a number, simply use the formula =SQRT(number).

Replace "number" with the desired value or a cell reference containing the number. Attempting to find a negative number's square root will result in the #NUM! error.

For calculating nth roots, employ the POWER() function. The formula =POWER(number, (1/n)) will yield the desired root value. Specify the number and its inverse exponent as arguments. For example, to calculate the square root 256, use =POWER(256, (1/2)), which returns 16.

Regarding cube roots, Excel employs the caret operator (^) with 1/3 as the exponent. Use the formula =number^(1/3) to find the cube root of a number. For instance, =D3^(1/3) will calculate the cube root 216 as 6.

Excel provides the IMSQRT() and IMPOWER() functions in cases involving imaginary numbers. These functions function similarly to their real-number counterparts and can be used to calculate the roots and powers of imaginary numbers.

By utilizing these Excel functions, you can easily compute various types of roots for real and imaginary numbers, empowering you to perform complex mathematical calculations efficiently.

How to do square root in Excel using a calculation

Typing the traditional square root symbol (√) directly in Excel is impossible, but you can still calculate square roots using the caret symbol (^) as the exponent operator. In Excel, the caret represents exponentiation, meaning raising a number to a certain power. To square a number, you use the formula "=number^2". However, to find the square root, you raise the number to the power of 1/2 or 0.5.

Typing the traditional square root symbol (√) directly in Excel is impossible, but you can still calculate square roots using the caret symbol (^) as the exponent operator. In Excel, the caret represents exponentiation, meaning raising a number to a certain power. To square a number, you use the formula

For example, to calculate the square root of 25, you can enter "=25^(1/2)" or "=25^0.5" in a cell. This will yield the result of 5, as the square root of 25 is 5. Similarly, you can use this formula as part of larger calculations or within functions.

Why does raising a number to the power 1/2 give the square root? A square root is a number that equals the original number when multiplied by itself. When you raise a number to the power of 1/2, it is equivalent to multiplying it by itself. So, the expression "25^(1/2)" can be seen as "√25" and yields the same result of 5.

How to calculate Nth root in Excel

You can use the exponent formula mentioned earlier to calculate any nth root in Excel. You can find the nth root of a number by placing the desired root in the denominator of a fraction after the caret symbol (^).

You can use the exponent formula mentioned earlier to calculate any nth root in Excel. You can find the nth root of a number by placing the desired root in the denominator of a fraction after the caret symbol (^).

The formula format is as follows:

number^(1/n)

Here, "number" represents the value you want to find the root of, and "n" represents the root you desire.

For instance:

To find the cube root of 64, you would enter "=64^(1/3)".

To calculate the 4th root of 16, you would type "=16^(1/4)".

If you have a number in cell A2 and want to find the 5th root, you would use the formula "=A2^(1/5)".

Fractional exponents should always be enclosed in parentheses to ensure the correct order of operations in the formula. First, the division is performed (using the forward slash (/) as the division operator in Excel), and then the result is raised to the power.

Alternatively, you can achieve the same results using the POWER function. For example, "=POWER(64, 1/3)" will yield the cube root of 64.

You can separate the root values in different cells in your worksheets and reference them in your formulas. You can perform multiple calculations with a single formula by fixing the references using dollar signs ($).

Why Use Excel for Root Calculations

For several compelling reasons, Excel is a powerful tool for performing root calculations. Firstly, Excel offers robust computational capabilities, allowing it to handle complex mathematical operations involving roots efficiently. Excel can handle large datasets and precisely perform calculations whether you need to calculate square roots or nth roots.

One of the primary advantages of using Excel for root calculations is its flexibility. Excel allows you to input formulas and perform calculations on individual values and entire data ranges. This flexibility makes it suitable for various scenarios, from simple calculations to complex data analysis tasks.

Excel's root calculation capabilities find applications in numerous fields. For instance, in data analysis, you may need to compute the square root of values to analyze patterns or assess the variability of data points. Engineers can utilize Excel to calculate roots for mathematical modeling, solving equations, or estimating unknown quantities.

Moreover, Excel's ability to organize and manipulate data provides added value for root calculations. You can easily incorporate other functions and formulas, create visual representations of data using charts, and automate repetitive tasks using macros.

Tips and Tricks for Efficient Root Calculations

To perform efficient root calculations in Excel, consider the following tips and tricks:

  1. Utilize cell references: Instead of entering values directly into formulas, reference cells that contain the numbers you want to calculate roots for. This allows for easy updating of data and promotes consistency.
  2. Absolute vs. relative cell references: When using cell references, determine whether you need them to be absolute (fixed) or relative (adjustable). Absolute references, denoted by the dollar sign ($), remain fixed when copied across cells, while relative references adjust based on the cell's position.
  3. Take advantage of formula shortcuts: Excel offers various shortcuts for common calculations. For example, you can use the caret (^) operator for exponentiation to find square or nth roots. Additionally, the POWER function provides a versatile approach to calculating roots.
  4. Apply to format for clarity: Format the cells displaying root calculations appropriately. Consider using decimal places or scientific notation to enhance readability and precision.
  5. Explore keyboard shortcuts: Excel includes numerous keyboard shortcuts to streamline calculations. For instance, pressing F4 after selecting a cell reference will cycle through absolute and relative reference combinations.
  6. Combine root calculations with other functions: Excel allows you to combine root calculations with other functions and formulas. This flexibility enables you to perform complex calculations and create dynamic models.

FAQs

How do you find the cube root in Excel?

To find the cube root of a number in Excel, you can use the POWER function with the exponent set to 1/3.

How do you calculate square and cube in Excel?

To calculate the square of a number in Excel, use the POWER function with the exponent set to 2; for the cube, use the POWER function with the exponent set to 3.

How do I find the square root of a number in Excel?

To find the square root of a number in Excel, use the SQRT function followed by the number you want to calculate the square root of.

How do you find the square root formula?

The square root formula in Excel is simply the SQRT function followed by the number you want to find the square root of.

What is the formula for square root transformation in Excel?

In Excel, the formula for a square root transformation involves using the SQRT function on the original data set to obtain the transformed values.

Final Thoughts

Calculating square and cube roots in Microsoft Excel provides powerful tools for numerical analysis and complex calculations. Excel users can efficiently perform these calculations by utilizing the SQRT() function for square roots and the caret operator (^) with appropriate exponents for cube roots. 

The flexibility to work with both individual numbers and cell references allows for seamless integration into larger formulas and datasets. Additionally, the ability to find nth roots using the POWER() function expands the scope of mathematical operations in Excel. 

Mastering these techniques empowers users to easily handle diverse mathematical tasks, making Excel a valuable tool for mathematical analysis and problem-solving.

One more thing

If you have a second, please share this article on your socials; someone else may benefit too. 

Subscribe to our newsletter and be the first to read our future articles, reviews, and blog post right in your email inbox. We also offer deals, promotions, and updates on our products and share them via email. You won’t miss one.

Related articles 

» Compare Lists in Excel: How To Find Differences Between Lists in Excel
» What-if Analysis in Excel: Making Informed Decisions
» How to Fix Excel Sharing Violation Error

]]>
http://oktec.kr/?big=es-sp/blogs/consejos-y-trucos/creative-video-effects-and-filters 2023-06-13T15:43:00-07:00 2024-04-16T23:49:31-07:00 Unleashing Creativity: Explore the World of Video Effects and Filters Rick Akura Más

]]>
In visual storytelling, video effects, and filters are powerful tools that can elevate the impact and appeal of videos. These creative elements add depth, style, and visual enhancement, transforming ordinary footage into captivating visual experiences.

As technology advances, online video editors have become a go-to resource for unleashing creativity and exploring the vast world of video effects and filters. Among these platforms, CapCut stands out as a versatile and feature-rich tool that empowers creators to delve into visual enhancement.

Bytedance's CapCut provides a full range of editing features, including various video effects and filters. Creators can unleash their creativity and experiment with various visual aesthetics using the video effects and filters offered by CapCut. Let's examine the excellent options this video editor online free tool has for video effects and filters as we read this post.

Exploring the World of Video Effects and Filters

CapCut: A Versatile Platform for Video Effects and Filters

CapCut is an innovative video editing platform that offers users various tools and effects to create stunning edits. With CapCut, users can easily explore its various features - filters, effects, and more. It's easy to use and is a great tool for easily creating compelling visuals.

The platform also supports intuitive touch and drag controls, allowing you to quickly adjust settings and video elements on your desktop. Therefore, CapCut makes it simple to unleash your creativity and advance your videos, whether you're a novice or a professional.

The Power of Video Effects

The power of video effects

Video effects can transform ordinary videos into visually stunning and captivating content. Whether it's adding filters, transitions, or special effects, video effects can enhance the mood, highlight key elements, and create a unique visual experience that engages viewers and leaves a lasting impact.

Enhancing the Visual Aesthetics of Videos with Creative Effects

Video effects are an invaluable tool for creating aesthetically pleasing visuals in videos. With video effects, you can enhance the visual aesthetics of a video by adding special effects like color correction, transitions, motion tracking, and more.

You may make a video entertaining and immersive by adding innovative effects to lure viewers in and give them something interesting to watch. Video effects can also add interest to a video by providing text overlays, distortion filters, or light leaks.

Ultimately, creative video effects provide the opportunity to create unique visuals that attract viewers and capture their attention.

CapCut’s Array of Video Effects and Their Application in Storytelling

CapCut offers a wide range of video effects to help add interest to your content. These effects come in several categories: color, motion, distortion, and light. This allows you to create stylish visuals with a variety of options to choose from. In addition, you can adjust the strength of the effect or layer multiple effects to achieve extraordinary results. Moreover, these video effects can also be used to enhance storytelling by adding emotion to scenes or highlighting certain elements.

For example, blurring an object can draw attention to it, or adding a vignette can create a moody atmosphere. Overall, CapCut's expansive range of video effects makes for an invaluable tool for anyone looking to take their videos to the next level regarding visual aesthetics and storytelling.

Exploring Cinematic Effects, Color Grading, and Artistic Overlays

Exploring cinematic effects, color grading, and artistic overlays can provide a great opportunity to refine the look of your videos further. Cinematic effects like camera motion blurs and lens flares can help add a professional flair to any video. Color grading also helps bring out specific moods and themes in a scene by adjusting a shot's white balance and saturation.

Moreover, artistic overlays such as text or animated elements can create dynamic visuals that draw the viewers' attention and direct them through the story. By exploring these different tools, you can take your videos from good to great, giving them a unique and eye-catching style.

Unleashing Creativity with Filters

Unleashing creativity with filters

Filters are a powerful tool for unleashing creativity in video editing. With a wide range of options, filters allow you to add mood, atmosphere, and style to your videos. From vintage looks to vibrant colors, filters can transform the overall aesthetic, evoke emotions, and make your videos visually captivating and memorable.

Transforming the mood and atmosphere of videos with filters

Filters can transform the mood and atmosphere of videos, allowing creators to convey specific emotions and set the tone for their visual storytelling. By applying filters, creators can adjust color tones, contrast, and saturation levels, bringing a distinct look and feel to their videos.

Whether it's creating a warm and nostalgic ambiance, a cool and futuristic vibe, or a vibrant and energetic atmosphere, filters enable creators to tailor the visual aesthetics to match the desired emotional impact.

CapCut’s Collection of Filters and Their Impact on Video Aesthetics

CapCut provides a diverse collection of filters that can greatly impact the overall aesthetics of videos. With an extensive range of options, creators can find filters that align with their creative vision and enhance the visual appeal of their content. In addition, CapCut offers various styles of filters, from vintage and retro looks to modern and minimalistic aesthetics.

Each filter imparts a unique character to the video, elevating its visual quality and adding a touch of artistry. The availability of a wide selection of filters in CapCut enables creators to find the perfect match for their video project, enhancing its visual appeal and capturing the desired mood and atmosphere.

Experimenting with Filter Combinations for Personalized Visual Styles

One of the exciting aspects of using filters is the ability to experiment with different combinations, allowing creators to develop their personalized visual styles. CapCut encourages creators to explore and discover unique combinations of filters that align with their creative vision.

By combining filters, creators can create customized looks that reflect their individuality and artistic preferences. This experimentation opens up endless creative possibilities, enabling creators to establish a distinct visual identity and leave a lasting impression on their audience.

Creative Possibilities with Video Background Remover and Filters

Combining a video background remover and filters presents even more creative possibilities for video editing. By removing or replacing the background of a video and then applying filters, creators can completely transform the visual environment and enhance the overall aesthetics.

This tandem allows for creating visually stunning videos that transport viewers to new worlds, amplify the storytelling, and capture attention. With the flexibility to manipulate the background and the visual effects, creators can unleash their creativity and craft videos that stand out from the crowd.

Personalization and Artistry: Video Effects and Filters

Personalization and artistry

Video effects and filters provide an avenue for personalization and artistic expression in video editing. These tools allow creators to add their unique touch, style, and creativity to their content. From subtle adjustments to bold transformations, video effects and filters empower creators to craft visually stunning videos that reflect their artistic vision and captivate their audience.

Infusing Videos with Creativity and Personal Expression

With the use of video effects and filters, producers may add their own creative and expressive flair to their videos, giving their visual storytelling a distinctive flair. Additionally, by adding effects and filters, artists can improve their films' tone, ambiance, and aesthetic, which will help them stand out and connect with their audience.

Whether adding a vintage film effect for a nostalgic feel, applying glitch effects for a contemporary and edgy look, or utilizing animated overlays for a whimsical touch, effects and filters allow creators to personalize their videos and bring their artistic vision to life.

CapCut’s Role in Empowering Creators to Unleash Their Imagination

CapCut is pivotal in empowering creators to unleash their imagination and explore the vast possibilities offered by video effects and filters. With its user-friendly interface and intuitive controls, CapCut provides a seamless editing experience that allows creators to bring their artistic ideas to fruition.

The platform's diverse selection of effects and filters enables creators to push the boundaries of their creativity, experimenting with different styles, moods, and visual aesthetics.

Effects and Filters: Evoke Emotions and Enhance Storytelling

Effects and filters go beyond visual enhancements; they can evoke emotions and enhance the storytelling experience. Through careful selection and application of effects and filters, creators can establish a specific atmosphere, evoke a desired emotional response, and amplify the impact of their storytelling.

For instance, a warm color grading combined with soft blur effects can create a romantic and nostalgic mood, enhancing the emotional connection between the audience and the story. Similarly, dramatic lighting effects and intense color contrasts can evoke suspense or excitement, intensifying the narrative tension.

Conclusion

The creative possibilities that come with exploring the world of video effects and filters are truly inspiring. Whether you're looking to add flair to your marketing videos or create striking visuals for films, effects and filters can help bring your vision to life.

You can produce spectacular images that will captivate your audience and leave them wanting more if you have the correct tools and knowledge. Unleashing your creativity with the world of video effects and filters is a great way to expand your skillet and add exciting new visuals to your projects.

]]>
http://oktec.kr/?big=es-sp/blogs/consejos-y-trucos/excel-shortcut-keys-pdf 2023-06-05T14:27:00-07:00 2024-04-16T23:51:59-07:00 Essential Excel Keyboard Shortcuts for Efficient Work Rick Akura Más

]]>
This article will explore a comprehensive list of Excel shortcut keys that will significantly enhance productivity and efficiency. 

These shortcuts have enhanced Excel's data entry, formatting, navigation, and formula-related operations. 

Take your Excel skills to the next level and maximize efficiency by downloading our Excel Shortcut Keys PDF.

Table of Contents

  1. Formatting Shortcuts in Excel
  2. Useful CTRL Shortcuts in Excel
  3. Useful Function Key Shortcuts in Excel
  4. Helpful Navigation Shortcuts in Excel
  5. Useful Columns and Rows Shortcuts in Excel
  6. FAQs
  7. Final Thoughts

Formatting Shortcuts in Excel

Format Box: Press "Ctrl + 1" to quickly access the Format Cells dialog box, where you can modify formatting options like font, number, alignment, and borders. 

format box

Copy Format: Use "Alt + E + S + T" to copy the format of a selected cell or range and apply it to another cell or range.

Increase/Decrease Decimal: To increase the number of decimal places, press "Alt + H + 0." Conversely, press "Alt + H + 9" to decrease the decimal places.

Increase/Decrease Decimal

Boxing: Create a border around selected cells by pressing "Ctrl + Shift + 7." This shortcut provides a quick way to separate and highlight specific data visually.

Fit Column Width: Use "Alt + O + C + A" to automatically adjust the column width to fit the contents of the selected cells.

Change Tab Name: Quickly rename a worksheet tab by pressing "Alt + H + O + R" and entering the desired name for the tab.

(Un)Split Panes: Press "Alt + W + F" to toggle between splitting and unsplitting panes, allowing you to view different worksheet parts simultaneously.

(Un)freeze Windows: Use "Alt + W + S" to freeze or unfreeze panes in Excel, keeping specific rows or columns visible while scrolling through large data sets.

Date Format: Apply the date format to selected cells by using "Shift + Ctrl + #" shortcut, which ensures consistent formatting across your workbook.

Dollar Format: To format numbers as currency with the dollar sign, use "Shift + Ctrl + $." This shortcut simplifies the process of applying the currency format to financial data.

Percentage Format: Press "Shift + Ctrl + %" to quickly format numbers as percentages, making displaying and analyzing relative values easier. 

Percentage Format

Sum Function: Calculate the sum of selected cells by pressing "Alt + =," which automatically inserts the SUM function and includes the appropriate range.

Sum Function

Useful CTRL Shortcuts in Excel

Select All: Press "Ctrl + A" to select all cells in the current worksheet. This shortcut is handy when applying a formatting change or performing an action on the entire data range.

Bold: To make text bold, use "Ctrl + B" shortcut. It helps emphasize important information in your Excel worksheet.

Copy: "Ctrl + C" allows you to make a copy of selected cells or text. You can then paste it elsewhere in the worksheet or in a different application.

Copy

Fill Down: Use "Ctrl + D" to quickly fill down the contents of the topmost selected cell into the cells below. This is useful when you want to copy data or formulas to multiple adjacent cells.

Find: Press "Ctrl + F" to open the Find dialog box, which helps you search for specific data or text within the worksheet.

Italic: Make text italic by using "Ctrl + I" shortcut. It adds a slanted appearance to the selected text.

New Workbook: Create a new Excel workbook instantly by pressing "Ctrl + N." This shortcut saves you time when starting a new project.

Open: To open an existing workbook, use "Ctrl + O" shortcut. It allows you to browse and select the file you want to open.

Print: "Ctrl + P" opens the Print dialog box, enabling you to quickly print the current worksheet or workbook.

Fill Right: Use "Ctrl + R" to fill the contents of the leftmost selected cell into the cells on the right. This is useful for copying data or formulas horizontally.

Save Workbook: Save your Excel workbook with "Ctrl + S" shortcut. It ensures that your changes are saved and prevents data loss.

Underline: Apply underline formatting to selected text or cells by using "Ctrl + U" shortcut. Underlining helps draw attention to specific information.

Underline

Paste: "Ctrl + V" allows you to paste copied or cut content into a selected cell or range. It is a quick way to insert data from the clipboard.

Close Window: To close the current Excel window, use "Ctrl + W" shortcut. This is handy when you no longer need the current workbook open.

Cut: "Ctrl + X" cuts the selected cells or text and places it on the clipboard, ready for pasting elsewhere.

Undo: Press "Ctrl + Z" to undo the most recent action in Excel. This helps revert changes or mistakes.

Useful Function Key Shortcuts in Excel

F2 Edit Cells: Pressing the F2 key allows you to edit the contents of a selected cell directly. It is a quick way to make changes or corrections to your data.

F4 Anchor Cells: When you need to repeat a certain action, pressing F4 will repeat your last action. It saves you time and effort by automating repetitive tasks.

F7 Spell Check: Pressing F7 initiates the spell check feature in Excel. It helps you identify and correct spelling errors in your worksheet.

F7 Spell Check

F12 Save As: Use F12 to quickly open the Save As dialog box, allowing you to save the current workbook with a different name or in a different location.

SHIFT + F2 Insert a Comment: Pressing SHIFT + F2 lets you insert a comment in the selected cell. Comments are useful for providing additional information or explanations about the data.

SHIFT + F8 Add to Selection: If you want to select non-adjacent cells or ranges, press SHIFT + F8. It allows you to add more cells or ranges to your current selection.

SHIFT + F10 Right Click: By pressing SHIFT + F10, you can access the right-click context menu. It provides a range of options and actions on the selected cell or object.

CTRL + F3 Name a Cell: Use CTRL + F3 to define a name for a selected cell or range. Naming cells makes it easier to reference them in formulas and calculations.

Windows Flag + D Minimize Programs: Pressing the Windows key (flag) + D simultaneously minimizes all open programs and displays the desktop. It provides a quick way to access files or shortcuts on your desktop.

Helpful Navigation Shortcuts in Excel

Arrows Move: You can use the arrow keys to move the active cell one step in the desired direction, making it easy to navigate through your worksheet.

CTRL + Arrows Go to End of Continuous Range: Pressing CTRL along with the arrow keys allows you to quickly move to the last cell of a continuous range in the corresponding direction.

SHIFT + Arrows Select A Cell Range: You can select a range of cells by holding down the SHIFT key while pressing the arrow keys. This is useful for highlighting a group of cells for formatting or data manipulation.

CTRL + SHIFT + Arrows Highlight A Continuous Range: The combination of CTRL and SHIFT with the arrow keys enables you to extend the current selection to the last cell of a continuous range in the chosen direction.

ALT + Tab Switch Programs: Pressing ALT + Tab allows you to switch between different open programs or windows, making it convenient to move between Excel and other applications.

CTRL + Pg Up/Down Switch Worksheets: Use CTRL + Pg Up to move to the previous worksheet and CTRL + Pg Down to move to the next worksheet within your Excel workbook.

Enter Move below: Pressing Enter moves the active cell down to the cell directly below, making it efficient for data entry or navigation within a column.

Shift + Enter Move Up: Shift + Enter can move the active cell to the cell above, which is useful for navigating within a column or editing data.

Home Move to Beginning of Line: Pressing the Home key moves the cursor to the beginning of the current line, allowing you to navigate within a cell's content quickly.

CTRL + Home Go to Cell A1: The combination of CTRL + Home instantly takes you to the worksheet's top-left corner cell, usually cell A1.

ESC Cancel: Pressing the ESC key cancels an ongoing action, such as cell editing or a dialog box, allowing you to revert to the previous state.

Alt + Enter (when in a cell) Add a Line: If you are editing a cell's content, pressing Alt + Enter inserts a line break within the cell, allowing you to add multiple lines of text.

Useful Columns and Rows Shortcuts in Excel

CTRL + 9 Hide Row: Pressing CTRL + 9 hides the selected row, making it disappear from view. This is helpful when temporarily removing certain rows from your worksheet.

CTRL + 9 Hide Row

SHIFT + CTRL + 9 Unhide Row: Use SHIFT + CTRL + 9 to reveal hidden rows. This shortcut allows you to restore rows that were previously hidden.

CTRL + 0 Hide Column: By using CTRL + 0, you can hide the selected column, temporarily removing it from the worksheet. This is useful when you want to focus on specific columns or data.

SHIFT + CTRL + 0 Unhide Column: If you have hidden columns that you want to bring back into view, press SHIFT + CTRL + 0 to unhide them.

SHIFT + Spacebar Highlight Row: Pressing SHIFT + Spacebar selects the entire active cell row, making it easy to format or manipulate the data within that row.

SHIFT + Spacebar Highlight Row

CTRL + Spacebar Highlight Column: Use CTRL + Spacebar to select the entire column of the active cell. This is useful for formatting or performing calculations on the entire column.

SHIFT + CTRL + Plus sign Insert Blank Cells: By pressing SHIFT + CTRL + Plus sign, you can insert blank cells within the selected range. This helps create space for additional data or adjustments.

CTRL + Minus Sign Delete Selected Cells: Pressing CTRL + Minus Sign allows you to delete the selected cells or rows/columns. This shortcut helps remove unnecessary data or adjust the layout of your worksheet.

SHIFT + ALT + Left Arrow Group Rows/Columns: Use SHIFT + ALT + Left Arrow to group selected rows or columns together. Grouping allows you to collapse and expand sections of your worksheet, providing a more organized view.

SHIFT + ALT + Right Arrow Ungroup Rows/Columns: If you have grouped rows or columns, press SHIFT + ALT + Right Arrow to ungroup them and restore the individual rows or columns.

FAQs

What is the shortcut key for symbols in Excel PDF?

The shortcut key for symbols in Excel is "Ctrl + Shift + F11".

What is the shortcut key for all formulas in Excel?

There is no specific shortcut key for all formulas in Excel. However, you can use "Ctrl + A" to select all cells containing formulas.

What is Ctrl F9 used for in Excel?

In Excel, "Ctrl + F9" minimizes the active workbook window to an icon.

What is F1 F2 F3 F4 F5 F6 F7 F8 F9 F10 F11 F12 in Excel?

F1 is used for Help, F2 is used to edit a cell, F3 is used to paste a function, F4 is used to repeat the last action, F5 is used to go to a specific cell, F6 is used to switch between the worksheet, ribbon, task pane, and zoom controls, F7 is used for spell check, F8 is used for extending the selection, F9 is used to recalculate formulas, F10 is used to activate the menu bar, F11 is used to create a chart, and F12 is used to save as.

What is Ctrl F8 used for in Excel?

In Excel, "Ctrl + F8" performs the resize command for the active window when it is not maximized.

Final Thoughts

Excel keyboard shortcuts are essential tools for boosting productivity and efficiency in spreadsheet work. 

They allow you to perform various tasks quickly, such as selecting cells, formatting data, navigating worksheets, and more. 

By familiarizing yourself with these shortcuts and incorporating them into your workflow, you can save time and streamline your Excel experience, making you a more proficient software user.

One more thing

If you have a second, please share this article on your socials; someone else may benefit too. 

Subscribe to our newsletter and be the first to read our future articles, reviews, and blog post right in your email inbox. We also offer deals, promotions, and updates on our products and share them via email. You won’t miss one.

Related articles 

» 100+ Best Google Doc Keyboard Shortcuts for Windows and Mac Productivity  
» The Most Useful Excel Keyboard Shortcuts
» Controller vs Mouse and Keyboard: Which Is Better?

]]>
http://oktec.kr/?big=es-sp/blogs/consejos-y-trucos/excel-data-management-functions 2023-06-02T15:53:00-07:00 2024-04-16T23:53:59-07:00 Excel Data Management Functions - Organize and Analyze Data Efficiently Rick Akura Más

]]>
With its comprehensive suite of data management functions, Excel provides a powerful tool for efficiently organizing and analyzing data. 

By mastering Excel's data management functions, you can gain a competitive edge in your professional life and make informed decisions based on accurate data.

Follow along as we explore the various data management functions and techniques that will empower you to effectively organize and leverage your data.

Table of Contents

  1. Tips for Data Management in Excel
  2. Enter Your Data
  3. Maintain Your Data
  4. Database Terms: Records and Fields
  5. Excel's Data Management Tools
  6. FAQs
  7. Final Thoughts

Tips for Data Management in Excel

Becoming proficient in Excel goes beyond understanding functions and formulas; it also involves mastering the art of data management. Proper data management is essential for effectively utilizing Excel and maximizing its potential. 

Here are some simple tips to help you manage your data efficiently and get the most out of Excel:

  1. Set up Your Data: Before entering or downloading data, take the time to plan your worksheet structure. Consider these points:
    • Plan your headings: Instead of splitting data for categorization, create a column for the category and utilize charts and PivotTables for organizing.
    • Avoid hardcoding numbers in formulas: Assign cells to variables and reference them in formulas for easier future editing.
    • Keep your data tight and efficient: Avoid unnecessary formatting with extra headings, subtotals, or empty rows/columns. Utilize charts and graphs for visual representation. 
      keep your data tight and efficient

This example has a column labeled "Category" to categorize the items. Instead of splitting the data into multiple columns for categorization, we use a single column and can later utilize charts or PivotTables to organize and analyze the data based on categories.

The prices are not hardcoded directly into the formulas. Instead, they are assigned to cells, such as cell B2 for the Apple price. This allows for easier future editing of prices by simply updating the cell values, and any formulas referencing those cells will automatically recalculate.

The table is kept tight and efficient without unnecessary formatting. There are no extra headings, subtotals, or empty rows/columns. Visual representation can be achieved by creating charts or graphs based on this data.

  1. Use fixed cell references: Employ fixed cell references in your formulas. This allows for easy copying, pasting, and reusing formulas within the workbook, reducing errors.
  2. Lock cells with formulas: To protect cells with formulas from accidental changes, lock them:
    • Select the entire worksheet using Ctrl+A.
    • Click the dialog box launcher in the "Font" group on the Home tab.
    • In the "Format Cells" dialog box, go to the "Protection" tab and uncheck "Locked."
      Lock cells with formulas

    • Select only the cells with formulas, repeat steps 2-3, and recheck "Locked."
      Protect Sheet
    • Finally, on the Review tab, click "Protect Sheet."
      Use data validation

By following these tips, you can efficiently manage your data in Excel, saving time, ensuring accuracy, and making your data analysis more effective.

Enter Your Data

Once you have set up your tables and workbooks in Excel, it's important to ensure the consistency and accuracy of your data. Here are some tips to help you enter and maintain your data effectively:

  1. Use data validation: Utilize Excel's data validation feature to ensure that data formats are correct and common mistakes, such as entering numbers out of range, are caught. Data validation prompts users for correct data and warns them when incorrect entries are made.
    use data validation

  2. Consider using forms: If you need to enter data manually, using a form can provide a user-friendly interface that facilitates faster data entry and protects existing data from accidental overwriting.
  3. Avoid excessive editing of imported data: If you import data into Excel, resist the temptation of reformatting it to match your preferred style. Editing imported data can introduce errors and waste time. Instead, focus on analysis and reporting in separate sheets where you can design the desired look while creating reports.

Maintain Your Data

Over time, as you add and delete records, you may need to perform maintenance tasks on your Excel database. Here are a couple of key points to keep in mind:

  1. Backup your database: Before making any changes or performing maintenance tasks, it's crucial to back up your Excel database. Create copies of your original files and store them in a safe place.
    If anything goes wrong during maintenance, you can recover your data and start over.
    Backup your database

Database Terms: Records and Fields

A database is like a digital collection of information stored in computer files. It helps us keep things organized and easily update sort, correct, and filter data. Let's understand two important terms used in databases:

  1. Records: Think of a record as a package that holds all the information about one specific thing in the database. In a database program like Excel, each cell in a worksheet holds one piece of information or value.
    So, when we gather all the information about something, like a person or a product, and put it in one row or record, we can easily access and manage that information.
  2. Fields: In a database record, each piece of information, like a phone number or a street address, is called a field. In Excel, each cell in a worksheet acts as a field because it holds one specific information about something.
    Fields

    For example, a field can be a person's name or age or a product's price or quantity.
  3. Field Names: We use field names to make finding and organizing information in a database easier. Field names are like column headings describing what information each column or field holds. They help us enter data consistently and in the same order for each record.

Understanding records and fields helps us organize and work with data in databases like Excel, making finding and managing the information we need easier.

Excel's Data Management Tools

In addition to its regular features, Excel provides powerful data management tools to handle large amounts of data and maintain its quality. Here are a few of these tools explained simply:

  1. Using a Form for Records: Excel offers a data form tool that helps you find, edit, enter, or delete records in tables with many columns or fields. The form displays field names and provides text boxes to enter or modify data, ensuring accurate record entry.
  2. Remove Duplicate Data Records: In databases, duplicate records can be problematic as the data grows. Excel provides a tool to identify and remove duplicate records, whether they are exact duplicates or have partial similarities.
    Remove Duplicate Data Records

    This helps maintain clean and accurate data.
    This helps maintain clean and accurate data.

  3. Sorting Data in Excel: Sorting means organizing data based on specific properties. Excel's sorting options allow you to sort data alphabetically, numerically, or chronologically.
    You can sort by one or more fields, customize the sorting based on dates or times, and even rearrange the order of fields in a table.

These tools in Excel assist in managing and organizing data effectively, making it easier to work with large datasets and maintain data integrity.

FAQs

How do you manage and organize data in Excel?

To manage and organize data in Excel, you can use features such as sorting, filtering, creating tables, and utilizing named ranges to arrange and structure your data effectively.

How do you maintain data in Excel?

To maintain data in Excel, it is important to ensure data accuracy by validating input, using formulas and functions to perform calculations, regularly updating and reviewing data, and implementing data protection measures.

What is the purpose of data management?

Data management aims to collect, organize, store, secure, and utilize data to support decision-making processes, improve operational efficiency, ensure data integrity, and comply with regulatory requirements.

How important is data management?

Data management is crucial as it enables businesses to derive meaningful insights from their data, make informed decisions, enhance productivity, streamline processes, improve customer experiences, and maintain compliance with data protection regulations.

How do we do data management?

Data management involves various practices such as data governance, quality assurance, integration, security, storage, analysis, and lifecycle management to ensure that data is accurate, accessible, secure, and effectively utilized throughout its lifecycle.

Final Thoughts

In conclusion, Excel provides a range of powerful data management functions that can greatly enhance your ability to organize, analyze, and maintain data. These functions enable you to sort and filter data, create tables and named ranges, validate data inputs, and protect sensitive information. 

By utilizing these features effectively, you can ensure data accuracy, improve data organization, and streamline your workflow. Data management is crucial for making informed decisions, improving productivity, and complying with data protection regulations. With Excel's data management functions at your disposal, you can optimize your data management processes and unlock the full potential of your data.

One more thing

If you have a second, please share this article on your socials; someone else may benefit too. 

Subscribe to our newsletter and be the first to read our future articles, reviews, and blog post right in your email inbox. We also offer deals, promotions, and updates on our products and share them via email. You won’t miss one.

Related articles 

» Sparklines: Creating Meaningful Excel Dashboards with Data Visualization
» How to Use Data Tables in Excel: A Step-by-Step Guide
» How to Use Conditional Formatting to Make Your Excel Data Stand Out
» Creating a Data Entry Form in Excel: Simplify Your Data Input Process

]]>
http://oktec.kr/?big=es-sp/blogs/consejos-y-trucos/excel-data-analysis-tools 2023-05-31T18:39:00-07:00 2024-04-16T23:56:26-07:00 Excel Data Analysis: Visualization, Modeling, Regression and More Rick Akura Más

]]>
Spreadsheets have stood the test of time, remaining a popular tool for data analysis since their introduction in 1979. Even in the era of advanced programming languages and databases, Microsoft Excel continues to dominate, boasting over 750 million users globally. 

Excel's popularity stems from its extensive features and functions, empowering analysts to clean, aggregate, pivot, and visualize data seamlessly. In this article, we will explore Excel's top 10 essential features and functions for data analysis. 

Table of Contents

  1. Pivot tables and pivot charts
  2. Conditional formatting
  3. Remove duplicates
  4. XLOOKUP 
  5. IFERROR function
  6. Load and Activate Analysis Toolpak
  7. Anova 
  8. Correlation 
  9. Covariance 
  10. Descriptive Statistics
  11. FAQs
  12. Final Thoughts

Pivot tables and pivot charts

Pivot tables and pivot charts are powerful tools in Excel that allow analysts to transform and visualize data effortlessly. A pivot table reorganizes columns and rows, enabling easy grouping, summarization, and statistical analysis. To create a pivot table and chart:

  1. Select the data range and enter Insert
  2. PivotChart > PivotChart & PivotTable.
    PivotChart > PivotChart & PivotTable.

Once the Create PivotTable editor appears, the selected range will automatically fill the Table/Range field. Clicking OK generates the pivot table. In the PivotChart Fields, drag the desired field (e.g., Marital_Status) into the Axis (Categories) box and Values box. If the data type is a string, the aggregation defaults to Count; if it's numeric, the default is Sum.

Once the Create PivotTable editor appears, the selected range will automatically fill the Table/Range field. Clicking OK generates the pivot table. In the PivotChart Fields, drag the desired field (e.g., Marital_Status) into the Axis (Categories) box and Values box. If the data type is a string, the aggregation defaults to Count; if it's numeric, the default is Sum.

The pivot table and chart populate with just a few clicks, visually representing the data. Additional dimensions or filters can be added by dragging new fields into the corresponding boxes. This simplicity and versatility make pivot tables and charts widely favored for data aggregation and visualization in Excel.

Advantages of pivot tables and charts:

  1. Simplify data analysis: Transforming raw data into a summarized format becomes effortless.
  2. Quick insights: Visualizing data through charts allows for easily identifying patterns, trends, and outliers.
  3. Flexible customization: Fields can be easily added, removed, or rearranged to tailor the analysis.
  4. Interactive exploration: Pivot charts allow users to filter and drill down into specific data subsets for deeper analysis.
  5. Automatic updates: When the underlying data changes, pivot tables and charts can be refreshed to reflect the updated information.

Conditional formatting

Conditional formatting is a highly useful feature in Excel that allows you to highlight or hide cells based on specified rules dynamically. It is an effective tool for identifying outliers, duplicates, or patterns within your data. With conditional formatting, you can apply rules to single or multiple cells in the same worksheet.

To illustrate, we want to highlight all values in the "Year_Birth" column that are greater than 1987. 

  1. Select the column.
  2. Go to Conditional Formatting.
  3. Highlight Cells Rules > Greater Than, and the rule editor will appear.
    Highlight Cells Rules > Greater Than, and the rule editor will appear.

  4. Enter the value 1987 and click OK. The cells in the column with values exceeding 1987 will be highlighted light red.
    Enter the value 1987 and click OK. The cells in the column with values exceeding 1987 will be highlighted light red.

If you need to adjust or modify the conditional formatting rule you created, you can access the Conditional Formatting Rules Manager through Conditional Formatting > Conditional Formatting Rules Manager. This manager allows you to edit existing rules or create new ones. It's even possible to have multiple rules affecting different aspects of the spreadsheet.

Remove duplicates

Data often contains duplicates, which can hinder accurate analysis. Excel provides a convenient feature to remove duplicates and streamline your data. Before deleting duplicates, you can use conditional formatting to highlight them for review. Go to Data > Data Tools > Remove Duplicates to access the Remove Duplicates feature.

Data often contains duplicates, which can hinder accurate analysis. Excel provides a convenient feature to remove duplicates and streamline your data. Before deleting duplicates, you can use conditional formatting to highlight them for review. Go to Data > Data Tools > Remove Duplicates to access the Remove Duplicates feature.

In this example, we have a dataset with three columns: Name, Age, and City. The table contains six rows of data, including some duplicate entries.

To remove duplicates, you would follow the steps mentioned earlier. After selecting the dataset, you would go to Data > Data Tools > Remove Duplicates.

The Remove Duplicates editor would appear, allowing you to choose the columns to consider when identifying duplicates. In this case, you might select all three columns: Name, Age, and City. You would also make sure that the "My data has headers" checkbox is selected.

After configuring the settings, you would click OK. Excel would eliminate the duplicate entries, and a message would indicate the number of unique values in the dataset. In this example, after removing duplicates, the table would look like this:

After configuring the settings, you would click OK. Excel would eliminate the duplicate entries, and a message would indicate the number of unique values in the dataset. In this example, after removing duplicates, the table would look like this:

As you can see, the duplicate entries for John and Sarah have been removed, resulting in a dataset with four unique values.

XLOOKUP 

XLOOKUP is a versatile function in Excel that combines the functionality of VLOOKUP and HLOOKUP. It allows you to search for a value in a range, whether vertically or horizontally, and retrieve a corresponding result. The syntax for the XLOOKUP function is as follows:

=XLOOKUP(lookup_value, lookup_array, return_array, [if_not_found], [match_mode], [search_mode])

To illustrate, let's consider an example where we want to find the Year_Birth based on an entered ID value. In cell AD2, enter the ID value (e.g., 8755), and in cell AE2, enter the XLOOKUP formula:

=XLOOKUP(

The lookup_value is the value we want to search for, so we reference AD2.

The lookup_array is the column or row that contains the lookup values, so we select A2:A2241 to get an array of IDs.

The return_array is the column or row that contains the values we want to retrieve, so we select B2:B2241 to obtain Year_Birth values.

The completed formula will look like this: =XLOOKUP(AD2, A2:A2241, B2:B2241)

Once you enter different IDs, the corresponding Year_Birth values will be returned. XLOOKUP is a powerful tool that can be further utilized by joining data from different sheets or nesting lookup functions within each other, allowing for complex calculations such as summing the values of multiple lookups.

IFERROR function

The IFERROR function in Excel allows you to handle errors within a formula by providing a custom error message or alternative value. Its syntax is straightforward:

=IFERROR(value, value_if_error)

In the context of the XLOOKUP function, if the ID entered in cell AD2 is not found in the lookup array, cell AE2 would display the #N/A error. We can use the IFERROR function to wrap the XLOOKUP function to provide a more meaningful message. The formula would look like this:

=IFERROR(XLOOKUP(AD2, A2:A2241, B2:B2241), "ID Not Found")

With this formula, if the XLOOKUP function encounters an error (e.g., ID not found), it will display the specified custom message "ID Not Found" in cell AE2.

Instead of a text message, you can also use another cell as the value_if_error. If you reference a blank cell as the value, it will display 0 in the cell where the error occurs.

Load and Activate Analysis Toolpak

The Analysis ToolPak is a powerful Excel add-in allowing you to perform complex statistical or engineering analyses easily. By using this tool, you can save time and simplify the process of data analysis. The ToolPak utilizes a range of statistical and engineering macro functions to calculate and display results in output tables, and it can even generate charts.

To access the Analysis ToolPak:

  1. Go to the Data tab.
  2. Click on the Data Analysis button in the Analysis group.
    Click on the Data Analysis button in the Analysis group.

If you don't see the Data Analysis command, you must load the Analysis ToolPak add-in program.

If you don't see the Data Analysis command, you must load the Analysis ToolPak add-in program.

To load and activate the Analysis ToolPak, follow these steps:

  1. Click on the File tab, select Options, and go to the Add-Ins category.
  2. In the Manage box, choose Excel Add-ins and click the Go button.
  3. For Excel on Mac, go to the Tools menu, and select Excel Add-ins.
  4. Check the Analysis ToolPak checkbox in the Add-Ins box, and click OK.
  5. If you don't see the Analysis ToolPak listed, click Browse to locate it.
  6. If prompted, click Yes to install the Analysis ToolPak if it is not currently installed on your computer.

Note: If you want to include Visual Basic for Application (VBA) functions for the Analysis ToolPak, you can also load the Analysis ToolPak - VBA Add-in like the Analysis ToolPak.

Anova 

The Anova analysis tools in Excel provide different types of variance analysis for comparing multiple samples or factors. The specific tool you should use depends on the number of factors and samples you have.

  1. Anova: Single Factor: This tool is used when you have data for two or more samples and want to test the hypothesis that they are drawn from the same underlying probability distribution. It compares the variances between the samples to determine if they are significantly different.
  2. Anova: Two-Factor with Replication: This tool is helpful when you have data classified along two dimensions, such as different fertilizer brands and temperature levels. It allows you to test the effects of each factor independently and also examines whether there are additional effects due to specific combinations of factors.
  3. Anova: Two-Factor Without Replication: Similar to the Two-Factor with Replication tool, this analysis is used when data is classified along two dimensions. However, it assumes that there is only one observation for each combination of factors, unlike the multiple observations in the replication case.

To perform an Anova analysis, you must set up your input range in Excel. This includes organizing your data in a specific format to ensure accurate analysis.

Correlation 

You can use the CORREL or PEARSON functions in Excel to calculate the correlation coefficient between two measurement variables. These functions are useful when observing each variable from multiple subjects. The correlation coefficient measures the extent to which two variables vary together. The Correlation analysis tool in Excel is especially handy when you have more than two measurement variables for each subject.

The correlation analysis tool generates a correlation matrix showing the correlation coefficient between each pair of measurement variables. Unlike the covariance, the correlation coefficient is scaled to be independent of the units in which the variables are expressed. This means that converting the units of one variable does not change the value of the correlation coefficient.

The correlation coefficient can take values between -1 and +1, inclusive. A positive correlation indicates that large values of one variable are associated with large values of the other, while a negative correlation indicates that small values of one variable are associated with large values of the other. A correlation near 0 suggests that the variables are unrelated.

Covariance 

In Excel, the Correlation and Covariance tools can be used to analyze sets of N measurement variables observed in a group of individuals. These tools provide output tables, or matrices, that display the correlation coefficient or covariance, respectively, between each pair of measurement variables.

The main difference between correlation and covariance is in their scaling. Correlation coefficients are scaled to range between -1 and +1, while covariances are not scaled. Both correlation and covariance measure the extent to which two variables "vary together" or are related.

The Covariance tool in Excel calculates the COVARIANCE.P value for each pair of measurement variables. If only two variables exist, you can use the COVARIANCE.P function directly. The diagonal entries in the Covariance tool's output table represent the covariance of each measurement variable with itself, which is equivalent to the population variance calculated using the VAR.P function.

Descriptive Statistics

The Descriptive Statistics analysis tool in Excel generates a comprehensive report of univariate statistics for a given data set. It provides valuable information about the central tendency and variability of the data, allowing you to understand and summarize its characteristics.

Here's what you need to know about the Descriptive Statistics tool:

  1. Central Tendency: The report includes measures that describe the center of the data distribution, such as the mean (average), median (middle value), and mode (most frequent value).
  2. Variability: The tool calculates various measures that indicate the spread or dispersion of the data, such as the range (difference between the maximum and minimum values), variance (average squared deviation from the mean), and standard deviation (square root of the variance).
  3. Distribution Shape: The tool also provides information about the shape of the data distribution, including skewness (asymmetry of the distribution) and kurtosis (peakedness or flatness of the distribution).
  4. Quartiles and Percentiles: The report includes quartiles (dividing the data into four equal parts) and percentiles (dividing the data into hundredths), which give insights into the data's distribution at different levels.
  5. Count and Missing Values: The tool counts the number of data points and identifies any missing values, ensuring you completely understand the dataset.

FAQs

Which tool is used for data analysis in Excel?

Excel provides various tools for data analysis, including functions, charts, PivotTables, and the Power Query and Power Pivot add-ins.

What are the data analysis functions of Excel?

Excel offers a wide range of data analysis functions such as SUM, AVERAGE, COUNT, MIN, MAX, IF, VLOOKUP, and many more, which allow you to perform calculations and manipulate data effectively.

Is Microsoft Excel data analysis?

Microsoft Excel is widely used for data analysis due to its comprehensive set of features, functions, and tools designed specifically for analyzing and interpreting data.

How do you perform data analysis?

To perform data analysis in Excel, you can start by organizing your data in a tabular format, applying appropriate functions and formulas, creating charts and graphs, utilizing PivotTables, and employing advanced tools like Power Query and Power Pivot for more complex analysis.

What is data analysis explain in detail?

Data analysis is the process of inspecting, cleansing, transforming, and modeling data to discover useful information, draw conclusions, and support decision-making. It involves various techniques such as statistical analysis, data visualization, data mining, and pattern recognition to uncover patterns, trends, and insights from the data.

Final Thoughts

In conclusion, Excel provides a powerful suite of tools for data analysis, making it a popular choice for professionals in various fields. With its features for data visualization, you can create compelling charts and graphs to represent your data visually. 

Excel's data modeling capabilities allow you to organize and structure your data for advanced calculations and scenario analysis. The regression analysis tools in Excel enable you to identify relationships and make predictions based on your data. 

Beyond these specific functions, Excel offers a wide range of additional analysis tools and functions to explore and analyze your data effectively. By leveraging Excel's data analysis capabilities, you can gain valuable insights, make informed decisions, and communicate your findings with clarity and impact.

One more thing

If you have a second, please share this article on your socials; someone else may benefit too. 

Subscribe to our newsletter and be the first to read our future articles, reviews, and blog post right in your email inbox. We also offer deals, promotions, and updates on our products and share them via email. You won’t miss one.

Related articles 

» Mastering Data Modeling in Excel: Advanced Techniques and Best Practices
» Beginner's Guide to Microsoft Excel Online: Manage Data & Create Spreadsheets
» Master Data Manipulation with Excel SUBSTITUTE Function: A Step-by-Step Guide

]]>
http://oktec.kr/?big=es-sp/blogs/consejos-y-trucos/excel-goal-seek 2023-05-30T21:30:00-07:00 2024-04-16T23:58:10-07:00 Using Excel's Goal Seek Function to Solve Problems Rick Akura Más

]]>
If you use Excel regularly, you may have heard of the Goal Seek function. 

This article will provide a step-by-step guide on using Excel's Goal Seek function to solve problems. 

Suppose you want to streamline your Excel work and become more efficient in finding the input values needed to achieve specific results; keep reading. 

We'll show you how Goal Seek can help you achieve your goals.

Table of Contents

  1. Excel's Goal Seek Function
  2. Using Excel Goal Seek to Solve Formula Problems
  3. More Examples of Using Goal Seek in Excel
  4. Using Goal Seek for What-If Analysis in Excel
  5. Troubleshooting Excel Goal Seek Issues
  6. FAQs
  7. Final Thoughts

What is Goal Seek in Excel?

Goal Seek is Excel's built-in What-If Analysis tool that shows how one value in a formula impacts another. More precisely, it determines what value you should enter in an input cell to get the desired result in a formula cell. 

Excel's Goal Seek Function

Have you ever wanted to know what input value to use in a formula to get a specific result? This is where Excel's Goal Seek function comes in handy! 

Goal Seek a built-in tool in Excel that helps you determine the input value required to achieve a desired result in a formula.

To use Goal Seek, you need to specify three parameters: 

  • Formula cell
  • Target/desired value
  • Cell to change to achieve the target

The tool then calculates the input value needed to achieve your specified target.

There are many uses for Goal Seek, such as:

  1. Determining the sales volume required to reach a specific profit target
  2. The exam score needed to pass a class
  3. The number of votes required to win an election

It is a helpful tool for doing sensitivity analysis in financial modeling, and it can save you a lot of time by eliminating guesswork.

However, it's important to note that Goal Seek can only process one input value simultaneously. 

If you are working on a complex business model with multiple input values, you may need to use Excel's Solver add-in to find the optimal solution.

Overall, Excel's Goal Seek function is a powerful tool that can help you solve various problems and save time in your data analysis.

Using Excel Goal Seek to Solve Formula Problems

Have you ever wanted to know what number to put into a formula to get a certain answer? That's where Excel's Goal Seek function can help you! Let's say you want to buy a toy that costs $20, but you only have $50. 

You can use Goal Seek to figure out how much money you need to save each week to buy the toy in four weeks.

Here's how to use Goal Seek in Excel:

  1. Set up your data with a formula and a cell you want to change (such as the amount you save each week).
  2. Go to the Data tab, click the What-If Analysis button, and select Goal Seek.
  3. In the Goal Seek dialog box, choose the cell with the formula, enter the desired result, and select the cell you want to change.
  4. Click OK, and Excel will do the calculations for you!

For example, you want to buy a toy that costs $20 in four weeks. You currently have $50 saved, and you want to know how much you need to save each week to reach your goal.

Here's what your data set-up would look like:

how to use goal seek in excel


  1. Set up your data in Excel like the table above.
  2. Go to the Data tab, click the What-If Analysis button, and select Goal Seek.
    Go to the Data tab, click the What-If Analysis button, and select Goal Seek.
  3. In the Goal Seek dialog box, set the cell with the formula as cell B2, set the To value as $20 (the toy cost), and set the By changing cell as B1 (the amount saved each week).
  4. Click OK, and Excel will do the calculations for you!

Excel's Goal Seek is a great tool for solving problems like this quickly and easily. Remember to set up your data correctly and choose the right cells to test.

More Examples of Using Goal Seek in Excel

Goal Seek a useful tool in Excel that helps you find the input value needed to get a specific output result in a formula. Here's another example that shows how Goal Seek can solve a business problem.

Example 1: Determine the break-even point

Problem: You own a lemonade stand and want to know how many cups of lemonade you need to sell to break even. Your stand has a fixed cost of $50, and each cup of lemonade costs $0.50. You sell each cup for $1.

Solution: Organize the source data in a table like this:

Organize the source data in a table


  1. Set up the following parameters for the Goal Seek function:
  2. Set cell - the formula that calculates the break-even point (B4).
  3. To value - the formula result you are looking for ($0).
  4. By changing cell - the number of cups sold (B3).
    By changing cell - the number of cups sold (B3).

Result: The Goal Seek analysis shows you must sell 100 cups of lemonade to break even.

Using Goal Seek in Excel, you can quickly solve complex problems and make better business decisions. Just remember to set up your data correctly and define the parameters of the Goal Seek function carefully.

Using Goal Seek for What-If Analysis in Excel

Problem: You run a bakery and want to know how many loaves of bread you need to sell each day to break even. 

You know that your fixed costs are $500 per day, your variable costs per loaf of bread are $1, and you sell each loaf of bread for $3.

Solution: Use Goal Seek to find out the minimum number of loaves of bread you need to sell each day to break even:

Set cell - the formula that calculates the total profit (B4).

To value - the formula result you are looking for ($0).

By changing cell - the number of loaves of bread sold (B2).

Result: What-If analysis with Goal Seek shows that you need to sell 250 loaves of bread each day to break even:

What-If analysis with Goal Seek shows that you need to sell 250 loaves of bread each day to break even


Troubleshooting Excel Goal Seek Issues

Goal Seek a helpful tool in Excel that can find the right input value to achieve a specific goal or result. However, sometimes Goal seeking may not work, and knowing what to do in those situations is essential.

Here are two things to check if you find that Goal Seek is not working:

  1. Check the Goal Seek parameters. Make sure you selected the right cell containing the formula you want to solve, and check that this cell depends on the changing cell.
    If you chose the wrong cell or didn't include a necessary cell, Goal Seek won't work.
  2. Adjust iteration settings. If the Goal Seek doesn't work, adjust the iteration settings. In Excel, go to File, then Options, then Formulas. 

You can increase the maximum iterations if you want Excel to try more possible solutions. You can also decrease the maximum change if you need more accuracy. 

What-If analysis with Goal Seek shows that you need to sell 250 loaves of bread each day to break even


The default settings may not work for your specific formula, so adjusting these settings may solve the issue.

If none of these solutions work, it's possible that there isn't a solution to the problem you're trying to solve. Excel will provide the closest possible solution, but it may be different.

Double-check your Goal Seek parameters and adjust iteration settings for the best results.

FAQs

How do you use Excel to solve a problem?

You can use Excel to solve a problem by analyzing and manipulating data, performing calculations, creating formulas, using functions, and utilizing various Excel tools and features.

What is the problem with Goal Seek?

One potential problem with Goal Seek in Excel is that it may not always converge to a solution if the data or formulas are complex, the target value is not attainable, or there are multiple possible solutions.

What is Goal Seek in a spreadsheet?

Goal Seek is a feature in Excel that allows you to find the input value needed to achieve a specific output or result by adjusting another input value based on a given target or goal.

How do you solve an equation using Goal Seek?

To solve an equation using Goal Seek in Excel, you need to set up the equation as a formula in Excel, specify the target value you want to achieve, and then use Goal Seek to determine the input value required to reach that target.

Where is Goal Seek in Sheets?

In Google Sheets, the Goal Seek feature is not available by default, but you can achieve a similar functionality using the Solver add-on, which can be accessed through the "Add-ons" menu in Google Sheets.

Final Thoughts

Goal Seek is a powerful tool in Excel that allows you to solve problems by finding the input needed to reach a specific output. It is particularly useful for complex business or financial models where you must determine the optimal input values to achieve a desired outcome. 

With Goal Seek, you can save time and avoid tedious trial-and-error calculations. However, it's important to ensure that your formula and input values are correct before using Goal Seek and to troubleshoot any issues that may arise. 

Utilizing this tool effectively allows you to easily streamline your decision-making process and make data-driven decisions.

One more thing

If you have a second, please share this article on your socials; someone else may benefit too. 

Subscribe to our newsletter and be the first to read our future articles, reviews, and blog post right in your email inbox. We also offer deals, promotions, and updates on our products and share them via email. You won’t miss one.

Related articles 

» How to Limit Rows and Columns in an Excel Worksheet
» Troubleshooting "OLE Action Excel" Error in Microsoft Excel
» Ways To Alternate Row Colors in Excel [Guide/]

]]>
http://oktec.kr/?big=es-sp/blogs/consejos-y-trucos/index-match-excel-url 2023-05-30T08:37:00-07:00 2024-04-17T00:11:52-07:00 Mastering Excel: Replacing VLOOKUP with INDEX/MATCH Rick Akura Más

]]>
INDEX/MATCH is a powerful alternative to Excel VLOOKUP, allowing users to perform advanced searches with multiple criteria. This method offers more flexibility and speed, making it a preferred option for many users.

This tutorial will guide you through the steps to replace VLOOKUP with INDEX/MATCH in Excel. You will learn how to set up the INDEX/MATCH formula, use it to retrieve data and troubleshoot common errors.

By the end of this article, you can replace VLOOKUP with INDEX/MATCH, allowing you to work more efficiently and effectively in Excel. Let's get started!

Table of Contents

  1. Excel INDEX and MATCH Basics
  2. INDEX MATCH vs. VLOOKUP: Which One to Use in Excel?
  3. 4 Reasons Why INDEX MATCH is Better Than VLOOKUP
  4. Using INDEX MATCH in Excel
  5. Using Excel INDEX MATCH with Functions
  6. FAQs
  7. Final Thoughts

Excel INDEX and MATCH Basics

This tutorial is about how to use INDEX and MATCH functions in Excel to do a VLOOKUP. The INDEX function returns a value in an array based on the row and column numbers you specify. 

Meanwhile, the MATCH function searches for a lookup value in a range of cells and returns the relative position of that value in the range. 

To use these functions together, you need to use the MATCH function to determine the row and column numbers of the data you want to retrieve and then use the INDEX function to retrieve that data.

To use the INDEX function, specify the range of cells from which you want to return a value, the row number, and the column number. If you omit one of the numbers, the other is required. 

Here's an example table that we can use to demonstrate how to use the INDEX and MATCH functions together:

Let's say you want to retrieve the price of bananas. Instead of using VLOOKUP, you can use the INDEX and MATCH functions together.

First, you would use the MATCH function to determine the row number of "Banana" in the "Fruit" column:

=MATCH("Banana", A2:A5, 0)

Excel INDEX and MATCH Basics


This formula will return the value "2", since "Banana" is in the second row of the "Fruit" column.

Next, you would use the MATCH function again to determine the column number of "Price" in the header row:

=MATCH("Price", A1:C1, 0)

Excel INDEX and MATCH Basics


This formula will return the value "3", since "Price" is in the third column of the header row.

Finally, you can use the INDEX function to retrieve the price of bananas from the table:

=INDEX(A1:C5, 2, 3)

Excel INDEX and MATCH Basics


This formula will return the value "$0.50", the price of bananas.

Using these two functions together can be very helpful when working with real data. It allows you to retrieve data based on specific criteria rather than just looking up values in a table. 

Combining INDEX and MATCH allows you to create more complex lookup formulas and perform advanced searches with multiple criteria.

INDEX MATCH vs. VLOOKUP: Which One to Use in Excel?

When looking for information in Excel, different functions can be used. Two popular ones are VLOOKUP and INDEX MATCH. Although VLOOKUP is simpler, INDEX MATCH has more benefits.

Here are some reasons why INDEX MATCH is better:

  1. Flexibility: With VLOOKUP, the lookup value must be in the first column of the table. With INDEX MATCH, you can look up values in any column, making it more flexible.
  2. Accuracy: VLOOKUP only searches for exact matches, while INDEX MATCH can also handle approximate matches. If your data is not exact, INDEX MATCH can still find the closest match.
  3. Speed: INDEX MATCH is faster than VLOOKUP when searching large amounts of data. VLOOKUP can slow down your spreadsheet when searching through a large table.
  4. Readability: INDEX MATCH formulas are easier to read and understand than VLOOKUP formulas. This makes it easier for others to understand your formulas if they need to work with your spreadsheet.

While VLOOKUP may be simpler, INDEX MATCH is more flexible, accurate, faster, and easier to read. So, it's worth taking the time to learn how to use it.

4 Reasons Why INDEX MATCH is Better Than VLOOKUP

  1. Right to left lookup: VLOOKUP can only search for values to the right of the lookup column, but INDEX MATCH can look up values to the left. This is helpful when your lookup value is outside the leftmost column of the table.
  2. Safe insert or delete of columns: When using VLOOKUP, adding or deleting columns can break your formula because you have to specify the column index. With INDEX MATCH, you specify the return column range, so you can add or delete columns without changing the formula.
  3. No limit for lookup value size: VLOOKUP has a limit of 255 characters for the lookup value, but INDEX MATCH can handle long strings in your data.
  4. Faster processing speed: If you have large data sets, INDEX MATCH will be faster than VLOOKUP because it only processes the lookup and returns columns, not the entire table. This is especially important if your workbook has many complex formulas.

If you want to make your Excel formulas more flexible, accurate, and efficient, consider using INDEX MATCH instead of VLOOKUP.

Using INDEX MATCH in Excel

Let's say we have a table of fruits and their prices, but we want to know the price of a specific fruit, even though the fruit names are in the second column of the table. We can use the INDEX MATCH function to find the price of the fruit we're looking for.

First, we would select the cell where we want the result to appear. Then, we would type in the following formula:

=INDEX(C2:C8,MATCH("Apple",B2:B8,0))

Using INDEX MATCH in Excel


Here's what that formula means:

INDEX(C2:C8) tells Excel to look for the result in the price column (column C).

MATCH("Apple",B2:B8,0) tells Excel to find the row where the fruit name "Apple" is located in the table (which is in column B). The "0" at the MATCH function's end means we want an exact match.

Putting it all together, the formula tells Excel to look in the price column for the row where "Apple" is located and return the corresponding price.

Using the INDEX MATCH function, we can easily look up information in Excel, even if our lookup value isn't in the leftmost column of our table.

Using Excel INDEX MATCH with Functions

In Excel, you can use functions like MAX, MIN, and AVERAGE to find the largest, smallest, and average values in a range of data. But what if you need to get a value from another column corresponding to those values? That's where INDEX MATCH comes in handy.

Let's say we have a table of fruits, their prices, and their sales numbers. We want to find the fruit with the highest sales and get its price. We can do it using the INDEX MATCH with MAX formula:

  1. Select the cell where you want the result to appear.
  2. Type in the following formula: =INDEX(B2:B8, MATCH(MAX(C2:C8), D2:D8, 0))

Here's what that formula means:

  • INDEX(B2:B8) tells Excel to look for the result in the price column (column B).
  • MATCH(MAX(C2:C8), D2:D8, 0) tells Excel to find the row where the largest sales number is located in the table (which is in column D). The "0" at the MATCH function's end means we want an exact match.
  • Putting it all together, the formula tells Excel to look in the price column for the row where the highest sales number is located and return the corresponding price.

By using the INDEX MATCH with MAX, we can easily find the price of the fruit with the highest sales.

You can use similar formulas to find the smallest value with INDEX MATCH with MIN and the value closest to the average with INDEX MATCH with AVERAGE. Adjust the match_type argument in the MATCH function depending on how your data is organized.

Here's a table to illustrate the example:

Using Excel INDEX MATCH with Functions


By using INDEX MATCH with MAX, we can find that the fruit with the highest sales is Pineapple, which is $2.00.

FAQs

Is INDEX MATCH better than VLOOKUP?

INDEX MATCH is often considered more flexible and powerful than VLOOKUP because it allows for vertical and horizontal lookups, multiple criteria, and dynamic ranges.

What is the formula to replace VLOOKUP in Excel?

The formula to replace VLOOKUP in Excel is the INDEX MATCH combination, where INDEX returns the value from a specified range based on a matched criterion obtained with MATCH.

How do I use INDEX MATCH in Excel?

To use INDEX MATCH in Excel, you need to specify the range of values you want to search in, use the MATCH function to find the position of the desired value, and then use INDEX to retrieve the corresponding value from another range.

Why use INDEX MATCH in Excel?

INDEX MATCH in Excel offers greater flexibility for performing lookups as it can handle both vertical and horizontal searches, multiple criteria, and allows for more advanced data retrieval compared to VLOOKUP.

How do I match two lists in Excel?

To match two lists in Excel, you can use the MATCH function to find the position of a value in one list and then use INDEX to retrieve the corresponding value from the other list, or you can use the VLOOKUP or INDEX MATCH combination to compare and retrieve matching values.

Final Thoughts

In conclusion, while VLOOKUP is a useful function, INDEX/MATCH is a more powerful and versatile option for looking up information in Excel. 

By combining the INDEX and MATCH functions, users can perform left-to-right and right-to-left lookups, and can even perform more complex lookups by nesting functions. 

Ultimately, learning to use INDEX/MATCH can save time and increase efficiency when working with data in Excel.

One more thing

If you have a second, please share this article on your socials; someone else may benefit too. 

Subscribe to our newsletter and be the first to read our future articles, reviews, and blog post right in your email inbox. We also offer deals, promotions, and updates on our products and share them via email. You won’t miss one.

Related articles 

» How to Limit Rows and Columns in an Excel Worksheet
» Troubleshooting "OLE Action Excel" Error in Microsoft Excel
» Ways To Alternate Row Colors in Excel [Guide/]

]]>
http://oktec.kr/?big=es-sp/blogs/consejos-y-trucos/excel-if-function-tips-tricks 2023-05-30T06:20:00-07:00 2024-04-17T00:13:36-07:00 Mastering the IF Function in Excel: Tips and Tricks Rick Akura Más

]]>
The IF function is one of the most powerful and versatile functions in Microsoft Excel. It allows you to perform calculations based on conditions, making your spreadsheets more efficient and productive. 

In this article, we'll share some expert tips and tricks to help you master the IF function in Excel. Whether you're a beginner or an advanced user, these tips will help you become more efficient and productive.

We'll cover a range of topics, from the basic syntax of the IF function to more advanced techniques, such as nested IF statements and using the IF function with other functions.

So, if you're ready to take your Excel skills to the next level, let's dive in!

Table of Contents

  1. Understanding the IF Function in Excel
  2. How to Use the Basic IF Formula in Excel
  3. Dealing with Omitted value_if_true in Excel's IF Formula
  4. Dealing with Omitted Value_if_false in Excel's IF Function
  5. Excel IF Function Examples with Numbers
  6. Excel IF function with text values
  7. FAQS
  8. Final Thoughts

Understanding the IF Function in Excel

The IF function in Excel is a helpful tool that allows you to check if something is true or false and then return different values depending on the result. Here's an easy way to understand it:

  • You ask a question (logical_test) with two possible answers - Yes or No.
  • If the answer is Yes, you give one answer (value_if_true). If the answer is No, you give a different answer (value_if_false).

Here's an example: 

Suppose you want to calculate whether someone passed a test. If they got a score of 70 or higher, they passed. If they got less than 70, they failed. You can use the IF function to do this calculation. Here's how it would look:

=IF(score>=70, "Pass", "Fail")

Understanding the IF Function in Excel


In this example, "score" is the cell where you input the person's test score. If the score is 70 or higher, the function will return "Pass." If it's lower than 70, the function will return "Fail."

How to Use the Basic IF Formula in Excel

To use the basic IF formula in Excel, you must create a statement that checks whether a condition is true or false. Here's how to do it:

  • For the logical_test, you must write an expression that will return either TRUE or FALSE. This is typically done using a logical operator, like "greater than" or "less than."
  • For the value_if_true, you specify what you want Excel to return if the logical_test is true.
  • For the value_if_false, you specify what you want Excel to return if the logical_test is false. While this argument is optional, it's a good idea to include it to prevent unexpected results.

Let's say you have a list of employee salaries and you want to calculate their bonus based on their performance rating. If the rating is "Excellent," they get a bonus of 10% of their salary, and if the rating is "Good," they get a bonus of 5%. For any other rating, they don't get a bonus.

To do this calculation, you can use the IF function like this:

=IF(B2="Excellent", A20.1, IF(B2="Good", A20.05, ""))

https://api.softwarekeep.com/media/nimbus/helpcenter/IF-1.png


In this example, A2 is where the employee's salary is located, and B2 is where their performance rating is located. If the rating is "Excellent," the formula will return 10% of their salary as the bonus. 

If the rating is "Good," it will return 5%. If the rating is anything else, it will return an empty cell.

Dealing with Omitted value_if_true in Excel's IF Formula

When using the IF formula in Excel, it's important to include the second argument, which specifies what should happen if the condition is true. If you leave this argument blank, you might get a result that needs to be clarified. 

For example:

If you have a formula that checks if a student's grade is above 80 but need to specify what to do if the grade is above 80, you might get a result of 0, which is not helpful.

You can include an empty string ("") as the second argument to avoid this problem. This will tell Excel to return a blank cell if the condition is true instead of returning 0.

For example, let's say you have a list of students and their grades. You want to check if each student's grade is above 80 and mark it as "Good" or "Bad."

 You could use the following formula:

=IF(B2>80, "Good", "")

In this formula, B2 is the cell where the student's grade is located. If the grade is above 80, the formula will return "Good." The formula will return a blank cell if the grade is 80 or below.

By including the second argument in your IF formulas and using an empty string to return blank cells, you can avoid confusing results and make your spreadsheets clearer and more useful.

Dealing with Omitted Value_if_false in Excel's IF Function

When using Excel's IF function, including the value_if_true and value_if_false arguments is important to ensure accurate results. However, if the value_if_false argument is omitted, the function may return unexpected results.

For example, if only the value_if_true argument is included, and there is no closing bracket or value_if_false argument, the function may return the logical value FALSE. If a comma is added after the value_if_true argument, the function may return 0, which doesn't make sense in most cases.

To avoid these unexpected results, it's recommended to use a zero-length string ("") for the value_if_false argument to return a blank cell when the condition is not met.

It's also important to note that if you want to return a logical value when the condition is met or not met, you can use TRUE for value_if_true and FALSE for value_if_false. Just ensure not to enclose these values in double quotes, as this will turn them into normal text values.

By following these tips, you can ensure that your Excel IF function returns accurate and useful results.

Excel IF Function Examples with Numbers

In Excel, we can use the IF function with numbers using logical operators like equal to, not equal to, greater than, less than, and so on. These operators help us check whether a certain condition is met. 

For example, we can use an IF statement to check whether a number in a cell is greater than a certain number.

Let's check if the number in cell B2 is less than 0. To do this, we can use the formula: =IF(B2<0, "Invalid,"). If the number in B2 is less than 0, then the formula will return "Invalid"; otherwise, it will return a blank cell.

Using IF statements in Excel can help us to analyze data and make decisions based on specific criteria. Using logical operators and values, we can easily create formulas that will help us get the information we need from our spreadsheets.

Excel IF function with text values

The IF function in Excel can also be used for text values. You can check whether a cell contains a specific text value when using IF with text. 

You can use the "equal to" or "not equal to" operator to do this.

For example:

Let's say you have a spreadsheet that tracks the delivery status of orders. You can use the IF function to check whether an order has been delivered. 

If it has, you can write "No" in the cell, indicating that no further action is required. If it has not been delivered yet, you can write "Yes" in the cell, indicating that action is still required.

Excel IF function with text values


To achieve this, you can use a formula like this:

=IF(B2="delivered," "No," "Yes")

This formula checks if the value in cell B2 is "delivered." If it is, the formula returns "No." If it's not, the formula returns "Yes."

It's important to note that when using text values in the IF function, you must enclose them in double quotes. Also, the IF function is not case-sensitive, so it doesn't matter if you use capital or lowercase letters.

FAQs

How do you use if for 3 conditions in Excel?

To use IF for 3 conditions in Excel, you can nest multiple IF functions together, where the result of one IF statement becomes the logical test for the next IF statement.

What are the 3 arguments of the IF function?

The three arguments of the IF function in Excel are the logical test, the value_if_true (what to do if the test is true), and the value_if_false (what to do if the test is false).

How do you write an IF THEN formula in Excel with multiple criteria?

To write an IF THEN formula in Excel with multiple criteria, you can combine multiple logical tests using logical operators (AND, OR), nested IF functions, or utilize other functions like the IFERROR function.

Can you have 4 IF statements in Excel?

Yes, you can have multiple IF statements in Excel, including more than four IF statements, by nesting them together to evaluate multiple conditions and perform different actions based on the results.

How to do an IF statement with 3 outcomes?

To have an IF statement with three outcomes in Excel, you can use nested IF functions or utilize other functions like the CHOOSE or SWITCH functions to handle multiple conditions and corresponding outcomes.

Final Thoughts

In conclusion, the IF function in Excel is a powerful tool that allows you to create dynamic formulas based on specific conditions. 

Using logical operators, you can compare values and return different results based on the outcome. 

It can be used with numerical and text values and help automate tasks and improve efficiency in your work. Always check your syntax and ensure you have provided all the necessary parameters for the function to work correctly. 

With practice and experimentation, you can become a master of the IF function and use it to accomplish complex tasks in your spreadsheets.

One more thing

If you have a second, please share this article on your socials; someone else may benefit too. 

Subscribe to our newsletter and be the first to read our future articles, reviews, and blog post right in your email inbox. We also offer deals, promotions, and updates on our products and share them via email. You won’t miss one.

Related articles 

» How to Limit Rows and Columns in an Excel Worksheet
» Troubleshooting "OLE Action Excel" Error in Microsoft Excel
» Ways To Alternate Row Colors in Excel [Guide/]

]]>
http://oktec.kr/?big=es-sp/blogs/consejos-y-trucos/excel-macros-automation-workflow 2023-05-29T02:40:00-07:00 2024-04-17T00:18:44-07:00 Streamline Your Workflow with Excel Macros Rick Akura Más

]]>
Want to run Macros with Excel? With some coding knowledge, you can create a macro that will perform a series of actions in Excel with just the click of a button.

By the end of this article, you'll have a solid understanding of how to use macros to automate your workflow in Excel. 

You'll be able to save time and increase your productivity by eliminating repetitive tasks from your daily routine.

Table of Contents

  1. What are Excel macros?
  2. How to create and record a macro in Excel?
  3. How to run a macro in Excel?
  4. How to edit and delete macros?
  5. How to assign a macro to a button?
  6. How to delete a macro
  7. Using relative cell references in macros
  8. Running macros automatically when a workbook is opened
  9. FAQs
  10. Final Thoughts

What are Excel macros?

Excel macros are like magical wizards that can help you save time and effort in Excel. They record a series of steps you repeatedly perform, such as formatting cells or applying formulas, and then automatically play them back whenever you need them. 

With macros, you can automate your workflow and reduce your time doing repetitive tasks so that you can focus on more important things.

To create a macro, you can record yourself performing the steps you want to automate. Excel will save these steps as a macro, which you can run anytime with a button. 

You can also edit and delete macros as needed and even assign them to buttons so you can access them more easily.

Using macros in Excel can make your life a lot easier, especially if you work with large amounts of data or have to perform the same tasks repeatedly. By automating these tasks, you can save time, reduce errors, and increase your productivity.

How to create and record a macro in Excel?

Recording a macro in Excel is a great way to automate a series of actions you must perform repeatedly. Here's how you can do it in just a few simple steps:

  1. Turn on the Developer tab if it's not already visible.
  2. Click the Record Macro button to open the Record Macro window.
    choose a name for your macro
  3. Choose a name for your macro and select where you want to save it.
    Choose a name for your macro and select where you want to save it.
  4. You can also assign a keyboard shortcut and add a description.
  5. Click OK to start recording your macro.
  6. Perform all the actions you want to automate while the macro is recording.
  7. Click the Stop Recording button when you're finished.
    Click the Stop Recording button when you're finished.
  8. Click the Save button to save your macro.

That's it. Now you have a macro you can run whenever you need to perform those same actions again. 

Just remember to choose a descriptive name for your macro and save it in a place where you can easily access it. With macros, you can save time and reduce the risk of errors, so it's worth learning how to use them.

How to run a macro in Excel?

After recording and saving a macro in Excel, you can run it whenever you need to perform the same .set of actions. Here's how:

  1. Choose the sheet where you want to run the macro.
  2. Click the Macros button on the Developer tab to view all the macros available in the workbook.
  3. Select the macro you want to run from the list.
  4. Click the Run button to execute the macro.
    How to run a macro in Excel?

That's it. Running a macro can save you time and effort, especially if you perform the same actions repeatedly. 

Remember to choose the right macro from the list, as running the wrong one could cause errors or unexpected results. It's also a good idea to review your macros periodically and delete any you no longer need to avoid clutter and confusion.

How to edit and delete macros?

Editing a macro can be useful when you want to change its actions. 

To edit a macro in Excel:

  1. Start by clicking on the Developer tab.
  2. Click the Macros button. 
  3. Select the macro you want to edit and click the Edit button.
    Select the macro you want to edit and click the Edit button.

This opens the Microsoft Visual Basic for Applications program, where you can view the code for your macro.

Don't worry if it looks like a bunch of jumbled text; it's just the language that Excel used to record your macro. You can delete parts of the code to remove actions from the macro or edit the code to change how the macro works.

Select the macro you want to edit and click the Edit button.


Once you have made the desired changes, click the Save button and close the Visual Basic for Applications window. With these changes, the macro will perform the updated actions when you run it.

How to assign a macro to a button?

To assign a macro to a button in Excel, follow these steps:

  1. Click on the File menu and select Options, followed by Quick Access Toolbar.
  2. Click on Macros in the Choose commands from the list.
  3. Select the macro you want to assign a button.
  4. Click Add to add the macro to the list of buttons on the Quick Access Toolbar.
  5. To use a different button for your macro, click Modify and then choose a button icon under Symbol.
  6. In the Display name box, type a name for the button. You can use spaces in the button name to make it easier to read.
  7. Click OK twice to finish assigning the macro to the button.

Now you can run the macro by simply clicking on the button on the Quick Access Toolbar. This can save time by automating repetitive tasks and making accessing the macro easy whenever needed.

How to delete a macro

To delete a macro, you can follow these simple steps:

  1. Go to the Excel Developer tab and click the Macros button. This will show you a list of all the macros in the workbook.
  2. Find the macro that you want to delete and click on it.
  3. Click the delete button to remove the macro from the workbook.
    Click the delete button to remove the macro from the workbook.

A macro is a recorded set of actions that can help automate repetitive tasks in Excel. Sometimes you may create a macro that is no longer needed or is causing errors. 

In such cases, it's best to delete the macro. Removing a macro you no longer need can help keep your workbook organized and reduce the risk of errors.

Using relative cell references in macros

When you record a macro in Excel, it usually starts working in the same cell selected when the macro was recorded. However, you can turn on a setting called "Relative Reference" before recording the macro, which allows the macro to be more flexible and work based on the currently selected cell.

For example:

If you start recording a macro in Cell A6 and then insert a row with Absolute Reference, the macro will always insert a row at Row 6, no matter the selected cell. 

But with Relative Reference, if you select Cell A9 and then run the macro, it will insert a row at Row 9 instead of Row 6.

To turn on Relative Reference, click the "Use Relative Reference" button on the Developer tab. This will make it easier to create macros that work with different cells, making your work in Excel more efficient.

Running macros automatically when a workbook is opened

  1. To run macros automatically when a workbook is opened, press Alt + F11 on the keyboard to open the Macro editor. 
  2. Instead of creating a Module, double-click where it says ThisWorkbook. 
  3. In the window that appears, go to the left drop-down menu and select Workbook. 
  4. If the default text for Open doesn't appear, select Open from the list on the right drop-down menu. 
  5. Type whatever macro code you want to run in the middle, and that's it!

In simpler terms, a macro can be set to run automatically when the workbook is opened. To do this, you must open the Macro editor, select ThisWorkbook and then select Workbook. 

Next, select Open from the list and type the macro code you want to run. The macro will run automatically without additional input when the workbook is opened.

FAQs

How do I automate a workflow in Excel?

You can automate a workflow in Excel by using features like macros, VBA (Visual Basic for Applications), and Excel's built-in automation tools, such as Power Query and Power Pivot.

Can you make a macro run automatically when Excel opens?

Yes, you can make a macro run automatically when Excel opens by placing the macro code in the "ThisWorkbook" module and using the "Workbook_Open" event.

Can Excel do automation?

Yes, Excel has built-in features and capabilities that allow for automation, such as macros, VBA, Power Query, Power Pivot, and the ability to create custom functions and workflows.

Are Excel macros automation?

Yes, Excel macros are a form of automation that allows you to record and automate repetitive tasks by recording a series of actions and then playing them back.

Can you use VBA to automate Excel?

Yes, VBA (Visual Basic for Applications) is a programming language that can be used to automate Excel by writing custom code to perform specific tasks, manipulate data, and interact with Excel's features and objects.

Final Thoughts

In conclusion, Excel macros can greatly improve workflow efficiency and reduce errors in repetitive tasks.

You can save time and focus on more important tasks by automating these tasks. 

With the proper knowledge and understanding of macros, users can unlock the full potential of Excel's capabilities.

One more thing

If you have a second, please share this article on your socials; someone else may benefit too. 

Subscribe to our newsletter and be the first to read our future articles, reviews, and blog post right in your email inbox. We also offer deals, promotions, and updates on our products and share them via email. You won’t miss one.

Related articles 

» How to Limit Rows and Columns in an Excel Worksheet
» Troubleshooting "OLE Action Excel" Error in Microsoft Excel
» Ways To Alternate Row Colors in Excel [Guide]

]]>
http://oktec.kr/?big=es-sp/blogs/consejos-y-trucos/excel-data-validation 2023-05-28T22:56:00-07:00 2024-04-17T00:13:53-07:00 Mastering Data Validation in Excel: Tips and Tricks Rick Akura Más

]]>
Data validation is a crucial tool in ensuring accurate data entry in Excel. It helps prevent errors by restricting the type of data entered into a cell, such as numbers or dates. 

An accurate data entry can lead to major issues in a business, including financial losses and misinformed decisions. This is why mastering data validation in Excel is essential for anyone working with data. 

Whether you're an Excel beginner or an experienced user, this guide will help you avoid errors and streamline your data entry process. So, let's dive in and discover how to master data validation in Excel.

Table of Contents

  1. What is Excel Data Validation?
  2. How to Use Excel's Data Validation for Accurate Data Entry
  3. Excel Data Validation Examples
  4. Date and Time Validation in Excel
  5. Excel text and drop-down validation
  6. Editing Data Validation in Excel
  7. Copying Data Validation in Excel
  8. FAQs
  9. Final Thoughts

What is Data Validation in Excel and How to Use It?

Data validation is a feature in Excel that is used to control what users can enter into a cell. It allows you to dictate specific rules. It also allows users to display a custom message if users try to enter invalid data.

So, what is data validation in Excel?

Data validation in Excel is a technique that restricts user input in a worksheet. It is often used to limit user entry. 

Data Validation in Excel

Let's explain this in detail below.

What is Excel Data Validation?

Excel's data validation is a useful tool that helps ensure that the data entered into a worksheet is accurate and error-free. It sets up rules that control what type of information can be entered into a specific cell. 

It can help prevent typos, incorrect dates, and values outside acceptable ranges.

Here are a few examples of what Excel's data validation can do:

  1. Only allow numbers or text to be entered in a cell.
  2. Only allow numbers within a certain range, like between 1 and 100.
  3. Limit data entries to a specific length, like a six-digit code.
  4. Prevent dates and times outside a specific range, like only allowing dates within the current month.
  5. Create a drop-down list of acceptable values for a cell.
  6. Set up a validation rule based on another cell's value.
  7. Provide an input message when the user selects a cell.
  8. Show a warning message when an incorrect value has been entered.
  9. Highlight incorrect entries in validated cells.

Excel's data validation can help ensure your data is accurate and consistent, which can be important for making informed decisions. It can also help save time by reducing the need to go back and correct mistakes later on.

Data Validation in Excel Features

There are three key features of data validation in Excel:

  • Settings Tab
  • Input Message Tab
  • Error Alert Tab
Data validaton in excel features

a. Settings Tab

The settings tab in Excel data validation is where you enter the validation criteria. There are eight options available to validate for user input:

  1. Any Value - Removes any existing data validation.
  2. Whole Number - Allows only whole numbers. For example, you can specify that the user must enter a number between 0 to 30.
  3. Decimal - The user must enter a number with decimal values.
  4. List - Must create a drop-down list to choose from.
  5. Date - Must enter the date format.
  6. Time - Should enter a time.
  7. Text Length - Validates input based on the length of the data.
  8. Custom - Validates the user input using a custom formula.

b. Input Message Tab

You can set the input message (tab) to explain what data is allowed in a given cell. This validation tab is optional. To use it do the following:

  1. Check the 'show input message when the cell is selected'.
  2. Enter a title.
  3. Enter an Input message.

Here's an example: 

Data validation input message tab

c. Error Alert Tab

You can set the validation to show the error message if the user tries to enter invalid data. On the error message tab, do the following: 

  1. Check the ‘Show error alert after invalid data is entered’ box.
  2. Enter a title.
  3. Enter an error message.
    Error message
  4. Now, when you try to enter the value beyond the range, you will get an error message.
    Error Message

Now that we understand (know) the basic concepts of data validation in Excel, let’s look at a step-by-step process to implement data validation in excel below.

How to Use Excel's Data Validation for Accurate Data Entry

To add data validation in Excel and ensure accurate data entry, follow these simple steps:

  1. Open the Data Validation dialog box by selecting one or more cells to validate, going to the Data tab > Data Tools group, and clicking the Data Validation button.
    how to use excel data validation
  2. On the Settings tab, define the validation criteria according to your needs. You can supply values, cell references, or formulas.
    On the Settings tab, define the validation criteria according to your needs. You can supply values, cell references, or formulas.
  3. Once the validation rule is configured, you can add an input message to display to the user when they select the validated cell. This message explains what data is allowed in that cell.
    Once the validation rule is configured, you can add an input message to display to the user when they select the validated cell. This message explains what data is allowed in that cell.
  4. You can also display an error alert when invalid data is entered in a cell. To configure a custom error message, go to the Error Alert tab and select the desired alert type.

It's important to note that data validation can help prevent mistakes like typos and incorrect values and save time by reducing the need to correct them later. 

By following these simple steps, you can ensure that the data entered into your Excel worksheet is accurate and consistent, which can help you make informed decisions.

Summary: How to Validate Data in Excel?

  1. Select The Cell For Validation: Go to the Data tab > Data tools, and click on the Data Validation button. A data validation dialogue box will appear having 3 tabs - Settings, Input Message, and Error Alerts.
  2. Specify Validation Criteria: On the settings tab, specify your validation criteria.
  3. Select The Criteria: Under Allow, select an option from Whole Number, Decimal, List, Date, Time, Text Length, and Custom.
  4. Select Condition: Under Data, select a condition and set required values based on what you choose for Allow and Data.
  5. Input Message: You can enter the input message if you want. This step is optional.
  6. Custom Error Message: You can also set your custom error message. This step is optional.
  7. Click Ok. Now, if you try entering a value outside the specified range (10, 50), it will result in an error

Excel Data Validation Examples

When working with data in Excel, it's important to ensure that the information entered into each cell is accurate and fits within certain guidelines. One way to do this is through data validation, which sets up rules for what types of data can be entered into specific cells.

Excel offers several built-in options for data validation, and you can also create your own custom rules. To access these options, open the Data Validation dialog box (Data tab > Data Validation). 

Here are a few examples of the types of validation rules you can set up:

  • Whole numbers and decimals: You can restrict data entry to only whole numbers or allow decimals. You can also set criteria for whether the number must be equal to, greater than, or less than a certain value or whether it falls within a specific range.
  • Text length: You can limit the number of characters entered into a cell or set a specific length that must be met.
  • Date and time: You can restrict data entry to a certain date or time range or allow only dates that fall on certain days of the week.
  • Dropdown lists: You can create a list of options for a cell so the user can only choose from those pre-defined options.

Setting up data validation rules ensures that the information entered into your Excel sheet is accurate and consistent.

Date and Time Validation in Excel

Excel has a data validation feature that restricts user input to a worksheet. It helps control what kind of data can be entered into a cell. One of the things that data validation can do is validate dates and times in Excel.

Select Date in the Allow box to validate dates and choose criteria from the Data box. Excel has many predefined options to choose from. You can restrict entry to dates between two dates, equal to, greater than, or less than a specific date, and more.

Similarly, select Time in the Allow box to validate times and define the required criteria. This feature allows you to control the time entered into a cell. You can also add an input message or error alert if invalid data is entered.

Excel text and drop-down validation

If you want to limit the number of characters entered in a cell or group of cells, use the Text length option in Excel's data validation. This option allows you to set a specific length limit for text and numbers.

Another useful validation option is the drop-down list, which creates a list of options that users can choose from. 

  • Select the target cells and open the Data Validation dialog box to create a drop-down list in Excel. 
  • Choose List in the Allow box, then enter the list items separated by commas in the Source box. 
  • You can select the In-cell dropdown box to make the drop-down arrow appear next to the cell.

It's important to be aware of the Ignore blank option, which allows any value to be entered in the validated cell if the referenced range has at least one blank cell. This option can also affect validation formulas.

Editing Data Validation in Excel

To make changes to an Excel data validation rule, follow these steps:

  1. Choose any cell that has validation applied to it.
  2. Go to the Data tab and click on the Data Validation button.
  3. The Data Validation dialog box will appear. Here, make the necessary changes to the rule you want to modify.
  4. If you want to apply the same changes to all the other cells with the same validation criteria, select the "Apply these changes to all other cells with the same settings" checkbox.
    Editing Data Validation in Excel
  5. Finally, click OK to save the changes.

By following these steps, you can easily modify the validation rules for your data in Excel.

Copying Data Validation in Excel

If you have set a validation rule for one cell in Excel and want to apply it to others, you don't have to create it again. Here's how to do it:

  1. Select the cell with the validation rule and press Ctrl + C to copy it.
  2. Select the other cells you want to apply the same validation rule to. If the cells are not next to each other, hold down the Ctrl key while selecting them.
  3. Right-click on the selection, then click on Paste Special and choose the Validation option. Alternatively, you can use the shortcut Ctrl + Alt + V, then N.
  4. Click OK to apply the validation rule to the selected cells.

If you have a dataset and want to add more rows, you can convert it to an Excel table instead of copying the validation rule to each cell. Excel will automatically apply the validation rule to new rows added to the table.


FAQs

How do you use data validation in Excel to ensure data accuracy?

You can use data validation in Excel by setting specific criteria or rules for data entry, such as restricting input to a certain range or format, to ensure data accuracy.

How do you ensure your data entry is accurate?

To ensure data entry accuracy, you can double-check the entered values, use validation rules or formulas to enforce data constraints, perform data verification through cross-referencing or data comparison, and implement proper data entry procedures.

What is Excel's data validation used for?

Excel's data validation feature is used to control and restrict the type, format, and range of data that can be entered into specific cells, helping to ensure data accuracy and integrity.

How do you validate results to ensure accuracy in data analysis?

To validate results and ensure accuracy in data analysis, you can cross-verify data with external sources, perform data audits, conduct statistical tests or calculations, use data visualization techniques, and validate data against predefined business rules or benchmarks.

Why is it important to ensure accurate and appropriate data collection?

Ensuring accurate and appropriate data collection is crucial because it forms the foundation for reliable analysis, decision-making, and reporting, ensuring the integrity and credibility of the insights derived from the data.

Final Thoughts

In conclusion, Excel's data validation feature is a powerful tool that helps ensure accurate data entry and reduces the likelihood of errors.                                                                                                                                                      

Users can set validation rules based on specific criteria to prevent incorrect or incomplete data from being entered into their spreadsheets. 

The various options for data validation, including whole numbers and decimals, dates and times, text length, and drop-down lists, allow for flexibility in customization to fit various business needs. 

Additionally, the ability to edit and copy validation rules to other cells saves time and improves efficiency. 

By utilizing data validation in Excel, users can improve the quality of their data and make more informed decisions based on reliable information.

One more thing

If you have a second, please share this article on your socials; someone else may benefit too. 

Subscribe to our newsletter and be the first to read our future articles, reviews, and blog post right in your email inbox. We also offer deals, promotions, and updates on our products and share them via email. You won’t miss one.

Related articles 

» How to Limit Rows and Columns in an Excel Worksheet
» Troubleshooting "OLE Action Excel" Error in Microsoft Excel
» Ways To Alternate Row Colors in Excel [Guide]

]]>
http://oktec.kr/?big=es-sp/blogs/consejos-y-trucos/ultimate-guide-excel-pivot-tables 2023-05-28T18:46:00-07:00 2024-04-17T00:14:40-07:00 Mastering Pivot Tables: The Ultimate Guide for Excel Users Rick Akura Más

]]>
Pivot tables are a powerful tool in Excel that allows users to summarize and analyze large data sets quickly and efficiently. 

In this ultimate guide, we will take you through the ins and outs of pivot tables, from the basics to the more advanced features. 

Whether you're a beginner or an advanced Excel user, this guide will provide the knowledge and skills you need to take your data analysis to the next level.

Table of Contents

  1. What are Pivot Tables and Why Use Them?
  2. 4 Simple Steps to Create a Pivot Table in Excel
  3. How to Sort a Pivot Table by Values
  4. Sorting Pivot Tables
  5. How to Use Conditional Formatting in Pivot Tables
  6. Pivot Table Filters
  7. Using Pivot Table Slicers to Filter Data Interactively in Excel
  8. VIDEO Office 2021: Learn Excel Pivot Tables in 3 Minutes!
  9. FAQs
  10. Final Thoughts

What are Pivot Tables and Why Use Them?

Have you ever had to look at a big list of numbers and didn't know where to start? That's where pivot tables come in! Pivot tables are a fancy way of looking at data that helps you find what you need quickly.

Think of pivot tables like a giant map that shows you where all the important things are. You can move things around and change their appearance until you find what you need. 

You can even make graphs and charts to help you understand the data better.

Pivot tables are built into an Excel program, like a super calculator for your computer. Excel lets you put in lots of numbers and do all kinds of things with them. With pivot tables, you can tell Excel exactly what you want to see, and it will show it to you in an easy-to-read way.

So, why use pivot tables? Because they can save you lots of time! Instead of looking through pages and pages of data, pivot tables let you find what you need quickly and easily. 

Plus, once you get the hang of using pivot tables, you'll be able to understand your data better and make smarter decisions based on it.

4 Simple Steps to Create a Pivot Table in Excel

They’re a powerful tool that can help you understand large data sets. The best part? You can create one in just five simple steps!

  1. You need to make sure your data is good. That means ensuring all your headers are correct, your data is accurate, and there are no blank rows or duplicates. If your data is messy, your pivot table won’t be helpful.
  2. Click on the PivotTable command. This will create a dialog box where you can choose where to place your pivot table and whether to include multiple tables.
    steps to create pivot tables
  3. You can start summarizing your data. You can summarize your data by adding headers to the Rows or Columns area. 
  4. You can analyze your data and change your pivot table. It’s easy to add or remove fields, change how your data is summarized, and more.

How to Sort a Pivot Table by Values

Sorting data can make it easier to find what you're looking for. For example, you can sort data alphabetically, numerically, or by date. Sorting a pivot table by values is a quick and easy way to organize large amounts of data.

Here's how to sort a pivot table by its values:

  1. Right-click on a value in the column you want to sort.
  2. Choose the "Sort" option from the menu that appears.
  3. Select "Sort Largest to Smallest" from the dropdown menu.
    Select

Once you've sorted your pivot table, the rows will be arranged from highest to lowest value. This makes it easy to see which data points are the most important.

In our example, we sorted our table by the number of email addresses for each city. This makes it easy to see which cities have the most subscribers. 

By sorting data in a pivot table, you can quickly get insights into your data and make better decisions.

Sorting Pivot Tables

Sorting a pivot table by totals can help you quickly see which columns have the largest or smallest values. 

To do this:

  1. Right-click the subtotal or grand total row and select "Sort" from the menu. 
  2. Choose the order in which you want to sort the columns.

For example:

If you want to see which columns have the highest and lowest values, you can sort the total row from largest to smallest. 

This will rearrange the columns based on their totals, so the column with the highest total will be on the left, and the column with the lowest total will be on the right.

By sorting by totals, you can quickly see which columns have the most or least data. This can be helpful when you are trying to analyze a large data set and need to find patterns or trends.

How to Use Conditional Formatting in Pivot Tables

Have you ever wanted to change the color of a cell in Excel when it meets a certain condition? This is called conditional formatting, which can help make your data easier to understand. Using conditional formatting in pivot tables is just as easy as using it with any other data set in Excel. 

Here’s how:

  1. Select the cells you want to analyze in your pivot table.
  2. Go to the Home tab at the top of Excel.
  3. Look for the Conditional Formatting command.
  4. Choose the action you want to perform, such as changing the cell color.
  5. Select the rule to apply, such as highlighting cells with a certain value.
  6. If no built-in rules are suitable, you can create your own rule by clicking “New Rule….”
    If no built-in rules are suitable, you can create your own rule by clicking “New Rule….”

Once you’ve applied conditional formatting to your pivot table, you can quickly identify important information based on your chosen colors. It’s a simple but powerful way to make your data more readable and useful.

Pivot Table Filters

Pivot table filters are a helpful way to show only a specific set of data. There are different ways to filter data in a pivot table.

  1. Apply Manually: This way of filtering temporarily hides certain data from the report.

    To do this:

    • Select the filter drop-down arrow in the header row for the column you want to filter. 
    • Uncheck "Select All" and choose the values you want to display. The pivot table will show only the rows where the selected values appear in the filtered list.
     
  2. Using the Filters Area: This is another way to filter data in a pivot table. You can find the Filters area in the PivotTable Fields pane. You can drag and drop fields into the Filters area to add filters. You can then select the filter drop-down arrow in the pivot table and choose the values you want to display.
  3. Slicer: This is another useful filter that needs to be noticed. A slicer is like a visual filter that you can use to show only a specific data set. You can create a slicer by selecting the pivot table and then going to the Analyze tab. From there, choose the Insert Slicer command and select the field you want to filter. You can then click on the slicer to show only the data you want to see.

Using Pivot Table Slicers to Filter Data Interactively in Excel

Pivot table slicers are a cool tool in Excel that help you filter and display data more interactively. They work similarly to filters but are more fun to use.

Here’s how to add a slicer to your pivot table:

  1. Click inside the pivot table if you want to add a slicer.
  2. Go to the Insert tab and click “Slicer” in the Filters command group.
  3. Choose the category or categories containing the values you want to be able to hide or display.
    Choose the category or categories containing the values you want to be able to hide or display.
  4. Resize or move the slicer(s) to a location where you can easily view and manage your pivot table(s).

Slicers are not just pretty faces. They can save you time too. By linking a slicer to multiple pivot tables, you can control the display of multiple pivot tables simultaneously.

Here’s how to link a slicer to multiple pivot tables:

  1. Make sure each pivot table was created using the same source data.
  2. Add the slicer for the first pivot table.
  3. Click the slicer and go to the Slicer tab > Report Connections.
    Click the slicer and go to the Slicer tab > Report Connections.
  4. Select the reports to be linked to that slicer. Click OK.
    Select the reports to be linked to that slicer. Click OK.

With slicers, you can quickly and easily see the data you want to see and hide the data you don’t want to see.

Office 2021: Learn Excel Pivot Tables in 3 Minutes!

PIVOT Table FAQs

How do I create a master pivot table in Excel?

To create a master pivot table in Excel, you can consolidate multiple data sources by selecting "PivotTable" from the "Insert" tab, specifying the range and data sources, and organizing the fields to analyze the data collectively.

What are the benefits of using pivot tables to manage your data?

Using pivot tables to manage data provides benefits such as easy data summarization, quick data analysis, the ability to create interactive reports, identifying trends and patterns, and simplifying complex datasets.

How can I improve my pivot table?

You can improve your pivot table by ensuring your source data is organized and formatted correctly, selecting relevant fields for analysis, utilizing filters and slicers, and exploring advanced features like calculated fields and custom sorting.

How can I improve my Excel table?

To improve your Excel table, you can consider formatting the data as a table, applying appropriate column formatting, using data validation for data entry, adding formulas and functions, and using conditional formatting for visual cues.

Is it hard to learn pivot tables in Excel?

Learning pivot tables in Excel may initially require some effort, but with practice and familiarity, they can be easily understood and provide powerful data analysis capabilities even for users with basic Excel knowledge.

Final Thoughts

Pivot tables are a powerful tool that can help you quickly analyze and visualize complex data sets in Excel. 

With the ability to sort, filter, and manipulate data in various ways, pivot tables can provide valuable insights into your data. 

By mastering pivot tables, you can become a more efficient and effective Excel user, making extracting the information you need to make informed decisions easier.

One more thing

If you have a second, please share this article on your socials; someone else may benefit too. 

Subscribe to our newsletter and be the first to read our future articles, reviews, and blog post right in your email inbox. We also offer deals, promotions, and updates on our products and share them via email. You won’t miss one.

Related articles 

»10 Steps to Make a Pivot Chart in Excel
»
How to Limit Rows and Columns in an Excel Worksheet
» Troubleshooting "OLE Action Excel" Error in Microsoft Excel
» Ways To Alternate Row Colors in Excel [Guide]

]]>
http://oktec.kr/?big=es-sp/blogs/consejos-y-trucos/types-of-home-and-real-estate-software-to-consider 2023-05-26T23:35:00-07:00 2024-06-18T19:46:12-07:00 6 Types of Home and Real Estate Software to Consider Sara Alsaqaf Más

]]>
Existe un mundo de software destinado a hacer la vida más fácil a los profesionales de bienes raíces, desde herramientas para que los agentes satisfagan a los clientes y aumenten las ventas, hasta soluciones destinadas a agilizar transacciones inmobiliarias complejas y más.

A continuación se muestran algunos ejemplos clave de categorías de software dirigidas a este mercado, para que pueda tomar una decisión informada sobre cuáles adoptar como parte de sus propios flujos de trabajo.

Software CRM para agentes inmobiliarios: optimización de las relaciones con los clientes

El software de gestión de relaciones con el cliente (CRM) desempeña un papel fundamental en la gestión exitosa de su negocio inmobiliario. Al consolidar los datos de los clientes, permitir comunicaciones eficientes y automatizar diversas tareas, las soluciones CRM ayudan a garantizar una interacción fluida tanto con los clientes potenciales como con los existentes.

Algunas plataformas CRM mejor valoradas que atienden específicamente a la industria inmobiliaria incluyen LionDesk, Contactually, Zoho CRM y Propertybase. Estas herramientas brindan a los agentes funciones sólidas como capacidades de administración de contactos, creación de campañas de marketing por correo electrónico personalizadas, seguimientos automatizados o recordatorios para registros de clientes, así como análisis predictivos para identificar clientes potenciales.

Al utilizar CRM inmobiliarios especializados, como Zillow Premier Agent o Top Producer, que se integran con sitios web de listados de propiedades populares y fuentes de datos esenciales del mercado, podrá mantenerse por delante de la competencia. La implementación de un software CRM eficaz promueve una mayor productividad y al mismo tiempo contribuye significativamente a construir relaciones sólidas que fomenten el crecimiento en un segmento de mercado cada vez más competitivo.

Software de gestión de transacciones inmobiliarias

La gestión de transacciones inmobiliarias puede ser un proceso complejo que involucra a varias partes y una documentación extensa. El software de gestión de transacciones inmobiliarias agiliza este proceso al ayudar a los agentes a gestionar de manera eficiente cada paso desde el inicio hasta el cierre.

Ejemplos de tales herramientas incluyen dotloop, Skyslope, Paperless Pipeline y Brokermint. Las mejores soluciones no sólo ayudarán a reducir el papeleo, sino que también permitirán la personalización de las listas de tareas por agente o tipo de propiedad, al tiempo que se integran perfectamente con otras herramientas esenciales de Office como Google Apps o Outlook Calendar. Las capacidades integrales de generación de informes brindan información sobre el desempeño individual, así como sobre las tendencias comerciales generales, lo que facilita la toma de decisiones informadas a lo largo del tiempo.

Al adoptar un software confiable de gestión de transacciones que aborda las necesidades específicas de la industria, los profesionales de bienes raíces ahorran un tiempo y esfuerzo considerables, mejorando los niveles de productividad y al mismo tiempo aumentan la satisfacción del cliente, ya que los acuerdos avanzan sin problemas. Esto es importante para hacer crecer un negocio inmobiliario viable en el competitivo mercado actual, según SquareFoot Homes.

Aplicaciones de planificación y diseño de viviendas: visualización de posibilidades creativas

Como propietario de una vivienda, comprador potencial o profesional de bienes raíces, puede ser esencial visualizar las posibilidades de diseño de un espacio antes de realizar cambios o recomendar mejoras. Las aplicaciones de diseño y planificación de viviendas ofrecen soluciones innovadoras para crear planos de planta detallados y modelos 3D que brindan una experiencia inmersiva de las modificaciones planificadas.

Los ejemplos populares incluyen SketchUp, AutoCAD Architecture, Floorplanner, Sweet Home 3D, entre otros, para redactar diseños arquitectónicos. Estas herramientas permiten a los usuarios generar representaciones precisas de habitaciones con medidas precisas y, al mismo tiempo, permiten la personalización en términos de ubicación de muebles o combinaciones de colores.

Al utilizar aplicaciones de diseño de viviendas de vanguardia, puede dar vida a los espacios imaginados comunicando de manera efectiva tanto los aspectos funcionales como la estética general, facilitando así la toma de decisiones informadas durante las etapas de desarrollo de su proyecto.

Plataformas de visitas virtuales para una mejor exhibición de propiedades

En la era digital, las plataformas de visitas virtuales se han convertido en herramientas indispensables en la industria inmobiliaria, proporcionando capacidades de exhibición de vanguardia que elevan la participación del cliente e impactan significativamente los procesos de toma de decisiones. Estas aplicaciones especializadas ayudan a crear presentaciones interactivas de propiedades para ofrecer una experiencia de visualización en línea completa.

Los ejemplos notables incluyen Matterport 3D Showcase, iStaging, Kuula y Zillow 3D Home, que brindan experiencias inmersivas al transformar fotos o videos simples en recorridos realistas con opciones adicionales como planos de planta o puntos de acceso integrados que muestran detalles importantes relacionados con la propiedad durante la navegación.

Además, estas aplicaciones a menudo otorgan a los compradores potenciales acceso para ver recorridos a pedido en cualquier dispositivo según su conveniencia, lo cual es una característica invaluable considerando las limitaciones geográficas.

La implementación de soluciones de recorridos virtuales permite a los clientes potenciales una comprensión integral tanto del diseño espacial como del ambiente, al tiempo que aumenta los esfuerzos de marketing de los agentes inmobiliarios.

Herramientas de valoración y análisis para impulsar el análisis de inversiones

La valoración precisa de la propiedad y el análisis de mercado informado son fundamentales para los profesionales de bienes raíces que buscan tomar decisiones de inversión acertadas. Las herramientas de valoración y análisis proporcionan información esencial basada en datos que ayudan a evaluar los valores actuales de las propiedades, calcular el retorno de la inversión potencial o incluso predecir tendencias emergentes en una región específica.

Realtors Property Resource (RPR), Zestimate by Zillow, HouseCanary Pro y Mashvisor son excelentes ejemplos de software de vanguardia desarrollado con estos propósitos en mente. Estas plataformas aprovechan vastas bases de datos llenas de registros históricos de ventas, comparaciones de tarifas de alquiler, información demográfica de vecindarios, así como dinámicas de oferta y demanda dentro de modelos algorítmicos innovadores.

El análisis de mercado comparativo (CMA) es otra característica esencial que ofrecen estas herramientas que permiten a los agentes inmobiliarios examinar múltiples propiedades similares cercanas, generando así estrategias de precios basadas en evidencia basadas en comparables fácticos, eliminando eficazmente las conjeturas en situaciones cruciales de toma de decisiones. .

Soluciones de automatización de marketing para promociones de listado efectivas

Elaborar una estrategia de marketing impactante es esencial para maximizar la exposición de su anuncio de propiedad y, en última instancia, impulsar transacciones exitosas de venta o arrendamiento. Las soluciones de automatización de marketing diseñadas específicamente para el sector inmobiliario pueden mejorar las promociones de listados, nutrir clientes potenciales y mejorar la presencia general de la marca en varios canales digitales.

Ejemplos de dicho software incluyen ActivePipe, Mailchimp (que ofrece un plan inmobiliario), HubSpot CRM (con características específicas de la industria), Placester y Buffini & Company Referral Maker® CRM que se concentran en aspectos como campañas de correo electrónico en propiedades destacadas que atienden directamente al público objetivo.

Estas plataformas permiten a los usuarios crear contenido promocional visualmente impresionante utilizando plantillas ajustadas para listados específicos con componentes multimedia integrados, al mismo tiempo que automatizan la generación de clientes potenciales en función de señales de comportamiento del usuario derivadas de sus patrones de participación en los correos recibidos. Además, los flujos de trabajo de seguimiento automatizados junto con los paneles de análisis aceleran las evaluaciones de desempeño y respaldan la asignación estratégica de recursos alineada con resultados tangibles generados a través de los esfuerzos de marketing.

Conclusiones clave

Como puede ver, las soluciones de software para el hogar y bienes raíces satisfacen diversas necesidades que van desde la gestión de clientes, la supervisión de transacciones, la visualización del diseño de propiedades hasta la valoración de inversiones y campañas de marketing.

Al comprender las capacidades de estas diversas herramientas, le resultará más fácil elegir el software adecuado que se ajuste a sus requisitos específicos y, en última instancia, mejorará su viaje inmobiliario o sus operaciones comerciales de manera eficiente.


]]>
http://oktec.kr/?big=es-sp/blogs/consejos-y-trucos/download-youtube-videos-subtitles 2023-05-26T16:20:00-07:00 2024-04-17T00:17:00-07:00 Download YouTube Subtitles: Save as Text and Video Rick Akura Más

]]>
Are you tired of searching for a reliable way to download YouTube subtitles? Look no further!

In this article, we will guide you through downloading YouTube subtitles as text or video so you can enjoy your favorite videos with accurate captions.

Let's dive in and learn how to save YouTube subtitles in just a few easy steps.

Table of Contents

  1. The importance of subtitles in videos
  2. How to download youtube video with subtitles
  3. How to download YouTube subtitles as text
  4. How To Download Youtube Videos With Subtitles On Phone
  5. Why some videos do not come with subtitles
  6. The benefits of using subtitles for language learning
  7. Best youtube downloader with subtitles 
  8. FAQs
  9. Final Thoughts

The importance of subtitles in videos

Subtitles are words appearing on the screen while watching a video. They show what the people in the video are saying but in a different language. 

This makes it easier for people who speak a different language than the video to understand what's happening.

But subtitles aren't just for people who speak a different language. They're also helpful for people who are hard of hearing, which means they have trouble hearing. With subtitles, they can read what people are saying instead of relying on their ears.

Subtitles can also make videos more popular. When videos have subtitles, they can be watched by more people worldwide. This can help content producers reach a wider audience and get more views. 

Subtitles can also help videos appear higher in search results, called SEO.

How to Download YouTube Video with Subtitles

If you want to download a YouTube video and its subtitles, you can use a website called SaveSubs. Here are the steps to follow:

  1. Find the YouTube video you want to download and copy its URL. You can do this by clicking on the video and copying the address from the address bar at the top of your web browser.
    Find the YouTube video you want to download and copy its URL. You can do this by clicking on the video and copying the address from the address bar at the top of your web browser.
  2. Go to the SaveSubs website and paste the YouTube video URL into the text box on the page.
    Go to the SaveSubs website and paste the YouTube video URL into the text box on the page.
  3. Click on the " Download" button, and SaveSubs will extract the subtitles from the video and allow you to download them in either SRT or TXT format.
    Click on the
  4. Choose the format you prefer and click on the download button. The subtitles will download to your computer.
    Choose the format you prefer and click on the download button. The subtitles will download to your computer.

Now you have a copy of the video and its subtitles on your computer. You can use the subtitles to help you understand what is said in the video, even if you need to speak the language fluently.

Now you have a copy of the video and its subtitles on your computer. You can use the subtitles to help you understand what is said in the video, even if you need to speak the language fluently.


Note that downloading videos from YouTube may violate their terms of service, and it is important to use these methods only for personal, non-commercial use.

How to download YouTube subtitles as text

You can download the words, also known as subtitles or captions, from the video as text. Here's how you can do it:

  1. Go to the video you want to download the subtitles for.
  2. Click the three dots (the "more options" menu) under the video.
  3. Click "open transcript." This will open up a text box showing all the words spoken in the video.
    Click
  4. Use your mouse to click and drag your cursor over the entire transcript to highlight it.
    Use your mouse to click and drag your cursor over the entire transcript to highlight it.
  5. Once the transcript is highlighted, copy it by pressing "Ctrl + C" on a Windows computer or "Command + C" on a Mac computer.
  6. Open a text editor, like Notepad or TextEdit, and paste the text by pressing "Ctrl + V" on a Windows computer or "Command + V" on a Mac computer.
    Open a text editor, like Notepad or TextEdit, and paste the text by pressing
  7. Finally, save the text file to your computer to read the subtitles anytime!

By following these simple steps, you can easily download subtitles from YouTube videos as text.

How To Download Youtube Videos With Subtitles In Phone

If you want to download a YouTube video and its subtitles on your phone, you can use a website called SaveSubs. Here are the steps to follow:

  1. Find the YouTube video you want to download and copy its URL. You can do this by clicking on the video and copying the address from the address bar at the top of your web browser.
  2. Open your phone's web browser and go to the SaveSubs website.
  3. Paste the YouTube video URL into the text box on the page.
    Paste the YouTube video URL into the text box on the page.
  4. Click on the "Extract and Download" button, and SaveSubs will extract the subtitles from the video and allow you to download them in either SRT or TXT format.
  5. Choose the format you prefer and click on the download button. The subtitles will download to your phone.
    Choose format

Now you have a copy of the video and its subtitles on your phone. You can use the subtitles to help you understand what is said in the video, even if you need to speak the language fluently.

Why some videos do not come with subtitles

There are a few reasons why this might happen:

  1. It could be because the video is still being processed. Sometimes, if a video has complex audio, it can take a while for YouTube to generate subtitles.
  2. Automatic subtitles might not be available in the video's language. This means the video's owner may need to add subtitles manually.
  3. If a video is long, it might be too much for YouTube's automatic captioning system to handle. In this case, the video's owner must add subtitles.

It's important to remember that not all videos have subtitles available. It's up to the video owner to decide whether or not to add them. 

However, if they are available, you can change your computer's or mobile device's settings to show subtitles by default. And if subtitles are available, you can customize them to make them easier to read.

The benefits of using subtitles for language learning

Watching videos with subtitles is a great way to improve language skills, especially for those learning a new language. Subtitles help increase reading speed and improve listening comprehension.

We are exposed to visual and audio cues when watching video with subtitles. This can help us understand the meaning of words and phrases that we might not have been able to comprehend otherwise. 

By seeing the words on the screen as we hear them spoken, we can begin to associate the sounds with their written form.

For people who are learning English as a second language, subtitles can be particularly helpful. It can be difficult to follow along with speech that is spoken quickly, has an accent, or is mumbled. 

Closed captions make it easier to understand what is being said and follow along with the dialogue.

Best youtube downloader with subtitles 

If you want to download YouTube videos with subtitles, there are some great tools that you can use. Here are five of the best tools for downloading YouTube videos with subtitles:

  1. Wondershare UniConverter: This tool is great for editing videos and adding subtitles. It offers various options in its subtitle downloader tool, allowing users to download subtitles for their videos in multiple formats and languages.
  2. YeetDL: This tool is straightforward and has a beautiful interface that is easy to use. It allows users to edit and download videos in various languages, making them more understandable.
  3. Aimersoft: This tool is perfect for downloading videos quickly and efficiently. It allows users to download videos in various qualities and formats, and it is straightforward to use.
  4. DownSub: This website is free and easy to navigate, making it easier for users to find subtitles for their videos. It contains subtitles for almost all videos and allows you to download files in various formats.
  5. 4K Download software: This tool has an interactive interface and can be downloaded directly onto your system. It allows users to download videos in the highest possible quality of 4K HD and download subtitles for videos on various platforms.

These are some of the best tools for downloading YouTube videos with subtitles. Each tool has unique features and benefits, so it is up to you to decide which works best for you.

FAQs

How to download YouTube video with subtitles on android?

You can use third-party apps like TubeMate or Snaptube to download YouTube videos with subtitles on Android.

How do I download a SRT file from YouTube?

You can use online subtitle downloaders such as DownSub or KeepSub to download an SRT file from YouTube.

How do I download subtitles to YouTube on my phone?

Unfortunately, you cannot directly download subtitles from YouTube on your phone, but you can use external websites or apps to download them separately.

How to download video with subtitles?

You can use online video downloaders like SaveFrom.net or 4K Video Downloader to download videos with subtitles from platforms like YouTube.

How can I download subtitles in Mobile?

You can use subtitle download apps like Subloader or Subtitle Downloader to download subtitles directly on your mobile device.

Final Thoughts

Downloading YouTube videos with subtitles can greatly improve language skills or help you enjoy content without sound. 

Following a few simple steps, you can easily download the video and subtitles separately or as a single file. 

Access to subtitles can also make videos more accessible to a wider audience, including foreign-language speakers and hard-of-hearing individuals. 

While some videos may not have subtitles, there are still plenty of options for finding videos with subtitles, including YouTube's automatic captioning feature. 

Overall, downloading YouTube videos with subtitles is a useful skill that can enhance the viewing experience for many people.

One more thing

If you have a second, please share this article on your socials; someone else may benefit too. 

Subscribe to our newsletter and be the first to read our future articles, reviews, and blog post right in your email inbox. We also offer deals, promotions, and updates on our products and share them via email. You won’t miss one.

Related articles 

» How To Fix “You’re Offline. Check Your Connection” on YouTube
» How To Check Your YouTube Comment History (Desktop & Mobile)
» Expert Guide: How to Convert YouTube to MP3

]]>
http://oktec.kr/?big=es-sp/blogs/consejos-y-trucos/delete-rename-software-distribution-folder-windows-10-11 2023-05-26T05:26:00-07:00 2024-04-03T22:43:42-07:00 How to Delete or Rename Software Distribution Folder in Windows 10/11 Rick Akura Más

]]>
If you're a Windows 10 or 11 users, you may have encountered issues with your system's automatic update feature. 

One solution to this problem is to delete or rename the Software Distribution folder, which stores files related to Windows updates.

In this step-by-step guide, we'll show you how to delete or rename the Software Distribution folder in Windows 10/11. 

So, let's get started and learn how to delete or rename the Software Distribution folder in Windows 10/11. 

Table of Contents

  1. What is the Software Distribution folder
  2. Why do Windows update issues occur
  3. How does deleting or renaming the Software Distribution folder help with Windows update issues
  4. Steps to delete the Software Distribution folder in Windows 10/11
  5. Steps to rename the Software Distribution folder in Windows 10/11
  6. How to prevent Windows update issues in the future
  7. FAQs
  8. Final Thoughts

What is the Software Distribution folder

The Software Distribution folder is a special folder in Windows that helps your computer to receive important updates. When your computer gets a new update from Microsoft, the update files are downloaded and saved to the Software Distribution folder. 

These files are then used to install the updates on your computer.

The Software Distribution folder is important because it helps your computer stay up-to-date and secure. Updates often include:

  • Important bug fixes
  • Security patches
  • New features that can improve your computer's performance

It is in the Windows directory, a special folder on your computer that holds important system files. You can find the Software Distribution folder by going to the Windows directory on your computer.

Sometimes, however, the files in the Software Distribution folder can become corrupted, which can cause problems with Windows updates. Deleting or renaming the folder may be necessary to fix the problem.

Deleting or renaming the Software Distribution folder is a safe and effective method for resolving Windows update issues. It can help ensure your computer receives the updates to stay secure and run smoothly.

Why do Windows update issues occur

Sometimes, when you try to update your Windows operating system, you may encounter issues that prevent the update from completing. 

Different things can cause these issues, but here are some of the most common reasons why Windows update issues occur:

  1. Corrupted or missing system files: System files are important for your computer to function properly. If these files become corrupted or are deleted, it can cause problems with Windows Update and prevent them from working correctly.
  2. Connectivity issues: Windows Update requires a stable and fast internet connection to download and install updates. If your internet connection is slow or unstable, it can cause issues with Windows Update.
  3. Outdated drivers: Drivers are software programs that help your computer communicate with hardware devices. Outdated or corrupted drivers can cause issues with Windows Update.
  4. Insufficient storage space: Windows updates require a certain amount of storage space to download and install. If your computer lacks free space, it can cause issues with Windows Update.
  5. Third-party software conflicts: Some third-party software programs can cause issues with Windows Update. Ensuring that any installed software is compatible with your operating system is important.

How does deleting or renaming the Software Distribution folder help with Windows update issues

If you are having Windows Update issues, one solution you can try is to delete or rename the Software Distribution folder. This folder contains files used by Windows Update; if they become corrupted, it can cause problems with the update process.

Renaming the Software Distribution folder is a safe and effective method for resolving Windows update issues. When you rename the folder, it creates a new Software Distribution folder, which can fix any issues that corrupted files in the original folder may have caused.

To rename the Software Distribution folder, you can follow these steps:

  1. Open the Command Prompt as an administrator.
  2. Type the command "net stop wuauserv" and press Enter. This stops the Windows Update service.
    Type the command
  3. Type the command "net stop bits" and press Enter. This stops the Background Intelligent Transfer Service.
    Type the command
  4. Go to the Windows directory on your computer and find the Software Distribution folder.
    Go to the Windows directory on your computer and find the Software Distribution folder
  5. Right-click on the folder and select "Rename."
  6. Change the name of the folder to "Software Distribution.old" and press Enter.
    Change the name of the folder to
  7. Close the Command Prompt and restart your computer.

After renaming the Software Distribution folder, you can try running Windows Update again to see if the issue has been resolved.

Steps to delete the Software Distribution folder in Windows 10/11

If you're having issues with Windows Update, you may need to delete the Software Distribution folder. This folder contains files used by Windows Update; if they become corrupted, it can cause problems with the update process. 

Here's how you can delete the Software Distribution folder in Windows 10 or 11:

  1. Restart your computer and enter Safe Mode. This special mode allows you to perform maintenance tasks without interference from other programs.
  2. Open File Explorer by clicking the folder icon in your taskbar or pressing the Windows key + E.
  3. Navigate to the C:\Windows\SoftwareDistribution folder. You can do this by clicking on This PC, selecting Local Disk (C:), then Windows, and finally SoftwareDistribution.
  4. Once you've opened the folder, press Ctrl + A to select all the files and folders.
  5. Press the Delete key on your keyboard. You'll be prompted to confirm the deletion, so ensure you delete the correct files.
    Press the Delete key on your keyboard. You'll be prompted to confirm the deletion, so ensure you delete the correct files
  6. Close File Explorer and restart your computer normally.

After you've deleted the Software Distribution folder, Windows will recreate it the next time you try to update your computer. This should fix any issues you were experiencing with Windows Update.

Steps to rename the Software Distribution folder in Windows 10/11

If you're having issues with Windows Update, you may need to rename the Software Distribution folder. This folder contains files used by Windows Update; if they become corrupted, it can cause problems with the update process. 

Here's how you can rename the Software Distribution folder in Windows 10 or 11:

  1. Press the Windows key + R to open the Run dialog box.
  2. Type "msconfig" (without the quotes) in the box and hit Enter.
    Type
  3. In the System Configuration window that appears, click on the "Boot" tab.
  4. Check the "Safe boot" box and select "Minimal" from the options below.
  5. Click on "Apply" and then "OK."
    Restart your computer. Your computer will now start in Safe Mode.
    Click on

  6. Open the Command Prompt by pressing the Windows key + X and selecting "Command Prompt (Admin)" from the menu that appears.
  7. In the Command Prompt window, type "ren C:\Windows\SoftwareDistribution SoftwareDistribution.old" (without the quotes) and hit Enter.
    In the Command Prompt window, type
  8. Close the Command Prompt window and restart your computer normally.

After you've renamed the Software Distribution folder, Windows will create a new one when you try to update your computer. This should fix any issues you were experiencing with Windows Update.

How to prevent Windows update issues in the future

Windows updates are important for keeping your computer running smoothly and securely. However, if you've experienced issues with Windows updates in the past, you may be wondering how to prevent them from happening again in the future. 

Here are some steps you can take to prevent Windows update issues:

  1. Go to Control Panel > System and Security > Security and Maintenance > Maintenance > Stop Maintenance. This will prevent your computer from performing maintenance tasks that could interfere with updates.
    Go to Control Panel > System and Security > Security and Maintenance > Maintenance > Stop Maintenance
  2. Turn off automatic updates to cancel any updates in progress and prevent future updates.

    To do this:

    • Go to Settings 
    • Update & Security 
    • Windows Update
    • Advanced Options
    • Choose how updates are delivered 
    • Toggle off "Updates from more than one place."
    • Set "Automatically download updates" to "Off."
  3. On Windows 10 Pro, you can use the Group Policy Editor to disable automatic updates. 
  • Press Windows key + R, type "gpedit.msc" and hit Enter
  • In the Local Group Policy Editor, navigate to Computer Configuration > Administrative Templates > Windows Components > Windows Update
  • Double-click on "Configure Automatic Updates" and select "Disabled."

By taking these steps, you can prevent future Windows update issues and ensure your computer stays up-to-date and secure.

FAQs

How do I rename a Software Distribution folder in Windows 11?

To rename the Software Distribution folder in Windows 11, you need to stop the Windows Update service, navigate to the folder location (C:\Windows\SoftwareDistribution), right-click on it, select "Rename," and enter the desired name.

How do I rename a Windows Software Distribution folder?

To rename the Windows Software Distribution folder, you should stop the Windows Update service, go to the folder location (C:\Windows\SoftwareDistribution), right-click on it, choose "Rename," and provide a new name for the folder.

Can I delete Windows Software Distribution folder?

Yes, you can delete the Windows Software Distribution folder, but it is recommended to stop the Windows Update service before deleting it to avoid potential issues.

What happens if we delete Software Distribution folder?

If you delete the Software Distribution folder, it will be recreated automatically by Windows when you restart the Windows Update service, and it will clear the update history and temporary files associated with Windows Updates.

Is it safe to delete SoftwareDistribution old?

Yes, it is generally safe to delete the "SoftwareDistribution.old" folder, which is created when you perform a Windows update, as it contains previous versions of the Software Distribution folder, and deleting it will free up disk space.

Final Thoughts

In conclusion, renaming or deleting the Software Distribution folder can help resolve Windows update issues. Windows use this folder to store updated files temporarily, and problems can occur if these files become corrupted or outdated. 

Renaming or deleting the folder can allow Windows to rebuild it from scratch and potentially fix any issues. However, following the steps correctly and using caution when deleting files from your system is important. 

Additionally, future update issues can be prevented by disabling automatic updates or stopping maintenance tasks in the Windows settings. Managing Windows updates can be frustrating, but it can be made easier with the right knowledge and tools.

One more thing

If you have a second, please share this article on your socials; someone else may benefit too. 

Subscribe to our newsletter and be the first to read our future articles, reviews, and blog post right in your email inbox. We also offer deals, promotions, and updates on our products and share them via email. You won’t miss one.

Keep Learning 

» Why Does Windows 11 Need TPM 2.0? What is TPM?
» How to Fix ‘Hardware Problems Were Detected’ Error on Windows Memory Diagnostic
» Fixed: Windows Could Not Automatically Detect This Network’s Proxy Settings


]]>
http://oktec.kr/?big=es-sp/blogs/consejos-y-trucos/fix-hbo-max-errors-url 2023-05-25T23:41:00-07:00 2024-04-17T00:24:53-07:00 Fix HBO Service Codes 905, H, 100, 321, 420 and Can't Play Title Rick Akura Más

]]>
En este artículo, proporcionaremos una guía completa sobre cómo solucionar los códigos de servicio HBO 905, H, 100, 321, 420 y el problema "no se puede reproducir el título".

Hemos recopilado pasos fáciles de seguir que te ayudarán a corregir estos errores y volver a disfrutar de tu contenido favorito en HBO Max.

Al final de este artículo, comprenderá mejor cómo solucionar los códigos de servicio de HBO y el problema "no se puede reproducir el título".

Entonces, comencemos y solucionemos estos errores juntos.

Índice

  1. ¿Qué son los códigos de servicio de HBO?
  2. Comprender el problema "no se puede reproducir el título"
  3. Pasos para solucionar errores de transmisión en HBO Max
  4. Verificar el estado del servidor HBO Max
  5. Corregir los códigos de error de HBO Max reinstalando o actualizando la aplicación
  6. Desactivación de VPN y proxy web para HBO Max
  7. Borrar caché máxima de HBO
  8. Solución de errores de HBO Max causados ​​por problemas de conexión a Internet
  9. ¿Por qué no recibo el código de HBO Max?
  10. Preguntas frecuentes
  11. Pensamientos finales

¿Qué son los códigos de servicio de HBO?

Los códigos de servicio de HBO son mensajes de error que puede encontrar mientras transmite contenido en HBO Max. Estos códigos de error están destinados a ayudarle a solucionar problemas y resolver cualquier problema que pueda surgir durante el uso de la plataforma.

Los códigos de servicio más comunes incluyen 905, H, 100, 321 y 420.

  • Código de servicio HBO 905 indica un problema de conectividad entre su dispositivo y el servidor HBO Max. Este error puede deberse a una velocidad de Internet lenta o una conexión Wi-Fi deficiente.
  • El código de servicio HBO H se refiere a un problema con la aplicación HBO Max o el dispositivo que utiliza para transmitir contenido.
  • Código de servicio HBO 100 indica que es posible que HBO Max no sea compatible con su dispositivo o que es necesario actualizar su navegador.
  • El código de servicio HBO 321 está relacionado con un problema con su cuenta o suscripción. Este error puede ocurrir si su cuenta no está autorizada para acceder a cierto contenido.
  • Código de servicio HBO 420 indica un problema con la reproducción de video. Los controladores de vídeo obsoletos o no compatibles pueden provocar este error.

Si encuentra alguno de estos códigos de servicio, no se preocupe. Puede solucionarlos fácilmente siguiendo algunos pasos sencillos de solución de problemas.

Comprender el problema "no se puede reproducir el título".

Si ves el mensaje de error "HBO Max no puede reproducir el título", la plataforma tiene problemas para reproducir el contenido seleccionado. Este problema puede ocurrir por varias razones, pero la causa más común es el uso de un dispositivo o modelo no compatible.

HBO Max tiene una lista de dispositivos compatibles que puedes verificar para ver si tu dispositivo es compatible. Para hacer esto, puedes visitar el Centro de ayuda de HBO Max, donde puedes encontrar una lista de dispositivos compatibles. Si su dispositivo está fuera de la lista, puede encontrar problemas al transmitir contenido.

Además de usar un dispositivo no compatible, el problema "no se puede reproducir el título" puede ocurrir debido a una conexión a Internet lenta o una versión desactualizada de la aplicación HBO Max. Si encuentra este mensaje de error, puede solucionar el problema actualizando su aplicación o verificando su conexión a Internet.

Pasos para solucionar errores de transmisión en HBO Max

Verificar el estado del servidor HBO Max

Puedes utilizar un sitio web llamado Downdetector para ver si los servidores de HBO Max están inactivos. Este sitio web comprueba si el servicio funciona correctamente o no. Si los servidores de HBO Max no funcionan, tendrá que esperar hasta que un ingeniero de servicio de HBO resuelva el problema.

Para verificar el estado del servidor usando Downdetector, vaya a su sitio web y escriba "HBO Max" en la barra de búsqueda. El sitio web le mostrará el estado actual del servicio. Si hay un corte en su área, puede informarlo al sitio web.

Corregir los códigos de error de HBO Max reinstalando o actualizando la aplicación

A veces, los archivos de instalación de la aplicación HBO Max en su dispositivo pueden dañarse con virus, lo que puede provocar que la aplicación falle y muestre diferentes códigos de error. La solución a este problema es desinstalar la aplicación de su dispositivo y reinstalarla.

Esto eliminará los archivos dañados y los reemplazará por otros nuevos.

Para desinstalar la aplicación HBO Max, debe ir a la configuración de la aplicación en su dispositivo y seleccionar la opción para desinstalar. Después de desinstalar la aplicación, vaya a la tienda de aplicaciones de su dispositivo y busque HBO Max.

Descargue e instale la aplicación nuevamente. Utilice una fuente confiable para descargar la aplicación y evitar descargar malware.

Desactivación de VPN y proxy web para HBO Max

Cuando utiliza una VPN o un proxy web, su conexión a Internet puede ser redirigida a través de un servidor diferente en otro país. Esto puede causar un problema al intentar acceder a la aplicación HBO Max y es posible que reciba un mensaje de error con el código 905.

Para solucionar este problema, debe desactivar la VPN o el proxy web que está utilizando.

Desactivar una VPN o un proxy web es fácil. Debes ir a la configuración de tu dispositivo y desactivar la opción VPN o proxy web.

Después de apagarlo, es posible que tengas que esperar unos minutos para que la aplicación HBO Max detecte tu ubicación. Una vez que la aplicación detecte su ubicación, debería poder acceder a la aplicación sin ningún problema.

Es importante tener en cuenta que el uso de una VPN o un proxy web puede violar los términos de servicio de HBO Max, y es mejor evitar usarlos al usar la aplicación. Si continúa experimentando problemas después de desactivar la VPN o el proxy web, es posible que deba probar otros métodos de solución de problemas o comunicarse con el servicio de atención al cliente de HBO Max para obtener más ayuda.

Borrar caché máxima de HBO

Borrar el caché de HBO Max puede ayudar a resolver problemas con la aplicación. Si estás mirando en una computadora usando Google Chrome, sigue estos sencillos pasos:

  1. Abre Google Chrome en tu computadora.
  2. Haga clic en los tres puntos en la esquina superior derecha de la ventana.
  3. Haga clic en "Más herramientas" y luego en "Borrar datos de navegación"."
    Clear browsing data
  4. Seleccione "Cookies y otros datos del sitio" e "Imágenes y archivos en caché", luego haga clic en "Borrar datos"."
    Select

Si miras HBO Max en un dispositivo móvil, ve a la configuración del dispositivo, busca la opción "Aplicaciones" y luego selecciona "HBO Max"." Desde allí, puedes borrar el caché de la aplicación.

Al borrar el caché, puedes eliminar cualquier archivo temporal que pueda estar causando problemas con HBO Max, lo que puede resolver el problema.

Solución de errores de HBO Max causados ​​por problemas de conexión a Internet

Explicación: Si experimentas errores de HBO Max, podría deberse a una mala conexión a Internet. Aquí hay algunos pasos que puedes seguir para solucionarlo:

  1. Compruebe si otros dispositivos conectados al mismo Wi-Fi tienen problemas de Internet.
  2. Reinicie su enrutador y vea si el problema persiste. Si es así, comuníquese con su proveedor de servicios de Internet (ISP).
  3. Si su dispositivo de transmisión tiene problemas con Internet, intente arreglar la conexión lenta o aumentar su velocidad.

Si sigue estos pasos, puede asegurarse de que su conexión a Internet sea estable y admita la transmisión en HBO Max sin errores.

¿Por qué no recibo el código de HBO Max?

Pruebe algunas cosas si tiene problemas para obtener un código HBO Max. Primero, utilice un navegador web diferente como Chrome, Firefox, Microsoft Edge o Safari.

Si eso no funciona, intente obtener un código nuevo. Para hacer esto, elija "Iniciar sesión" nuevamente en su televisor.

Si aún tienes problemas, intenta usar una computadora en lugar de tu teléfono. Ir a hbomax.com/activate e ingresa el código que aparece en tu televisor.

También es importante asegurarse de tener una suscripción válida a HBO Max y utilizar las credenciales de inicio de sesión correctas. Comuníquese con el servicio de atención al cliente de HBO Max si necesita ayuda después de seguir estos pasos.

Recuerde, es normal encontrar errores ocasionales al usar cualquier servicio de transmisión, pero la mayoría de los problemas se pueden resolver con un poco de solución de problemas.

Preguntas frecuentes

¿Qué es el código de error 321 en HBO Max?

El código de error 321 en HBO Max generalmente indica un problema de conectividad entre el dispositivo de transmisión y los servidores de HBO Max.

¿Qué es el código de error 905 en HBO Max?

El código de error 905 en HBO Max generalmente ocurre cuando hay un problema con la cuenta o la información de suscripción.

¿Cómo soluciono el código de error en HBO Max?

Para corregir un código de error en HBO Max, puede intentar solucionar pasos como reiniciar el dispositivo de transmisión, borrar el caché, actualizar la aplicación, verificar su conexión a Internet o comunicarse con el soporte de HBO Max para obtener más ayuda.

¿Por qué el título de HBO Max no está disponible en mi región?

Si un título de HBO Max no está disponible en su región, probablemente se deba a acuerdos de licencia de contenido o restricciones impuestas por los propietarios del contenido que limitan la disponibilidad de ciertos títulos a regiones geográficas específicas.

¿Por qué no se reproduce mi película en HBO Max?

Si una película no se reproduce en HBO Max, puede haber varias razones, como una mala conexión a Internet, problemas de compatibilidad con el dispositivo o el navegador, una versión desactualizada de la aplicación o posibles restricciones regionales sobre el contenido. Los pasos para solucionar problemas, como reiniciar el dispositivo, actualizar la aplicación o verificar la conexión a Internet, pueden ayudar a resolver el problema.

Pensamientos finales

En conclusión, los códigos de error 905, H, 100, 321, 420 y "No se puede reproducir el título" de HBO Max son problemas comunes que pueden interrumpir tu experiencia de streaming. Estos errores pueden ocurrir por varias razones, incluida una mala conexión a Internet, archivos de instalación dañados, VPN o proxy web y problemas con el servidor.

Sin embargo, puedes corregir estos errores probando soluciones simples como borrar el caché, deshabilitar VPN o proxy web, actualizar o reinstalar la aplicación HBO Max y arreglar tu conexión a Internet. Si el problema persiste, puedes comunicarte con el equipo de soporte de HBO Max o con tu proveedor de servicios de Internet para obtener más ayuda.

Con estos consejos, podrás disfrutar de streaming ininterrumpido en HBO Max y ver tus películas y programas de TV favoritos sin interrupciones.

Una cosa más

Si tienes un segundo, comparte este artículo en tus redes sociales; alguien más también puede beneficiarse.

Suscríbase a nuestro boletín y sea el primero en leer nuestros futuros artículos, reseñas y publicaciones de blog directamente en su bandeja de entrada de correo electrónico. También ofrecemos ofertas, promociones y actualizaciones sobre nuestros productos y las compartimos por correo electrónico. No te perderás ninguno.

Artículos relacionados 

» Cómo reparar el código de error 73 de Disney Plus [actualizado]
» Zoom Código de error "No se puede conectar" 5003 (solucionado)
» ¿Spotify Web Player no funciona? ¿Qué hacer?


]]>
http://oktec.kr/?big=es-sp/blogs/consejos-y-trucos/avast-core-shields-wont-enable 2023-05-25T05:20:00-07:00 2024-04-17T00:26:47-07:00 Troubleshooting: Avast Mail Shield Will Not Turn On? Follow Our Guide Rick Akura Más

]]>
No está solo si tiene un problema en el que Avast Mail Shield no se enciende. Muchos usuarios han informado de este problema, que puede resultar frustrante al intentar mantener segura su computadora.

Nuestra guía lo guiará a través de los pasos de solución de problemas para ayudarlo a solucionar el problema y hacer que Avast Mail Shield vuelva a funcionar.

Así que profundicemos y restablezcamos la protección de su correo electrónico.

Índice

  1. ¿Qué es Avast Mail Shield?
  2. Problemas comunes con Avast Mail Shield
  3. Importancia de Avast Mail Shield
  4. Avast Web Shield: lista de verificación inicial
  5. Cómo actualizar Avast para resolver la desactivación de Behavior Shield
  6. Cómo reparar Avast Antivirus para corregir la desactivación de Behavior Shield
  7. Preguntas frecuentes
  8. Pensamientos finales

¿Qué es Avast Mail Shield?

Avast Mail Shield es una herramienta especial que revisa sus correos electrónicos en busca de virus y otras cosas dañinas que puedan dañar su computadora. Cuando envía o recibe correos electrónicos utilizando programas como Microsoft Outlook o Mozilla Thunderbird, Mail Shield se asegurará de que no haya nada malo escondido en sus mensajes.

Avast es un popular software antivirus que ayuda a proteger su computadora de todo tipo de problemas. Se puede utilizar en muchos tipos diferentes de computadoras, como:

  • Windows
  • macOS
  • Android
  • IOS

No solo mantiene su computadora a salvo de virus, sino que también lo ayuda a protegerse cuando está en Internet.

Behavior Shield es otra característica interesante de Avast Antivirus que puede observar todo lo que sucede en su computadora en tiempo real. Si nota algo sospechoso o malo, lo detendrá antes de que pueda causar algún daño.

Entonces, ¿cómo funciona el Escudo de Comportamiento? ¡Es como un superhéroe! Puede saber si un archivo en su computadora se parece a otros archivos malos que han causado problemas antes, incluso si nadie ha visto ese archivo en particular antes.

Luego, evitará que ese archivo le haga algo malo a su computadora.

Problemas comunes con Avast Mail Shield

A veces, es posible que necesite ayuda para que Avast Mail Shield funcione correctamente. Estos son algunos problemas comunes con los que se topa la gente:

  1. Mail Shield no se activa. Esto puede resultar frustrante, pero hay algunas cosas que puedes intentar solucionar. Debe actualizar su software Avast o asegurarse de que su conexión a Internet funcione correctamente.
  2. Mail Shield está ralentizando su computadora. Si bien Mail Shield es excelente para mantener segura su computadora, puede utilizar muchos de sus recursos. Si tiene problemas con el rendimiento lento, ajuste la configuración de Mail Shield o utilice otro software antivirus que consuma menos recursos.
  3. Mail Shield está bloqueando correos electrónicos legítimos. A veces, Mail Shield se vuelve demasiado entusiasta y bloquea correos electrónicos que son seguros. Si esto sucede, intente ajustar la configuración de Mail Shield para que sea menos estricta.
  4. Mail Shield deja pasar correos electrónicos dañinos. Por otro lado, Mail Shield puede pasar por alto los correos electrónicos dañinos que desea detectar. Esto puede ser un problema grave, así que mantenga actualizado su software antivirus y tenga buen criterio al abrir correos electrónicos.

Si bien Avast Mail Shield es una herramienta importante para mantener su computadora segura, a veces puede causar problemas. Si sigue algunos pasos sencillos de solución de problemas, puede ayudar a solucionarlos y asegurarse de que su computadora permanezca protegida.

Importancia de Avast Mail Shield

Avast Mail Shield es una herramienta muy importante que ayuda a mantener su computadora a salvo de elementos dañinos que podrían ocultarse en sus correos electrónicos. Cuando envía o recibe correos electrónicos utilizando programas como Microsoft Outlook, Mail Shield revisa sus mensajes para asegurarse de que no se esconde nada malo en su interior.

Esto es importante porque hay muchas cosas malas en Internet que pueden dañar su computadora. A veces, las personas pueden enviarte correos electrónicos con virus o enlaces a sitios web que intentan engañarte para que proporciones tu información personal.

Mail Shield puede ayudarle a protegerse de estas cosas al revisar cada correo electrónico que entra o sale de su computadora.

Avast Web Shield: lista de verificación inicial

A continuación se indican algunas cosas que puede hacer antes de probar cualquier solución si tiene problemas con Avast Web Shield:

  1. Reinicie su computadora. Reiniciar puede solucionar problemas menores como fallas de software o problemas con la carga de todos los servicios y procesos.
  2. Ejecute Avast con privilegios de administrador. La necesidad de Avast de obtener más permisos puede afectar funciones importantes como Core Shields. Entonces, intente ejecutar Avast como administrador y vea si puede activar Core Shields sin problemas.
  3. Actualizar Avast. Si su versión de Avast necesita actualizarse o ser compatible con su versión actual de Windows, podría causar problemas con Web Shield. Compruebe si hay una actualización disponible para Avast y asegúrese de que sea compatible con su sistema operativo.

Puedes solucionar el problema sin probar soluciones complicadas realizando estas sencillas tareas. Si ninguno funciona, puede pasar a soluciones más avanzadas.

Cómo actualizar Avast para resolver la desactivación de Behavior Shield

Si tiene problemas con Avast Behavior Shield al apagarse solo, existe una solución que puede probar. A veces, Behavior Shield puede dejar de funcionar después de reiniciar o encender su computadora.

Pero no se preocupe, la primera solución es fácil: todo lo que necesita hacer es actualizar su software Avast a la última versión.

Para actualizar Avast, siga estos pasos:

  1. Abra el programa antivirus Avast: busque el icono de Avast en la esquina inferior derecha de su pantalla o en su escritorio y haga clic en él para abrir el programa.
  2. Actualizar Avast: Haga clic en el botón Menú en la esquina superior derecha del programa.
    Click on the Menu button in the top right corner of the program
  3. Elija Configuración: Vaya a la pestaña Actualizar en la ventana emergente.
    Go to the Update tab in the pop-up window
  4. Haga clic en VERIFICAR ACTUALIZACIONES.
    Click CHECK FOR UPDATES

Una vez que haya actualizado Avast a la última versión, ejecute el programa nuevamente para ver si Behavior Shield todavía se apaga solo. Si es así, existen otras soluciones que puedes probar.

Pero actualizar a la última versión es un buen primer paso para mantener su computadora segura y protegida de virus y otros elementos dañinos en Internet.

Cómo reparar Avast Antivirus para corregir la desactivación de Behavior Shield

Avast Antivirus es un programa popular que puede proteger su computadora contra virus y malware. Sin embargo, su Behavior Shield a veces puede apagarse solo, haciendo que su computadora sea vulnerable a las amenazas.

En este caso, reparar el programa antivirus Avast puede ser una solución eficaz. Debe seguir algunos pasos sencillos para reparar el programa antivirus Avast.

  1. Inicie Avast haciendo clic en su icono en la bandeja del sistema o en el escritorio.
  2. Haga clic en el botón "Menú" en la esquina derecha de la interfaz principal y seleccione "Configuración"." 
  3. Vaya a la pestaña "Solución de problemas" y haga clic en "REPARAR APLICACIÓN" para iniciar el proceso de reparación.
    Troubleshooting
  4. Espere a que se complete el proceso y luego reinicie el programa para verificar si el problema está resuelto.

Si esta solución no funciona, puede probar otras soluciones o ponerse en contacto con el soporte de Avast para obtener más ayuda. Mantener su programa antivirus actualizado y escanear periódicamente su computadora puede evitar estos problemas.

Preguntas frecuentes

¿Cómo habilito Avast File Shield?

Para habilitar Avast File Shield, abra el programa antivirus Avast, vaya a "Protección" en el menú de la izquierda, haga clic en "Core Shields" y cambie el interruptor junto a "File Shield" a " posición "ENCENDIDO".

¿Por qué no se abre el antivirus Avast?

Si el antivirus Avast no se abre, intente reiniciar su computadora, asegurándose de que Avast esté actualizado o reinstalando el programa para resolver cualquier posible conflicto de software.

¿Cómo activo Web Shield?

Para activar Web Shield en Avast, abra el programa antivirus Avast, navegue hasta "Protección" en el menú de la izquierda, haga clic en "Core Shields" y mueva el interruptor junto a "Web Shield" para la posición "ON".

¿Cómo soluciono que mi antivirus no se abre?

Si su antivirus no se abre, intente reiniciar su computadora, verifique si hay software o malware conflictivo o reinstale el programa antivirus para solucionar cualquier problema potencial.

¿Cómo soluciono que la protección antivirus no se abre?

Si la protección antivirus no se abre, puede intentar reiniciar su computadora, actualizar el software antivirus, realizar un análisis completo del sistema o reinstalar el programa antivirus para solucionar cualquier problema potencial.

Pensamientos finales

En conclusión, si tiene problemas con Avast Core Shields al desactivarse y no habilitarse, existen varias soluciones que puede probar. En primer lugar, verifique si su dispositivo está actualizado y reinicie su PC, ya que de esta manera se pueden resolver problemas menores como fallas de software.

Si eso no funciona, intente ejecutar Avast con privilegios de administrador o repare el programa. Actualizar Avast a la última versión también puede resolver problemas de compatibilidad entre la aplicación y los módulos del sistema operativo.

Si ninguna de estas soluciones funciona, puede desactivar cualquier aplicación conflictiva o ponerse en contacto con el servicio de atención al cliente de Avast para obtener más ayuda. Es importante mantener su programa antivirus actualizado y funcionando correctamente para proteger su dispositivo de posibles amenazas a la seguridad.

Una cosa más

Si tienes un segundo, comparte este artículo en tus redes sociales; alguien más también puede beneficiarse.

Suscríbase a nuestro boletín y sea el primero en leer nuestros futuros artículos, reseñas y publicaciones de blog directamente en su bandeja de entrada de correo electrónico. También ofrecemos ofertas, promociones y actualizaciones sobre nuestros productos y las compartimos por correo electrónico. No te perderás ninguno.

Artículos relacionados 

» Software de acceso remoto: una guía para elegir la solución adecuada para su negocio
» El mejor software antivirus para 2023
» Cómo encontrar el software antivirus ideal para Proteja sus datos


]]>
http://oktec.kr/?big=es-sp/blogs/consejos-y-trucos/should-you-set-up-a-delivery-team-or-outsource-deliveries-to-a-courier 2023-05-25T03:10:00-07:00 2024-04-14T11:54:24-07:00 Should You Set Up a Delivery Team or Outsource Deliveries to a Courier? Sara Alsaqaf Más

]]>
Cuando se trata de transportar mercancías a los clientes, tienes dos opciones principales: configurar un equipo de entrega interno o subcontratar las entregas. a un mensajero.

Ambas soluciones pueden ser efectivas y rentables, según las necesidades de su negocio. En este artículo, analizaremos los pros y los contras de ambos y brindaremos consejos para implementar cualquiera de ellos con éxito en sus operaciones.

Ya sea que elija utilizar un equipo interno o subcontratar las entregas, tener la estrategia adecuada es esencial para el éxito. ¡Vamos a sumergirnos!

Configuración de un equipo de entrega interno: ventajas y desventajas

A medida que las empresas continúan adaptándose a las demandas siempre cambiantes del mercado, muchas descubren que tener un equipo de entrega interno puede ser una cambiador de juego. Con la capacidad de brindar un servicio más rápido y personalizado, tener su propio equipo de entrega puede brindarle una ventaja competitiva.

Sin embargo, antes de lanzarte de cabeza, debes saber algunas cosas.

En primer lugar, tener un equipo de entrega requiere una inversión significativa en tiempo, dinero y recursos. Deberá contratar y capacitar personal, comprar vehículos y configurar un sistema para gestionar las entregas.

Además, deberá asegurarse de que su equipo cumpla con todas las regulaciones y leyes pertinentes. Sin embargo, un equipo de entrega interno puede ser un activo valioso para su negocio si está dispuesto a esforzarse.

Ventajas de configurar un equipo de entrega interno

Tener su propio equipo le brinda control total sobre el proceso de entrega de principio a fin y puede garantizar que sus clientes reciban lo mejor posible. servicio.

Puede personalizar la experiencia de entrega y crear una impresión duradera que hará que los clientes regresen por más. Un equipo de entrega interno también brinda el beneficio adicional de adaptarse rápidamente a los cambios y responder a las necesidades de los clientes de manera oportuna.

Con un equipo dedicado, puede tener un sistema de entrega eficiente y fluido que le permitirá ahorrar tiempo y dinero a largo plazo.

Desventajas de establecer un equipo de entrega interno

A pesar de las ventajas de un equipo de entrega interno, existen algunos inconvenientes que debe tener en cuenta en este escenario.

Configurar y administrar su equipo de entrega no es una tarea fácil y requiere mucho tiempo, dinero y recursos. Necesitará contratar personal calificado, comprar vehículos y crear sistemas para rastrear las entregas.

Las regulaciones del equipo de entrega varían según el estado y el país, así que asegúrese de cumplir plenamente con las leyes pertinentes. Además, si la demanda empresarial aumenta o disminuye repentinamente, es posible que su equipo no pueda mantenerse al día con los cambios.

Por último, configurar un equipo de entrega interno puede llevar mucho tiempo para ponerlo en funcionamiento, por lo que es esencial planificar con anticipación y tener en cuenta cualquier posible retraso.

Consejos para establecer un equipo de entrega interno exitoso

Cuando se trata de configurar un equipo de entrega interno, la planificación es clave. A continuación se ofrecen algunos consejos que le ayudarán a empezar:

  • Comience investigando las leyes y regulaciones locales relacionadas con los equipos de entrega. Asegúrese de que su equipo cumpla con todas las leyes pertinentes antes de continuar.
  • Haga un balance de sus recursos y desarrolle un plan para asignarlos. Esto incluye presupuestar salarios, vehículos y otros costos necesarios.
  • Contrate personal calificado que tenga experiencia en servicios de entrega. Organice un proceso de incorporación para garantizar que su equipo esté preparado para comenzar a trabajar desde el primer día.
  • Implementar sistemas de seguimiento de entregas para garantizar la precisión y la responsabilidad.
  • Supervise periódicamente el desempeño de su equipo de entrega para asegurarse de que cumplan con todos los estándares y objetivos necesarios.

Subcontratación de entregas a un mensajero: pros y contras

Con un mensajero, puede minimizar su carga de trabajo y asegurarse de que sus entregas se gestionen de manera eficiente y profesional. La subcontratación no solo le ayuda a ahorrar tiempo, sino que también puede ahorrarle dinero a largo plazo al evitar los costos asociados con el mantenimiento de su propia flota de entrega.

Los mensajeros tienen la experiencia necesaria para navegar las complejas reglas y regulaciones que vienen con el envío de artículos, garantizando que sus entregas lleguen a sus destinos de manera segura.

Por lo tanto, si está buscando optimizar su proceso de entrega, la subcontratación a un servicio de mensajería puede ser la respuesta que ha estado buscando.

Beneficios de subcontratar las entregas a un mensajero

Subcontratar las entregas a un servicio de mensajería puede cambiar las reglas del juego para las empresas, ya que ofrece una variedad de beneficios que pueden ahorrar tiempo y dinero.

Al confiar sus entregas a un mensajero profesional, podrá concentrarse en otras áreas de su negocio mientras el mensajero se ocupa de todas sus necesidades de envío.

También asumen la responsabilidad de rastrear y gestionar sus entregas, garantizando que lleguen de forma segura y puntual.

Tienen recursos especializados, como sistemas de software de gestión de mensajería, para ayudar a que su empresa funcione a pleno rendimiento en todo momento. Es posible que las empresas emergentes y las PYMES no quieran invertir en esto porque no ayuda directamente a que su negocio crezca en el corto plazo.

Para muchas empresas, subcontratar las entregas a un servicio de mensajería es una forma eficiente de optimizar las operaciones y mejorar la satisfacción del cliente, ayudando a las empresas a alcanzar sus objetivos de manera más efectiva.

Los servicios de entrega como Devolución suelen ofrecer servicios flexibles y personalizables, que incluyen entrega el mismo día o al día siguiente, envío exprés y recolección. hasta paquetes directamente desde su almacén.

Posibles inconvenientes de subcontratar las entregas a un mensajero

Existen posibles inconvenientes asociados con la subcontratación de entregas a un servicio de mensajería. Por ejemplo, es posible que tengas menos control sobre cómo se manejan tus paquetes, ya que el mensajero será responsable de todos los aspectos de la entrega.

El costo de utilizar un servicio de mensajería puede acumularse rápidamente y es posible que no siempre esté claro qué tarifas y cargos están asociados con cada envío.

También es importante recordar que es posible que algunos mensajeros no puedan garantizar los tiempos de entrega, lo que significa que existe el riesgo de que sus paquetes lleguen tarde. Antes de subcontratar sus entregas, asegúrese de comprender todos los riesgos y costos potenciales involucrados.

Consejos para trabajar exitosamente con un mensajero

Si decide que subcontratar las entregas a un servicio de mensajería es la opción correcta para su negocio, existen ciertos pasos que puede seguir para garantizar el éxito. Aquí hay algunos consejos a tener en cuenta:

  • Investigue diferentes mensajeros y compare sus servicios, precios y opiniones de clientes antes de seleccionar uno.
  • Lea todos los términos y condiciones asociados con los servicios de mensajería, incluidas las tarifas o restricciones.
  • Establezca una comunicación clara con su mensajero para que sepa qué esperar en cada paso del camino.
  • Defina claramente los deberes y responsabilidades que se esperan de ambas partes para minimizar la confusión y mantener una relación laboral exitosa.
  • Realice un seguimiento cuidadoso de todos los envíos para asegurarse de que lleguen a tiempo y sin problemas.
  • Asegúrese de que su mensajero comprenda el valor del servicio al cliente y solo trabaje con transportistas acreditados que puedan brindar un servicio de calidad.
  • Mantenga un contacto regular con su mensajero para que pueda solucionar cualquier problema de forma rápida y eficiente.

Algunas reflexiones finales: configurar un equipo de entrega o subcontratar las entregas a un mensajero

Es importante considerar los costos y beneficios asociados con cada opción antes de tomar cualquier decisión.

La subcontratación puede ofrecer a las empresas varias ventajas, incluido el ahorro de costos en términos de tiempo y dinero, así como el acceso a experiencia profesional. Pero utilizar tu propio equipo te da más control, pero te quita tiempo para lo que mejor sabes hacer, que es dirigir tu empresa.

Siga los consejos anteriores y continúe leyendo nuestras publicaciones para ayudar a preparar su negocio para el éxito. Si tiene tiempo, nuestro artículo sobre el mejor software antivirus de 2023 es un excelente seguimiento.


]]>
http://oktec.kr/?big=es-sp/blogs/consejos-y-trucos/excel-project-management-templates 2023-05-24T20:46:00-07:00 2024-04-17T00:34:57-07:00 10 Free Excel Templates Project Management Rick Akura Más

]]>
Are you struggling to keep your projects organized and on track? Look no further than these 10 free Excel templates for project management. 

With features such as task tracking, timeline monitoring, and budget management, these templates will help you stay on top of all aspects of your project.

So what are you waiting for? Download these free Excel templates for project management today and take the first step towards a more organized and successful project.

Table of Contents

  1. Project Timeline Excel Template
  2. Simple Budget Excel Template
  3. Event Budget Excel Template
  4. Family Excel Budget Planner
  5. Gantt Chart Template for Excel
  6. Project Tracker Template
  7. Agile Project Plan Template
  8. To-Do List Template
  9. Issue Tracker Template
  10. Project Risk Template
  11. Benefits of using project management templates
  12. FAQs
  13. Final Thoughts

Project Timeline Excel Template

A Project Timeline Excel Template is a tool that helps people organize their projects. It uses charts and tables in Microsoft Excel to show how long each part of a project will take. 

The chart automatically updates when changes are made to the table, making it easy to track progress.


This template has two different designs. The first one is a stacked bar chart that can show up to four important points in the project, called "milestones." 

The second design is a scatter chart that creates a timeline. Both designs are easy to use and can be customized for any project.

Simple Budget Excel Template

The Simple Budget Excel Template is a tool that helps you create a budget for your money. It is available for free download and is very easy to use. 

This template aims to help you determine how much money you can save each month. If you need something more detailed, there are other budgeting tools available.


This template includes a graph that shows how your savings can be divided into four categories: savings, emergency fund, debt repayment, and other long-term goals. You can decide what percentage of your money you want to allocate to each category.

 You can customize the labels for the different savings categories to suit your needs.

Event Budget Excel Template

Are you planning a special event like a party, wedding, or seminar? If so, you must ensure you have enough money to cover all the costs. That's where an Event Budget Excel Template can help!


This free template is easy to use and will help you keep track of all the expenses associated with your event. You can also track where your event's money is coming from (like ticket sales or sponsorships).

Family Excel Budget Planner

The Family Excel Budget Planner is a tool that can help you and your family track your spending throughout the year. It's built on a spreadsheet many people use to manage their finances. 

Creating an annual budget allows you to plan for major life changes, such as getting a new job or buying a home. You can also see where you may need to cut expenses to afford an increase in rent or mortgage payments.


Here are some important things to know about the Family Excel Budget Planner:

  • The planner can help you see if you're under or over budget each month.
  • You can customize your budget categories to fit your family's needs.
  • Version 2.0 includes new graphs that show how your spending and savings have changed over time.
  • The percentages listed below each category tell you what percentage of your family's budget is allocated to each category.
  • The assistance worksheet has been improved to help with using the planner.

Gantt Chart Template for Excel

A Gantt chart is useful if you are working on a project and must keep track of when things need to be done. A Gantt chart is a bar chart that shows the start and end dates of each task in a project. 


This template lets you quickly and easily create a simple Gantt chart. Each row of the worksheet corresponds to a different task; you must specify each activity's start date and duration. If you need to add more tasks, copy and paste rows or use the Ctrl+D shortcut.

Project Tracker Template

The Project Tracker Template is a tool that helps you keep track of all the important details of your project, such as the tasks that need to be done, their status, priority, deadlines, budget, and how much time and resources you need to complete them. 


With this template, you can easily update and manage all the information related to your project and better understand how your project is progressing. This way, you can ensure that everything is on track and complete your project successfully.

Agile Project Plan Template

This template helps you keep track of an Agile project. Agile projects involve breaking down the work into smaller chunks called sprints. 


With this template, you can organize and schedule each sprint, track how long each task will take, and assign resources to each task. This helps ensure that your project stays on track and meets its goals.

To-Do List Template

Stay on top of your tasks with this To-Do List Template! Whether you have things to do every hour, every day, or every week, this template will help you organize them all. You can use it for personal tasks, like chores or homework, or business tasks, like meetings or deadlines. 


With this template, you can make sure you're focusing on the most important tasks and view your schedule for the whole week. Get organized and stay on track with the To-Do List Template!

Issue Tracker Template

This issue tracker template helps you identify and track any problems that might come up during your project. By assigning team members to solve issues quickly, you can avoid delays and make sure everyone is responsible for fixing problems that arise. 


This template is like a checklist to help you ensure everything goes smoothly and catch any problems before they get out of hand.

Project Risk Template

This is a helpful tool for identifying and managing risks that could impact a project. A risk might cause problems, like running out of time or money. 


This template can help you list all the possible risks and devise ways to avoid or fix them before they become a big problem. This can help keep the project on track and ensure everyone knows what's happening.

Benefits of using project management templates

Using project management templates can make managing a project much easier. Here are some of the benefits of using project management templates:

  1. Simplicity: Project management templates are usually designed to be easy to use and understand. They can help you start quickly and avoid building a project plan from scratch.
  2. Ease of access: Project management templates can be accessed from anywhere, as long as you have an internet connection. This means you can work on your project plan from home, at work, or on the go.
  3. Customizability: Project management templates are usually customizable, so you can adjust them to suit your needs. This can save you time and effort in the long run, as you won't need to create a new template from scratch for each project.
  4. Manage project timelines: Templates can help you plan your project timelines, including milestones and deadlines. This can help ensure your project stays on track and is completed on time.
  5. Monitor task progress: Templates often include ways to monitor task progress, so you can track what's been done, what still needs to be done, and who is responsible for each task.

Project management templates can help you stay organized, save time, and ensure your project is completed successfully.

FAQs

Does Excel have a project management template?

Yes, Excel offers project management templates that can be used for various project planning and tracking purposes.

Where can I download Excel templates for free?

You can download free Excel templates from various sources such as the Microsoft Office templates website, third-party template websites, or through a search engine query for specific templates.

How do I create a project template in Excel?

To create a project template in Excel, you can start with a blank workbook and design it according to your project management needs, including sections for tasks, timelines, milestones, resources, and other relevant information.

How do I create a project management tool in Excel?

To create a project management tool in Excel, you can utilize features like data validation, conditional formatting, formulas, and charts to track and analyze project tasks, schedules, progress, and resources.

How do I create a simple project timeline in Excel?

To create a simple project timeline in Excel, you can use a stacked bar chart or a Gantt chart by entering task names, start dates, and durations, and formatting the chart to display the timeline visually.

Final Thoughts

In summary, Excel offers various project management templates you can utilize lived to simplify the project management process. These templates help organize and manage project details effectively, from tracking project schedules, tasks, and deadlines to identifying and mitigating potential risks. 

The templates are user-friendly, requiring little to no learning curve, and can be customized to meet specific project requirements. With the right project management templates, project managers can ensure project success by keeping track of every aspect of the project and ensuring that it stays on schedule and within budget.

One more thing

If you have a second, please share this article on your socials; someone else may benefit too. 

Subscribe to our newsletter and be the first to read our future articles, reviews, and blog post right in your email inbox. We also offer deals, promotions, and updates on our products and share them via email. You won’t miss one.

Related articles 

»How to insert page break in Excel worksheet
»Expense Record & Tracking Sheet Templates for Excel
»How to Calculate CAGR in Excel

]]>
http://oktec.kr/?big=es-sp/blogs/consejos-y-trucos/force-close-program-task-manager-fail 2023-05-24T11:00:00-07:00 2024-04-17T00:43:23-07:00 Program Won't Close? Force Close a Program without Task Manager Rick Akura Más

]]>

Program Won't Close? Force Close a Program without Task Manager

You're not alone if you've ever encountered a program won't close with task manager. This issue can be frustrating, especially if you need to shut down your computer quickly or if the program is causing other problems.

In this article, we'll walk you through the steps to force close a program won't close with task manager. 

Don't let a stubborn program slow you down. Keep reading to learn how to force close it and get your computer back to working smoothly.

Table of Contents

  1. What is force-closing a program
  2. Why would you need to force-close a program
  3. Force Close Apps Using a Desktop Shortcut
  4. Force Close Apps Using a Keyboard Shortcut
  5. Alternative Methods to Force-Quit Programs in Windows
  6. Other Ways to Force-Close Programs in Windows 
  7. The dangers of force-closing a program
  8. FAQs
  9. Final Thoughts

Summary: How to force quit on Windows using Task Manager

  1. Press Control + Alt + Delete.
  2. Choose Task Manager.
  3. Select the application that you want to force quit.
  4. Click End task.

What is force-closing a program

Force-closing a program means shutting it down forcefully when it's not responding or is stuck. Using your computer, you can run different programs to complete your tasks. 

Sometimes, a program may freeze or stop working, and you might not be able to close it normally. This is where force-closing comes in.

Force-closing a program means using special methods or tools to close it when it's not responding to your commands. This can help you regain control of your computer and prevent it from slowing down or crashing. 

There are different ways to force-close a program in Windows, such as using the following:

  • Task Manager or Command Prompt
  • Keyboard shortcuts
  • Third-party tools

However, it's important to note that force-closing a program can cause data loss or damage if you have yet to save your work. Therefore, trying other methods first is recommended, such as closing a program normally or waiting for it to respond. 

Why would you need to force-close a program

Using a computer program that suddenly stops working or freezes up can be frustrating, especially if you need to use the program for work or school. When this happens, it's a good idea to force-close the program.

Force-closing a program means ending its process so that it stops running on your computer. You should do this if the program becomes unresponsive or stops working properly. When you force-close a program, you can start fresh and try opening the program again. Sometimes, force-closing the program can even fix the issue that was causing it to stop working in the first place.

So, if you're having trouble with a program on your computer, try force-closing it first before doing anything else.

Force Close Apps Using a Desktop Shortcut

Sometimes, apps on your computer can get stuck or freeze, making it difficult to close them using the Task Manager. Fortunately, there's a way to create a desktop shortcut that can force close these apps quickly and easily. Here's how to do it:

  1. Right-click on a space on your desktop and choose "New" then "Shortcut."
    Shortcut
  2. In the location box, type "taskkill /f /fi "status eq not responding"" (without the quotes) and click "Next."
    taskkill /f /fi "status eq not responding
  3. Name your shortcut something like "Force Close" and click "Finish."

When an app gets stuck, you can double-click your new shortcut to force it to close. Here's what the command you typed into the shortcut means:

  • "taskkill" is the command to kill a process.
  • "/f" tells the command to force-close the program.
  • "/fi" tells the command to run only on processes that meet the following filter criteria.
  • "status eq not responding" is the command criteria. You want it only to kill processes with a status equal to "Not Responding."

With this shortcut, you won't have to worry about trying to close a frozen app using Task Manager anymore. Just double-click and let the computer do the rest!

Force Close Apps Using a Keyboard Shortcut

Creating a keyboard shortcut to force-close frozen apps can save you even more time than a desktop shortcut. Here's how to set it up:

  1. Right-click on your desktop shortcut and select "Properties."
    Properties
  2. Click on the "Shortcut" tab and the "Shortcut key" field to set your keyboard shortcut. Windows will automatically add Ctrl + Alt to any letter you press, but you can change it to Ctrl + Shift.
  3. Set "Run" to "Minimized" to avoid a disruptive flash of the app's window when you press the shortcut.
    Minimized
  4. Click "OK" to save your changes.

Now, whenever an app freezes, you can press your custom keyboard shortcut to force it to close. This will open a Command Prompt window for a brief moment before automatically closing the frozen app.

With this shortcut, you can quickly and easily force-close any program that's not responding. No more waiting for the Task Manager to load or manually typing in commands.

Alternative Methods to Force-Quit Programs in Windows

Sometimes, a program may freeze or stop working, and you can't close it using the Task Manager. In this case, you can try alternative methods to force-quit the program. 

One is pressing Alt + F4, a Windows keyboard shortcut to close the current process. It's equivalent to clicking the X icon in the upper-right corner of a window. 

While it won't work for stuck programs, it's worth a try if the app just had a minor issue. This method is particularly useful if your mouse stops responding when the program freezes. 

If this doesn't work, you can use the taskkill command, as explained in the previous section. You can also try using third-party task managers programs, such as Process Explorer or System Explorer, which provide more advanced features and options for managing processes in Windows.

 However, be cautious when using third-party software and download them from trusted sources.

Other Ways to Force-Close Programs in Windows 

If the methods mentioned above don't work for you, there are other tools that you can use to force-close Windows programs. One such tool is ProcessKO, which is recommended for advanced users. 

It offers additional features, such as terminating a specific process after a specified time interval. This tool is also officially updated for Windows 11, while others may need updating.

You can also explore other options that are similar to those mentioned earlier. It's best to try all options before looking for an alternative.

If you still can't get the program to close, the last resort is to restart your computer. You must perform a hard shutdown if you cannot access the security screen by using Ctrl + Alt + Del and shutting down using the Power icon. 

You can do this by holding down the Power button on your computer for several seconds until it shuts off. Alternatively, you can pull the power plug or remove the battery from your laptop.

The dangers of force-closing a program

When you use the regular method to close an application, it usually asks you to save any work you haven't done yet. But when you force-close a program, it may close without giving you a chance to save your work, and you could lose important files or data. 

That's why using this method as a last resort is essential only when the program isn't responding.

Frequent saving while working on a document or project is important to avoid losing work. That way, if the program stops responding, you'll have saved your work up to that point. 

Additionally, if you're working on something important, consider using automatic backup tools or services that save your files to the cloud in real-time so you always have a backup copy.

Force-closing a program should be a last resort and used only when necessary. It's important to save your work frequently and use backup tools to prevent data loss.

FAQs

Why won't a program close with Task Manager?

There could be various reasons why a program won't close with Task Manager, such as the program being unresponsive, experiencing a system or resource conflict, or having a background process running.

How can I force a program to close using Task Manager?

To force a program to close using Task Manager, open Task Manager (Ctrl+Shift+Esc), locate the program in the "Processes" or "Applications" tab, right-click on it, and select "End Task" or "End Process."

What should I do if Task Manager is not responding?

If Task Manager is not responding, you can try restarting your computer, using the Ctrl+Alt+Delete shortcut to open the security options screen and selecting "Task Manager," or launching Task Manager through alternative methods like PowerShell or Command Prompt.

What are alternative ways to force a program to close?

Aside from Task Manager, you can use the Alt+F4 keyboard shortcut, right-click on the program's taskbar icon and select "Close," or use the "kill" command in PowerShell or Command Prompt to force a program to close.

Why is it important to close programs properly?

Closing programs properly is important to release system resources, free up memory, prevent conflicts, and ensure the stability and performance of your computer.

Final Thoughts

In conclusion, force-closing a program that Task Manager cannot terminate is not difficult. You can close even the most unresponsive programs quickly and easily with a few simple steps. 

First, try using the keyboard shortcut Alt + F4 to close the program. If that doesn't work, try creating a taskkill command or using third-party tools like ProcessKO. 

You can always resort to a hard computer shutdown if all else fails. Following these steps, you can quickly and easily deal with unresponsive programs and return to using your computer.

One more thing

If you have a second, please share this article on your socials; someone else may benefit too. 

Subscribe to our newsletter and be the first to read our future articles, reviews, and blog post right in your email inbox. We also offer deals, promotions, and updates on our products and share them via email. You won’t miss one.

Related articles 

» What Is the Best Driver Updater for Windows?
» Windows Optimizer: Top Free PC Optimizers in 2023
» How To Download and Install the Windows 10 21H2 (November 2021 Update)

]]>
http://oktec.kr/?big=es-sp/blogs/consejos-y-trucos/microsoft-excel-conditional-formatting-easy-tutorial 2023-05-20T09:55:00-07:00 2024-04-17T00:38:57-07:00 Master Excel Conditional Formatting with this Easy Tutorial Rick Akura Más

]]>
Excel Conditional Formatting is a powerful tool that helps you highlight specific data based on certain conditions. This feature lets you easily identify trends, analyze data, and make informed decisions. This easy tutorial will show you how to use Excel's Conditional Formatting to its full potential.

Whether you're a beginner or an experienced user, this tutorial will provide step-by-step instructions and practical examples. By the end of this article, you will be able to apply different formatting styles to your data based on criteria such as cell values, dates, or text.

Trust us to guide you through this process and help you enhance your data visualization skills. Let's dive in and explore the possibilities of Excel Conditional Formatting.

Table of Contents

  1. Understanding Conditional Formatting
  2. Highlighting Cells Based on Criteria
  3. Applying Formatting to Cells with Data Bars
  4. Creating Color Scales and Icon Sets
  5. Using Conditional Formatting with Dates
  6. Applying Formatting to Top or Bottom-Ranked Values
  7. FAQs
  8. Final Thoughts

Understanding Conditional Formatting

Conditional formatting is a great tool in Microsoft Excel that helps you highlight specific values or cells that meet certain criteria. It is like having a magic wand that can change the appearance of your cells based on a specific condition you set.

For example, let's say you want to identify all the cells in your table that contain numbers greater than 50. You can easily use conditional formatting to change the color or font of those cells to make them stand out from the rest. This makes it easy to identify and analyze data.

There are many different ways to use conditional formatting in Excel. You can use it to highlight cells based on their values, format cells based on specific dates, or identify duplicate or unique values in a range of cells. You can customize the formatting style using different color scales, data bars, and icon sets.

Conditional formatting is a powerful tool that can help you quickly and easily identify important information in your Excel spreadsheets.

Highlighting Cells Based on Criteria

Excel's conditional formatting can help you do just that. One way to use this feature is by highlighting cells based on specific criteria.

  1. Select the range of cells, tables, or entire sheets to which you want to apply the formatting. 
  2. Go to the Home tab and click on the Conditional Formatting option. 
  3. Choose different Highlight Cell Rules, such as Text that Contains.
Choose different Highlight Cell Rules, such as Text that Contains.

Let's say you want to find all cells that contain the word "apple" in a list of fruits. Type "apple" in the box next to "containing" and click OK. This will highlight all cells that contain the word "apple" in the selected range.

Let's say you want to find all cells that contain the word

You can also use other criteria to highlight cells, such as those containing specific values, dates, or formulas. Conditional formatting makes it easy to identify specific information in a large table quickly and can help you save time and make more informed decisions.

Applying Formatting to Cells with Data Bars

Conditional formatting is a great feature in Microsoft Excel that can help you visually represent data meaningfully. One way to do this is by applying formatting to cells with data bars.

  1. Select the range of cells, tables, or entire sheets to which you want to apply the formatting. 
  2. Go to the Home tab
  3. Under Format, click on Conditional Formatting
  4. Point to Data Bars, and choose a gradient or solid fill
Point to Data Bars, and choose a gradient or solid fill

Data bars are horizontal bars placed behind the cell's data to represent its value. For example, if you have a list of sales figures, you can use data bars to quickly visualize which numbers are higher or lower. The longer the data bar, the higher the value of the cell.

You can customize the look of the data bars by changing the color, gradient, or border style. This makes it easy to highlight specific information and create professional-looking spreadsheets.

Data bars are a powerful tool in Excel that can help you quickly understand and analyze data. Whether you're a student, teacher, or business professional, this feature can help you make more informed decisions based on the data you have.

Creating Color Scales and Icon Sets

Conditional formatting is a useful feature in Microsoft Excel that can help you make sense of data by visually representing it differently. One way to do this is by using color scales and icon sets.

  1. Select the range of cells that you want to format. This could be a table or a specific area of your worksheet
  2. Go to the Home tab and click on Conditional Formatting in the Styles group. 
  3. Point to Color Scales and choose the type of color scale that you want to use. 
Point to Color Scales and choose the type of color scale that you want to use.

Color scales are a way to visually represent the value of a cell based on its color. For example, you might choose a green-yellow-red color scale to represent the value of sales figures. The cells with the highest sales numbers would be colored green, the cells with average sales figures would be yellow, and the cells with the lowest sales numbers would be red.

Color scales

Icon sets are another way to represent data visually. They use icons or symbols to represent different values, such as arrows pointing up or down to represent increases or decreases in sales. You can choose from various icon sets to find the one that best suits your needs.

Color scales and icon sets are powerful tools that can help you quickly understand and analyze data in Excel. Whether you're a student, teacher, or business professional, these features can help you make more informed decisions based on the data you have.

Using Conditional Formatting with Dates

Microsoft Excel has a feature called Conditional Formatting that can be used to make it easier to work with dates. This feature can help you quickly identify dates that fall within a certain range or meet specific criteria.

  1. Select the range of cells that contain the dates you want to work with to use Conditional Formatting with dates. 
  2. Go to the Home tab and click on Conditional Formatting
  3. Select Highlight Cell Rules and choose A Date Occurring
    Select Highlight Cell Rules and choose A Date Occurring
  4. Select one of the date options from the drop-down list in the left-hand part of the window
  5. Choose from various options, such as dates that occurred last week, this month, or next month.
Choose from various options, such as dates that occurred last week, this month, or next month.

Once you have selected the date range you want to work with, you can choose the formatting you want to apply to the cells. For example, you might highlight the cells in a specific color or add an icon to indicate that the date meets certain criteria.

Conditional Formatting with dates is a useful tool that can help you quickly identify and work with specific dates in Excel. By applying formatting to the cells, you can make it easier to work with and analyze large data sets that include dates.

Applying Formatting to Top or Bottom-Ranked Values

In Microsoft Excel, you can use Conditional Formatting to highlight the top or bottom-ranked values in a range of cells, tables, or PivotTable reports. This can be a useful way to identify trends, outliers, or key data points in a dataset.

  1. Select one or more cells in the range you want to work with to apply formatting to the top or bottom-ranked values
  2. Go to the Home tab and find the Styles group
  3. Click on the arrow next to Conditional Formatting and select Top/Bottom Rules.
  4. Choose the command you want to apply, such as Top 10 items or Bottom 10%. You can then enter the values you want to use, such as the number of items to include or the percentage of values you want to highlight.
    Choose the command you want to apply, such as Top 10 items or Bottom 10%. You can then enter the values you want to use, such as the number of items to include or the percentage of values you want to highlight.
  5. Select a format for the top or bottom-ranked values. This can include choosing a color or applying a data bar or icon to the cells.

Applying to format to top or bottom-ranked values is a quick and easy way to highlight key data points in Excel. It can help you identify trends, outliers, and other important information in large datasets.

Excel Conditional Formatting [2021]: All You Need to Know

FAQs

What are the types of conditional formatting in Excel?

The types of conditional formatting in Excel include data bars, color scales, icon sets, cell value rules, and formula-based rules, allowing you to format cells based on specific conditions or criteria.

How do I make Excel automatically change cell color?

To make Excel automatically change cell color, you can use conditional formatting by selecting the cells you want to format, going to the "Home" tab, clicking on "Conditional Formatting," and choosing the desired formatting rule.

How do you change the color of a cell based on value?

To change the color of a cell based on its value, you can apply conditional formatting using the "Highlight Cells Rules" option under the "Conditional Formatting" menu. Select the rule that suits your criteria, such as "Greater Than" or "Less Than," and specify the value and color.

Can you use an if statement to color a cell in Excel?

Yes, you can use an IF statement in Excel to conditionally format a cell by defining the desired formatting within the IF function's true or false arguments based on a specific condition.

How to make cell change color based on positive and negative?

To make a cell change color based on positive and negative values, select the cells you want to format, go to the "Conditional Formatting" menu, choose "Highlight Cells Rules," and select "Greater Than" for positive values and "Less Than" for negative values, specifying the desired colors for each.

Final Thoughts

In conclusion, conditional formatting is a useful tool in Microsoft Excel that can help you highlight important data points. There are many different types of conditional formatting that you can use, such as highlighting cells based on their values, applying data bars, or using color scales. 

Using conditional formatting effectively makes your Excel spreadsheets more visually appealing and easier to analyze. This can be especially useful when presenting your data to others or when you need to identify key information quickly. 

Overall, conditional formatting can help you get the most out of your Excel spreadsheets with just a few simple clicks.

One more thing

If you have a second, please share this article on your socials; someone else may benefit too. 

Subscribe to our newsletter and be the first to read our future articles, reviews, and blog post right in your email inbox. We also offer deals, promotions, and updates on our products and share them via email. You won’t miss one.

Related articles 

» How to Use Conditional Formatting to Make Your Excel Data Stand Out
»
How to insert page break in Excel worksheet
»Expense Record & Tracking Sheet Templates for Excel
»How to Calculate CAGR in Excel

]]>
http://oktec.kr/?big=es-sp/blogs/consejos-y-trucos/excel-waiting-for-ole-action 2023-05-18T16:40:00-07:00 2024-04-17T00:38:04-07:00 Fixing "Waiting for Another Application" Error in Excel Due to OLE Action Excel Rick Akura Más

]]>
If you're encountering the "Waiting for Another Application to complete an OLE Action" error in Excel, you may wonder what it means and how to fix it in Ole Action Excel. 

In this article, we'll provide practical solutions to resolve this issue in Excel. 

So, let's dive into how to fix the "Waiting for Another Application to complete an OLE Action" error in Excel.

Table of Contents

  1. What is the "Waiting for Another Application to complete an OLE Action" error in Excel?
  2. Why does the "Waiting for Another Application to complete an OLE Action" error occur?
  3. How to troubleshoot the "Waiting for Another Application to complete an OLE Action" error in Excel?
  4. What are the common reasons for the "Waiting for Another Application to complete an OLE Action" error in Excel?
  5. How to fix the "Waiting for Another Application to complete an OLE Action" error in Excel caused by third-party add-ins?
  6. How to recover unsaved Excel files when the "Waiting for Another Application to complete an OLE Action" error occurs?
  7. FAQs
  8. Final Thoughts

What is the "Waiting for Another Application to complete an OLE Action" error in Excel?

The "Waiting for Another Application to complete an OLE Action" error in Excel is a message that pops up when Excel is waiting for something to happen. 

This could be because Excel is waiting for permission to complete an action, or it could be waiting for another program, like Microsoft Outlook, to complete a task. This can happen when you are working with Excel and another program simultaneously.

The most common reason for this error is a security prompt from another Microsoft application, like Outlook. A security prompt is a message that pops up when a program tries to access something that might be dangerous. 

For example, if you are trying to open an email attachment in Excel, Outlook might show a security prompt to ensure you want to open the attachment.

Why does the "Waiting for Another Application to complete an OLE Action" error occur?

The "Waiting for Another Application to complete an OLE Action" error message in Excel can happen for several reasons. 

  • One common reason is that the user is running too many add-ins.

Small programs can be added to Excel to provide extra features. If too many add-ins are running at once, it can cause Excel to slow down or even crash.

  • Another reason for this error message could be that some add-ins are corrupt. 

When an add-in is corrupt, it is not working properly and can cause problems with Excel. This can happen if an add-in gets infected with a virus or becomes damaged in some other way.

How to troubleshoot the "Waiting for Another Application to complete an OLE Action" error in Excel?

One way to fix the "Waiting for Another Application to complete an OLE Action" error in Excel is to turn on a feature called "Ignore other applications that use the DDE." DDE stands for Dynamic Data Exchange, and it's a way for different applications on your computer to share information with each other. Sometimes, when Excel waits for another application to complete a DDE action, it can cause an error message to appear.

To turn on the "Ignore other applications that use the DDE" feature:

  1. Open your Excel workbook and click on the File menu
  2. Select Options and go to the Advanced tab
  3. Scroll down to the General section and check the box next to "Ignore other applications that use Dynamic Data Exchange (DDE)". 
  4. Restart your Excel document to see if the error message disappears.

Turning on this feature tells Excel to ignore any other applications that may be using DDE, which can help prevent the error message from appearing.

What are the common reasons for the "Waiting for Another Application to complete an OLE Action" error in Excel?

The "Waiting for Another Application to complete an OLE Action" error message in Excel can happen for several reasons. 

  1. The DDE protocol, a way for different programs to share information, might not be turned on in Excel. This can cause problems when Excel is trying to communicate with another program. 
  2. If your Microsoft Office program is damaged or corrupted, it can cause errors like this to appear. 
  3. Having too many add-ins installed in Excel can also cause conflicts and errors.

There are three main reasons why the "Waiting for Another Application to complete an OLE Action" error might happen in Excel: the DDE protocol is turned off, the Microsoft Office program is corrupted, or too many add-ins are installed. 

If you're experiencing this error message, try enabling the DDE protocol in Excel, repairing your Office program, or disabling some add-ins to see if that solves the problem.

How to fix the "Waiting for Another Application to complete an OLE Action" error in Excel caused by third-party add-ins?

If you encounter the "Waiting for Another Application to complete an OLE Action" error in Excel caused by third-party add-ins, you can take a few steps to fix it. This error occurs when Excel waits for another application to complete an action or when too many add-ins conflict with the Excel sheet. Here's what you can do:

  1. Open Excel and click on the "File" menu.
  2. Click on "Options" and select "Add-Ins" from the sidebar.
  3. At the bottom of the screen, choose "COM Add-Ins" from the "Manage" drop-down list and click "Go.
  4. Uncheck the box next to each add-in to disable it one by one until the error disappears.
  5. Once you find the add-in that causes the error, leave it unchecked, and click "OK".

Following these steps, you can identify and disable the problematic add-in to prevent future "Waiting for Another Application to complete an OLE Action" errors in Excel.

How to recover unsaved Excel files when the "Waiting for Another Application to complete an OLE Action" error occurs?

Losing an unsaved Excel file can be frustrating, especially when encountering the "Waiting for Another Application to complete an OLE Action" error message. Fortunately, there are several ways to recover unsaved Excel files. Here's what you can do:

  1. Check the AutoRecover folder - Excel has an AutoRecover feature that saves a copy of your file every few minutes. To find the AutoRecover folder, open Excel, click on the File menu, then click Options. From there, select Save and look for the AutoRecover file location.
  2. Look for temporary files - Excel also creates temporary files that may contain your unsaved work. Search for files with the ".tmp" extension in your computer's search bar to locate these files.
  3. Check the Recycle Bin - It may still be in it if you accidentally deleted your Excel file. Search for the file and restore it if you find it.
  4. Use third-party recovery software - If none of the above methods work, you can use third-party recovery software like EaseUS Data Recovery or Recuva.

By following these steps, you may be able to recover your unsaved Excel file and avoid losing important work.

FAQs

What does the message "Microsoft Excel is waiting for another application to complete an OLE action" mean?

This message indicates that Excel is attempting to communicate with another application through Object Linking and Embedding (OLE), but the other application is taking longer than expected to respond or complete the requested action.

Why am I seeing this message in Excel?

You may see this message if you have embedded or linked objects, such as charts or tables, in your Excel file that require data or interaction from another application, and that application is taking longer than expected to process the request.

How can I resolve the "Microsoft Excel is waiting for another application to complete an OLE action" message?

To resolve this issue, try closing or terminating the other application that Excel is waiting for. You can also check if the application is running smoothly or if any updates are available that might improve its performance.

Is there a way to speed up the OLE action and prevent this message from appearing?

You can try speeding up the OLE action and reducing the likelihood of seeing this message by optimizing the application's performance that Excel is waiting for. This may include closing unnecessary background processes or upgrading to a newer application version.

Can I disable OLE or change its behavior in Excel to avoid this message?

Disabling OLE functionality in Excel is not recommended, as it may prevent certain features and functionalities from working correctly. Instead, focus on optimizing the applications' performance or consider alternative approaches for achieving your desired outcome in Excel that do not rely on OLE actions.

Final Thoughts

In conclusion, the "Waiting for Another Application to complete an OLE Action" error in Excel means that Excel is waiting for something to complete or user approval of an action. This error can occur for various reasons, such as a disabled DDE protocol, a corrupt MS Office application, or conflicting add-ins. 

Fortunately, several troubleshooting steps exist to fix this error, such as enabling the "Ignore other applications that use Dynamic Data Exchange (DDE)" option and disabling third-party add-ins that cause errors. It is important to follow these steps carefully to ensure that your Excel documents work properly and efficiently. 

Remember, if you are still having trouble, seek assistance from a tech-savvy friend or a professional technician.

One more thing

If you have a second, please share this article on your socials; someone else may benefit too. 

Subscribe to our newsletter and be the first to read our future articles, reviews, and blog post right in your email inbox. We also offer deals, promotions, and updates on our products and share them via email. You won’t miss one.

Related articles 

»How to insert page break in Excel worksheet
»Expense Record & Tracking Sheet Templates for Excel
»How to Calculate CAGR in Excel


]]>
http://oktec.kr/?big=es-sp/blogs/consejos-y-trucos/countif-function-excel-formula-examples 2023-05-17T22:47:00-07:00 2024-04-17T00:41:25-07:00 Mastering the COUNTIF Function in Excel: Examples and How-To Guide Rick Akura Más

]]>
The COUNTIF function in Excel can save you time and effort by automatically counting cells that meet a specified condition. This article will explore the COUNTIF function in depth, including its formula, examples, and how to use it effectively.

Whether you're a beginner or an advanced Excel user, the COUNTIF function is essential to help you understand your data. This powerful function lets you quickly analyze large datasets and extract valuable insights. This article will give you the knowledge and skills to take advantage of the COUNTIF function in Excel.

So, if you want to streamline your data analysis process and make the most of Excel's features, keep reading to learn more about the COUNTIF function and how you can use it to your advantage.

Table of Contents

  1. Understanding the syntax of the COUNTIF function in Excel
  2. Here's how it works
  3. Range and Criteria in Excel's COUNTIF Function
  4. Troubleshooting Common Problems with the COUNTIF Function in Excel
  5. Top Tips for Using COUNTIF in Excel Like a Pro
  6. How to  use Countif in data validation
  7. Final Thoughts

Understanding the syntax of the COUNTIF function in Excel

Let's say you have a list of customers and want to know how many times a certain city appears in that list. That's where COUNTIF comes in! It's a bit like a robot that counts things for you. You just need to tell it what to look for; it'll do the rest.

COUNTIF might sound like a mouthful, but it's pretty simple! Imagine you're a detective trying to solve a case. You have a bunch of clues, but you're looking for one specific clue in particular. That's what COUNTIF does - it helps you find the specific thing you want in a big pile of data.

Here's how it works

You tell COUNTIF where to look (which cells in your Excel sheet), and then what to look for (like a name or a number). Then, COUNTIF goes through all those cells and counts how many times that thing you're looking for appears. It's like a computerized version of a treasure hunt!

Understanding the syntax of the COUNTIF function in Excel

We want to count how often "Jane" appears in column B. To do this, we would use the formula =COUNTIF(B4:B15,"Jane") in cell C8 since we want to look in the range B4:B15 and count the number of times "Jane" appears.

When we enter the formula and press enter, the value 6" should appear in cell B3 since "Jane" appears six times in the specified range.

You can use COUNTIF with various criteria, such as text, numbers, or dates. It's a powerful tool that can help you quickly analyze data and extracts meaningful insights.

Range and Criteria in Excel's COUNTIF Function

COUNTIF is a pretty neat tool that helps you count specific things in your Excel sheet. But to use it, you must know what "range" and "criteria" mean.

The range is like a fancy way of saying "a bunch of cells." When you use COUNTIF, you must tell it which group of cells you want to count. This group can include numbers, named ranges, and other fancy stuff, but don't worry too much about that. Just think of it as a bunch of boxes that you want to count things in.

Range and Criteria in Excel's COUNTIF Function

Criteria are a bit more complicated, but it's basically what you want to count in those boxes. For example, let's say you have a list of fruit in column A, and you want to count how many times "apple" appears. You'd write =COUNTIF(B3:B11,"apple"). 

In this case, "apple" is the criteria - it's the thing you want to count.

You can use different types of criteria, like numbers or comparisons, but for now, just remember that it's the thing you're counting in those boxes.And if you ever need to use multiple criteria, there's a similar tool called COUNTIFS that you can use. 

Troubleshooting Common Problems with the COUNTIF Function in Excel

Even the most experienced Excel users encounter problems with the COUNTIF function from time to time. Here are some common problems and their solutions to help you avoid frustration.

  • COUNTIF function returning the wrong value for long strings

This happens because the function can only match strings up to 255 characters long. To match longer strings, you can use the CONCATENATE function or the & operator to combine multiple strings into one. 

For example, if you want to match the string "long string" followed by "another long string," you could use the formula =COUNTIF(A2:A5,"long string"&"another long string").

  • The COUNTIF function not returning a value when you expect one

This can happen if you forget to enclose the criteria argument in quotes. Always remember to put quotes around text criteria, like "apples" or ">5", to ensure the function works properly.

  • You receive a #VALUE! error.

Make sure the other workbook is open. The COUNTIF function needs the other workbook to be open for this feature.

By knowing how to troubleshoot these common problems with the COUNTIF function, you can use it more effectively and avoid frustration in your Excel spreadsheets.

Top Tips for Using COUNTIF in Excel Like a Pro

COUNTIF is a powerful function in Excel that can help you quickly count cells that meet a specific criterion. Here are some best practices to help you get the most out of it:

  1. Don't worry about upper or lower case: COUNTIF ignores case when looking for matches in text strings.
  2. Use wildcard characters: You can use the question mark to match any single character or the asterisk to match any sequence of characters. If you need to find a literal question mark or asterisk, type a tilde (~) before it.
  3. Clean your data: Make sure your data doesn't contain any erroneous characters, like leading or trailing spaces or non-printing characters. The CLEAN function or TRIM function can help you with this.
  4. Use named ranges: Named ranges make referencing a range of cells easy in a formula. You can use named ranges from the same or different worksheets or even from different workbooks. Just make sure any external workbooks are open.

By following these tips, you can use COUNTIF like a pro and save time on your data analysis tasks.

How to use Countif in data validation

One way to use data validation is to look up a specific value from a list or range. The COUNTIF function counts the number of occurrences of the value in the list. If the count is greater than zero, the data will pass validation.

Let's say you have a list of fruits in column A, and you want to create a data validation rule that only allows the user to select fruits in the list. You can use the COUNTIF function in your data validation formula to check if the selected value exists in the list.

  1. Select the cell or range where you want to apply the data validation rule.
  2. Go to the Data Validation menu (under the Data tab).
    Go to the Data Validation menu (under the Data tab).
  3. In the Allow field, choose List.
    In the Allow field, choose List.
  4. In the Source field, enter the range of cells that contain the fruit list, for example, B3:B11.
  5. In the formula field, enter the following formula: =COUNTIF(B3:B11,B3)>0
  6. Click OK.
    How to use Countif in data validation

Now, when a user selects a cell in the range you specified, they can only choose fruit in the list. If they try to enter a fruit, not on the list, the cell will show an error message.

The COUNTIF function in the formula counts the number of occurrences of the selected value in the fruit list. If the count exceeds zero, the formula returns TRUE, allowing selection. If the count is zero, the formula returns FALSE, and the selection is not allowed.

FAQs

How do I use the Countif function in Excel?

To use the COUNTIF function in Excel, you need to provide two arguments: the range of cells you want to evaluate and the criteria or condition you want to count.

How do I use Countif with two conditions?

To use COUNTIF with two conditions, you can use the COUNTIFS function instead. It allows you to specify multiple criteria by providing separate ranges and conditions.

What are the conditions for Countif in Excel?

The condition for the COUNTIF function in Excel is typically a logical expression or a text string enclosed in double quotation marks. The function counts the number of cells within the given range that meet the specified condition.

What is Countif and Countif in Excel?

COUNTIF is a function in Excel that counts the number of cells within a range that meet a given condition. It is commonly used to analyze data and perform calculations based on specific criteria.

Can you use or function with Countif?

You can use the OR function with COUNTIF to count cells that meet at least one of several conditions. By combining multiple COUNTIF functions with the OR function, you can count cells that satisfy any of the specified conditions.

Final Thoughts

In conclusion, the COUNTIF function in Excel is a powerful tool for counting cells that meet a certain criteria. 

It takes two arguments: the range of cells to search and the matching criteria. This function can be used to count numbers, text, and dates and is case-insensitive. 

Using wildcards and named ranges, you can make the COUNTIF function even more flexible and powerful.

One more thing

We’re glad you’ve read this article upto here :) Thank you for reading.

If you have a second, please share this article on your socials; someone else may benefit too. 

Subscribe to our newsletter and be the first to read our future articles, reviews, and blog post right in your email inbox. We also offer deals, promotions, and updates on our products and share them via email. You won’t miss one.

Related articles 

»How to insert page break in Excel worksheet
»Expense Record & Tracking Sheet Templates for Excel
»How to Calculate CAGR in Excel

]]>
http://oktec.kr/?big=es-sp/blogs/consejos-y-trucos/excel-standard-deviation-guide 2023-05-17T08:44:00-07:00 2024-04-17T00:41:53-07:00 Calculating Standard Deviation Excel: A Step-by-Step Guide Rick Akura Más

]]>
In this article, we will explore how to calculate standard deviation in Excel, a powerful tool widely used for data analysis and statistical calculations.

By following the step-by-step instructions below, you will gain the confidence to perform standard deviation calculations effectively and efficiently.

Whether new to Excel or seeking to enhance your statistical skills, this article will equip you with the knowledge and techniques to analyze and interpret data confidently. 

Let's get started!

Table of Contents

  1. What is standard deviation
  2. How to find standard deviation in Excel
  3. Functions to calculate population standard deviation in Excel
  4. Which Excel standard deviation function to use
  5. Excel standard deviation formula examples
  6. FAQs
  7. Final Thoughts

What is Standard Deviation

Standard deviation is a way to measure how spread out or close together the numbers in a set of data are. It helps us understand if the data's average, or mean, is a good representation of the entire dataset. 

Imagine you have a group of numbers, like 5, 8, 6, 7, and 9. The mean of these numbers is 7, which is right in the middle. But what if the numbers were 2, 13, 3, 11, and 4? 

The mean is still 7, but the numbers are more spread out, so the mean might not tell the whole story.

What is Standard Deviation

That's where standard deviation comes in. It tells us how much the numbers deviate or move away from the mean. 

If the standard deviation is small, the numbers are close to the mean, and the mean represents the data well. If the standard deviation is large, the numbers are more spread out, and the mean might not be as reliable.

Let's take the example of the first set of numbers: 5, 8, 6, 7, and 9. The standard deviation is small because the numbers are close to the mean of 7. 

But in the second set of numbers: 2, 13, 3, 11, and 4, the standard deviation is larger because the numbers are more spread out.

How to Find Standard Deviation in Excel

To calculate standard deviation in Excel, you can use six different functions. The choice of function depends on whether you're working with the entire population or a sample of data.

For calculating the standard deviation based on a sample, you can use the following formulas:

  1. Excel STDEV function: This is the oldest function and works in all versions of Excel from 2003 to 2019. It can accept up to 255 arguments, which can be numbers, arrays, named ranges, or references to cells containing numbers.
    However, in Excel 2003, it can only accept up to 30 arguments.
    How to Find Standard Deviation in Excel
  2. Excel STDEV.S function: This improved version was introduced in Excel 2010. Like STDEV, it calculates the sample standard deviation based on the classic formula.
  3. Excel STDEVA function: This function is similar to STDEV and STDEV.S but handles logical and text values differently. Logical values are counted as 1 for TRUE and 0 for FALSE, and text values are counted as 0.

It's important to note that these functions require at least two numeric values to work correctly, otherwise, an error may be returned.

Functions to calculate population standard deviation in Excel

Excel provides three functions to calculate the population standard deviation if you're working with the entire population.

  1. Excel STDEVP function: This is the older function used to find the standard deviation of a population. It works in all versions of Excel and accepts multiple arguments, which can be numbers, arrays, or references to cells containing numbers.
  2. Excel STDEV.P function: This modern version introduced in Excel 2010 is recommended for better accuracy. It also calculates the population standard deviation. Like the sample standard deviation functions, it counts only numbers within arrays or reference arguments. The list of arguments, it also counts logical values and text representations of numbers.
  3. Excel STDEVPA function: This function calculates the population standard deviation and includes text and logical values. It behaves similarly to the STDEVA function for non-numeric values.

It's important to note that these functions may return an error if any error values or text cannot be interpreted as numbers within the arguments.

Which Excel standard deviation function to use

Choosing the right standard deviation function in Excel can sometimes be confusing, but by answering a few questions, you can easily determine which one to use:

Are you calculating standard deviation for a sample or a population?

  1. If it's for a sample: Use the STDEV.S function in Excel 2010 and later, or STDEV in Excel 2007 and earlier.
  2. If it's for a population: Use the STDEV.P function in Excel 2010 and later, or STDEVP in Excel 2007 and earlier.

What version of Excel are you using?

  1. If you have Excel 2010 or later, use the STDEV.S or STDEV.P functions, respectively.
  2. If you have Excel 2007 or earlier, use the STDEV or STDEVP functions.

Does your data set include only numbers, or does it include logical values and text as well?

  • If your data set includes logical values or text that you want to include in the calculation, use the STDEVA function for a sample or STDEVPA function for a population. However, these functions may not be useful and are commonly used within larger formulas.

Excel standard deviation formula examples

Let's see some examples of how to use Excel formulas to calculate standard deviation:

Example 1: Calculating population standard deviation

Imagine you have a set of data representing the heights of students in a class. The data is in cells B2 to B50. To calculate the population standard deviation, you can use the formula:

=STDEV.P(B2:B50)

This formula tells Excel to calculate the standard deviation for the entire population of values in cells B2 to B50.

Example 2: Calculating sample standard deviation

Now let's say you have a sample of data representing the weights of a group of animals. The sample is in cells B2 to B10. To calculate the sample standard deviation, you can use the formula:

=STDEV.S(B2:B10)

This formula tells Excel to calculate the standard deviation for the sample of values in cells B2 to B10.

In older versions of Excel (2007 and lower), the formulas are slightly different:

For population standard deviation, use:

=STDEVP(B2:B50)

For sample standard deviation, use:

=STDEV(B2:B10)

By using these formulas in Excel, you can easily calculate the standard deviation of your data. It helps you understand the variability or spread of values and make more informed decisions based on the data.

FAQs

How to calculate standard deviation in Excel?

To calculate standard deviation in Excel, use the STDEV.S function for a sample or the STDEV.P function for a population.

Should I use STDEV S or STDEV P in Excel?

Use STDEV.S for a sample when you want to estimate the standard deviation of a subset, and use STDEV.P for a population when you have data for the entire population.

What is the difference between STDEV P and STDEV S?

STDEV.P calculates the standard deviation for a population, considering all the data, while STDEV.S calculates the standard deviation for a sample, representing a portion of the population.

What does standard deviation represent in Excel?

Standard deviation in Excel represents the measure of how values in a dataset deviate from the mean, indicating the spread or variability of the data.

What does standard deviation tell you?

Standard deviation tells you how much the data points deviate from the mean, giving you an idea of the dispersion or variation within the dataset. A higher standard deviation indicates more variability, while a lower standard deviation indicates less variability.

Final Thoughts

Standard deviation in Excel is a useful tool for understanding data spread and assessing its variability. With the various functions available, you can easily calculate the sample and population standard deviation. 

By interpreting the standard deviation, you gain insights into the consistency and reliability of your data. 

Excel simplifies finding the standard deviation, empowering you to make informed decisions based on data analysis.

One more thing

If you have a second, please share this article on your socials; someone else may benefit too. 

Subscribe to our newsletter and be the first to read our future articles, reviews, and blog post right in your email inbox. We also offer deals, promotions, and updates on our products and share them via email. You won’t miss one.

Related Articles

» How to Calculate Standard Deviation in Excel
» How to Add Standard Deviation Bars in Excel
» How To Calculate a P-Value in Excel

]]>
http://oktec.kr/?big=es-sp/blogs/consejos-y-trucos/best-free-screensavers-windows 2023-05-03T15:53:00-07:00 2024-03-19T06:38:47-07:00 The Best Free Screensavers for Windows 11/10 Rick Akura Más

]]>
Los protectores de pantalla son una excelente manera de agregar personalidad a su computadora y evitar que se dañe. Afortunadamente, hay muchos protectores de pantalla gratuitos disponibles para usuarios de Windows 11 y Windows 10.

Tener un protector de pantalla en su dispositivo puede resultar beneficioso de varias maneras. Protege su dispositivo contra quemaduras causadas por el uso frecuente y puede ser una opción de entretenimiento cuando está lejos de su computadora. Sin mencionar que un protector de pantalla atractivo seguramente mejorará la estética de su configuración.

The Best Free Screensavers for Windows 11/10

Este artículo explorará los mejores protectores de pantalla gratuitos para Windows 11/10 y cómo descargarlos e instalarlos.

Ir a

  1. Reloj Flip Fliqlo
  2. Briblo
  3. La Matriz
  4. zz DVD 3
  5. Demostración de Dream Aquarium
  6. Bajo el agua
  7. Mezcla de colores
  8. Primavera de Japón
  9. Hiperespacio
  10. Ciudad Nocturna

¿Qué son los salvapantallas?

Los protectores de pantalla son imágenes animadas que se muestran en la pantalla de su computadora cuando está inactiva. Inicialmente fueron diseñados para evitar el "quemado" en monitores CRT más antiguos al mostrar imágenes en movimiento cuando la computadora no se utilizaba. Esto es posible porque los salvapantallas consumen menos energía que mostrar una imagen estática.

Hoy en día, los protectores de pantalla se utilizan para agregar personalidad a su computadora y evitar el acceso no autorizado a su escritorio cuando se aleja de su computadora. En los tiempos modernos, los salvapantallas también se utilizan más con fines decorativos y de entretenimiento que para evitar que se quemen.

Hay cientos de tipos diferentes de protectores de pantalla disponibles, desde animaciones simples hasta representaciones 3D complejas.

Salvapantallas integrados en Windows 11/10

Windows 11/10 viene con varios protectores de pantalla integrados. Para acceder a ellos, siga estos pasos:

  1. Haga clic derecho en su escritorio y seleccione "Personalizar."
  2. Haga clic en "Pantalla de bloqueo" en el menú de la izquierda.
  3. Desplácese hasta el final de la página y haga clic en "Configuración del protector de pantalla."
  4. Seleccione el protector de pantalla que desea usar en el menú desplegable.
  5. Haga clic en "Vista previa" para ver cómo se ve el protector de pantalla y luego haga clic en "Aceptar" para guardar los cambios.

Los protectores de pantalla predeterminados ofrecen una excelente selección, pero hay muchos más disponibles en línea. La siguiente sección cubrirá algunos de los mejores protectores de pantalla gratuitos para usuarios de Windows 11/10.

Los 10 mejores protectores de pantalla gratuitos para Windows 11/10

Echemos un vistazo más de cerca a algunos de los mejores protectores de pantalla gratuitos para usuarios de Windows 11/10.

1. Reloj Flip Fliqlo

fliqlo

El protector de pantalla Flip Clock presenta un reloj plegable de estilo retro que muestra la hora de una manera clara y visualmente atractiva. Es perfecto para quienes aprecian un diseño clásico y desean agregar un estilo vintage a la pantalla de su computadora.

Este protector de pantalla es imprescindible para quienes aprecian el diseño atemporal de antaño. Con su pantalla de reloj retro, puede disfrutar de la comodidad de la tecnología moderna mientras agrega un estilo clásico a la pantalla de su computadora. El reloj marca las horas y los minutos de forma clara y visualmente atractiva, aportando un toque de estilo vintage a su espacio de trabajo.

Si eres un entusiasta del diseño o simplemente alguien a quien le gusta un poco de nostalgia, este protector de pantalla es una adición elegante y práctica a tu escritorio. No te conformes con salvapantallas aburridos: elige este y mejora tu experiencia digital diaria.

2. Briblo

briblo

Briblo ofrece una experiencia única y creativa para personas que buscan agregar un toque personal a las pantallas de sus computadoras. Con su estructura de construcción de ladrillos en 3D, los usuarios pueden construir y ver cómo sus propios edificios cobran vida. Personalizar y diseñar sus estructuras permite infinitas posibilidades y una salida divertida para la creatividad.

Ya sea que uses Briblo como protector de pantalla o simplemente como una forma de relajarte durante un descanso, seguramente agregará algo de emoción a tu día. Este programa es una excelente manera de mostrar su personalidad y expresar su individualidad en una plataforma que se utiliza a menudo para el trabajo y la productividad. Briblo ofrece un refrescante escape de lo mundano y aporta un nuevo nivel de personalización a la pantalla de su computadora.

3. La Matriz

the matrix

El protector de pantalla Matrix presenta el icónico código verde de la película que se desplaza hacia abajo en la pantalla. Es perfecto para los fanáticos del cine o cualquiera que quiera agregar un ambiente fresco y futurista a la pantalla de su computadora.

El protector de pantalla Matrix es perfecto para aquellos que buscan agregar un elemento futurista a la pantalla de su computadora. Los fanáticos de la película clásica se maravillarán con el icónico código verde, desplazándose hacia abajo en su monitor, como en la película. El protector de pantalla está diseñado para brindar una sensación de emoción y dinamismo a la pantalla de su computadora, lo que lo hace perfecto para quienes buscan agregar un toque de estilo a su espacio de trabajo.

Este protector de pantalla causará una impresión duradera en cualquiera que lo vea y se convertirá en un tema de conversación entre sus colegas y amigos. Entonces, ¿por qué esperar? Dale a la pantalla de tu computadora el cambio de imagen que se merece con este icónico protector de pantalla Matrix hoy.

4. zz DVD 3

zz dvd 3

Este protector de pantalla animado para Windows presenta el icónico logotipo de DVD rebotando lentamente por la pantalla, creando una visualización visual relajante.

En el fondo, coloridas manchas iridiscentes se expanden hacia afuera, recordando los patrones que se ven en la superficie inferior de los discos ópticos. El movimiento suave y los colores vibrantes se combinan para crear un protector de pantalla atractivo y profesional, perfecto para cualquier escritorio. Ya sea que necesite un descanso del trabajo o desee agregar algo de interés visual a su computadora, este protector de pantalla seguramente lo complacerá.

Descarga este increíble fondo de pantalla hoy; ¡Quizás incluso veas el logotipo del DVD en la esquina de la pantalla!

5. Demostración del acuario Dream

dream aquarium

Dream Aquarium es un innovador acuario virtual y salvapantallas que ofrece un realismo inmejorable. La presentación en video muestra el impresionante comportamiento y movimiento realista del pez generado por computadora. Al igual que sus homólogos de la vida real, estos peces digitales nadan entre las plantas, picotean objetos en el tanque e incluso se persiguen entre sí.

Es realmente sorprendente cómo el equipo de Dream Aquarium ha capturado la esencia de un próspero acuario de agua dulce. Este protector de pantalla ofrece la comodidad de disfrutar de la belleza de un acuario sin ningún tipo de mantenimiento.

Con Dream Aquarium, tendrás un oasis de paz justo en la pantalla de tu computadora. La demostración gratuita le permite disfrutar de este protector de pantalla bellamente diseñado durante el tiempo que desee. Entonces, ¿por qué esperar? Descargue hoy este acuario virtual de alta calidad y disfrute de la belleza de un ecosistema acuático vivo, respirable.

6. Bajo el agua

underwater

Sumérjase en la serena belleza del mundo submarino con este impresionante protector de pantalla submarino de Windows. Los rayos de sol se filtran suavemente desde la superficie del agua, creando olas vívidas y realistas que te transportarán a un paraíso submarino.

Con un reloj digital semitransparente en el centro de la pantalla, siempre sabrás la hora, fecha y año actuales. Elija entre un formato de 12 o 24 horas, o elimine el reloj por completo y disfrute del ambiente tranquilo de la escena submarina.

Deja que este protector de pantalla te transporte lejos del estrés de la vida cotidiana y a un mundo tranquilo bajo las olas.

7. Mezcla de colores

color mix

Para aquellos que buscan un protector de pantalla fascinante y visualmente impactante, el Color Mix screensaver es una excelente opción. Su combinación siempre cambiante de colores vibrantes crea una atmósfera hipnótica y relajante, perfecta para cualquier espacio de trabajo o área de relajación.

Los movimientos suaves y fluidos de los colores traen a la mente un movimiento fluido, dando la sensación de estar viendo un baile cautivador. Además, la compatibilidad del Color Mix Screensaver con monitores Full HD y 4k garantiza que se vea genial en cualquier resolución de pantalla, lo que lo convierte en una opción ideal para cualquier dispositivo.

Color Mix es una elección perfecta para un protector de pantalla atractivo y visualmente impresionante. Entonces, ¿por qué descargar este protector de pantalla 3D hoy y sumergirse en la belleza cautivadora de este efecto de mezcla de fluidos único?

8. Primavera de Japón

japan spring

Experimente la belleza del símbolo nacional de Japón, el legendario Monte Fuji, en la comodidad de su hogar con este protector de pantalla gratuito Primavera de Japón.

Con su simetría casi perfecta y su elegante silueta, Fuji ha sido admirado como un estándar de belleza durante siglos, inspirando a poetas y artistas por igual. La montaña es impresionante en cualquier época del año. Sin embargo, las vistas más impresionantes se obtienen en primavera, cuando los huertos de cerezos y ciruelos florecen por completo. Este increíble papel tapiz resume las maravillas naturales de esta temporada tan inolvidable.

Descarga Japan Spring y experimenta un hermoso paisaje, con el icónico Monte Fuji erguido en el centro.

9. Hiperespacio

hyperspace

El protector de pantalla Hyperspace es una fascinante simulación de vuelo espacial que ofrece una experiencia inmersiva a todos aquellos que aman vagar por la inmensidad del espacio. Su combinación única de impresionantes imágenes te permite volar entre las deslumbrantes estrellas, a través de los planos cósmicos que rezuman la grandeza del universo y a través de interminables túneles relucientes.

La mejor parte es que puedes personalizar tu viaje ajustando la velocidad, la profundidad de visión, el campo de visión y el número y tamaño de las estrellas. No solo eso, también puedes limitar la velocidad de fotogramas y controlar la resolución de la geometría, lo que te brinda un control total sobre tu experiencia.

Hyperspace, un verdadero deleite visual para todos los entusiastas del espacio, es de hecho un salvapantallas de simulación de vuelo que debes probar.

10. Ciudad Nocturna

night city

El protector de pantalla Night City es una extraordinaria obra de arte que retrata la belleza y el misterio de una ciudad al anochecer. Si miras más de cerca, las nubes de humo de color púrpura oscuro añaden un elemento de intriga a la atmósfera. Los rascacielos dormidos, de varios tamaños, crean una sensación de grandeza y asombro. Los rayos rojos del sol que envuelven la ciudad crean un majestuoso nimbo, lo que aumenta la sensación encantadora del protector de pantalla.

Este protector de pantalla es único porque las dos palmas animadas se interponen entre usted y la ciudad, ondeando suavemente con la brisa virtual. Esta es una manera ideal de relajarse y escapar de la mundanidad de la vida cotidiana. Creado con soporte moderno OpenGL, el rápido protector de pantalla funciona perfectamente en cualquier resolución de pantalla.

A pesar de sus funciones avanzadas, la instalación es sencilla y rápida, lo que le permite disfrutar de la belleza de Night City en segundos.

Conclusión

Muchos protectores de pantalla en línea pueden transformar la pantalla de su computadora en una experiencia visual sorprendente. Hay algo para todos los gustos, desde relajantes escenas acuáticas hasta viajes espaciales inmersivos y paisajes urbanos cautivadores. ¡Elija cualquiera de los diez increíbles protectores de pantalla mencionados en este artículo y lleve sus experiencias de escritorio al siguiente nivel!

Esperamos que este artículo le haya ayudado a encontrar el protector de pantalla ideal para su máquina. Si aún no estás decidido, prueba algunos de nuestros protectores de pantalla recomendados y disfruta de tu viaje a través de diferentes entornos virtuales.

Una cosa más

Nos alegra que haya leído este artículo. :) Gracias por leer.

Si tienes un segundo, comparte este artículo en tus redes sociales; alguien más también puede beneficiarse.

Suscríbase a nuestro boletín y sea el primero en leer nuestros futuros artículos, reseñas y publicaciones de blog directamente desde su bandeja de entrada. También ofrecemos ofertas, promociones y actualizaciones sobre nuestros productos y las compartimos por correo electrónico. No te perderás ninguno.

Artículos relacionados 

» Cómo organizar su escritorio de Windows 11 para aumentar la productividad
» Las mejores aplicaciones de cambio automático de fondos de pantalla para Windows 11/10
» Cómo utilizar un fondo de pantalla GIF animado como El fondo de tu escritorio

]]>
http://oktec.kr/?big=es-sp/blogs/consejos-y-trucos/engaging-content-affiliate-marketing-strategy 2023-04-10T10:06:00-07:00 2024-06-18T19:55:17-07:00 Affiliate Marketing Strategy: Engaging Content that Converts Rick Akura Más

]]>
Affiliate marketing has become one of the most popular ways of earning money online. It allows marketers to promote products or services to their audience and earn a commission for every successful sale through their unique affiliate link. With the increasing number of online businesses, affiliate marketing has become a lucrative industry with enormous potential. Enlisting the expertise of a growth marketing agency can optimize this process, amplifying your content's reach and conversion potential through strategic, data-driven approaches.

However, being a successful affiliate marketer requires more than just promoting products. It involves creating engaging content to attract potential customers and drive them to purchase. In today's world, where consumers have become more informed and skeptical, content is the key to building trust and credibility with your audience.

In this article, you'll discover why engaging content is essential for successful affiliates and how platforms like YouTube can be effective affiliate tools.

Table of Contents

  1. What Is Affiliate Marketing?
  2. How Do I Get Started With Affiliate Marketing?
  3. Why Engaging Content Is Essential for Successful Affiliate Marketers
  4. Powerful Affiliate Marketing Tools
  5. Tips for Creating Content That Converts
  6. Increasing Conversion Rates With Engaging Content

What Is Affiliate Marketing?

Have you ever recommended a product to a friend and received a commission? Well, that's essentially what affiliate marketing is! Affiliate marketing is online marketing where a person promotes a product or service to their audience and earns a commission for each successful sale made through their unique affiliate link. It's like being a salesperson, but instead of being employed by the company, you're promoting their products and earning a commission for each sale you make.

To become an affiliate marketer, you must first find a company or brand that offers an affiliate program. Many companies offer affiliate programs, from big names like Amazon and Walmart to smaller niche brands. Once you've found a company, you want to work with, sign up for their affiliate program and get your unique affiliate link. You can promote this link on your blog, social media channels, or any other platform where your audience is.

When someone clicks on your affiliate link and makes a purchase, you'll earn a commission for that sale. The commission percentage varies from company to company, ranging from 1% to 50% or more. Some companies also offer bonuses or incentives for affiliates who make a certain number of sales within a specific period.

Affiliate marketing is a great way to earn money online, but it requires effort and dedication. To succeed, you need to create content that resonates with your audience and promotes products they would genuinely be interested in. You can build a loyal following and earn steady passive income through affiliate marketing.

How Do I Get Started With Affiliate Marketing?

If you're interested in starting affiliate marketing, there are a few things you can do to get started.

  1. First, you'll need to decide on a niche or topic you're passionate about. This can be anything from beauty products to tech gadgets or pet care. Once you've chosen your niche, you can start looking for companies that offer affiliate programs related to that niche.
  2. To find affiliate programs, you can do a quick Google search for "niche + affiliate program" or check out affiliate networks like Commission Junction or ShareASale. These networks have an extensive database of companies that offer affiliate programs in various niches.
  3. Once you've found a few companies you're interested in promoting, you must sign up for their affiliate program. This usually involves filling out a form and providing some basic information about yourself and your website (if you have one).
  4. After you've been approved for the affiliate program, you'll get access to your unique affiliate link. You'll use this link to promote the company's products or services to your audience. You can share your affiliate link on your website, social media channels, or any other platform where your audience is.
  5. Start creating content that promotes the company's products or services. You could create blog posts, video tutorials, social media posts, or any other content your audience would like.
  6. Finally, track and measure how much traffic you get from each platform and how many conversions you make. This will help you determine which strategies are working best for you.

To succeed in affiliate marketing, creating quality content that resonates with your audience and promotes products you believe in is essential. By building a loyal following and providing value to your audience, you can earn a steady stream of passive income by leveraging social media wall displays to enhance your affiliate marketing efforts.

Why Engaging Content is Essential for Successful Affiliate Marketers

Engaging content is crucial for successful affiliate marketers because it helps them build a loyal audience, increases the chances of conversion, and establishes them as authorities in their respective niches.

Build a Loyal Audience

When your content is engaging, your audience will likely stick around and become loyal followers. Engaging content can come in various forms, such as blog posts, videos, or social media posts, but the key is to provide value to your audience.

By providing helpful and informative content, you can establish yourself as an expert in your niche and build trust with your audience. This trust can translate into more conversions and long-term partnerships with companies.

Increase the Chances of Conversion

Engaging content can also increase the chances of conversion. When your audience finds your content informative and valuable, they are more likely to trust your recommendations and purchase the products you promote. This is because engaging content builds a relationship between you and your audience, making them more receptive to your suggestions.

By creating high-quality content that meets their needs, you can increase the likelihood of them following through with your affiliate link and purchasing. Whether creating videos on YouTube or uploading reviews on Medium, engaging content is essential for increasing conversions.

Establish Yourself as an Authority in Your Niche

By consistently creating engaging content, you can establish yourself as an authority in your niche. This can lead to more opportunities for partnerships and collaborations in the future.

Additionally, understanding your link building statistics can provide valuable insights into how your content is performing and where improvements can be made. These statistics can help you refine your strategy, ensuring your content reaches a wider audience and garners more backlinks.

Companies are always looking for influencers and experts to promote their products. If you've established yourself as an authority in your niche, you'll be more likely to be approached for these opportunities. Being seen as an authority can also help you build your brand and increase your visibility in the industry.

Powerful Affiliate Marketing Tools

Engaging content is essential for successful affiliate marketers, as it helps reach potential customers and convert them into buyers. You might wonder where to start with so many great platforms out there. Let's review some of the most powerful tools for affiliate marketing.
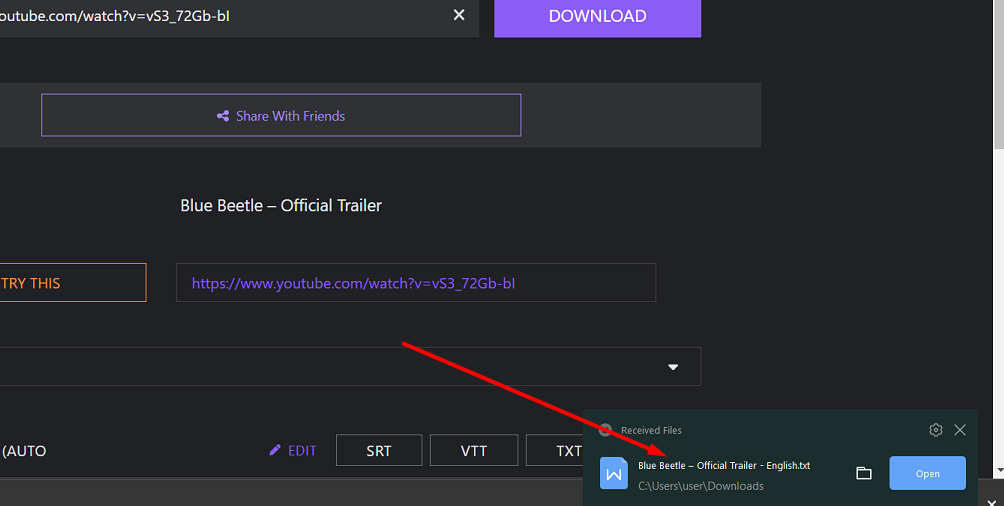
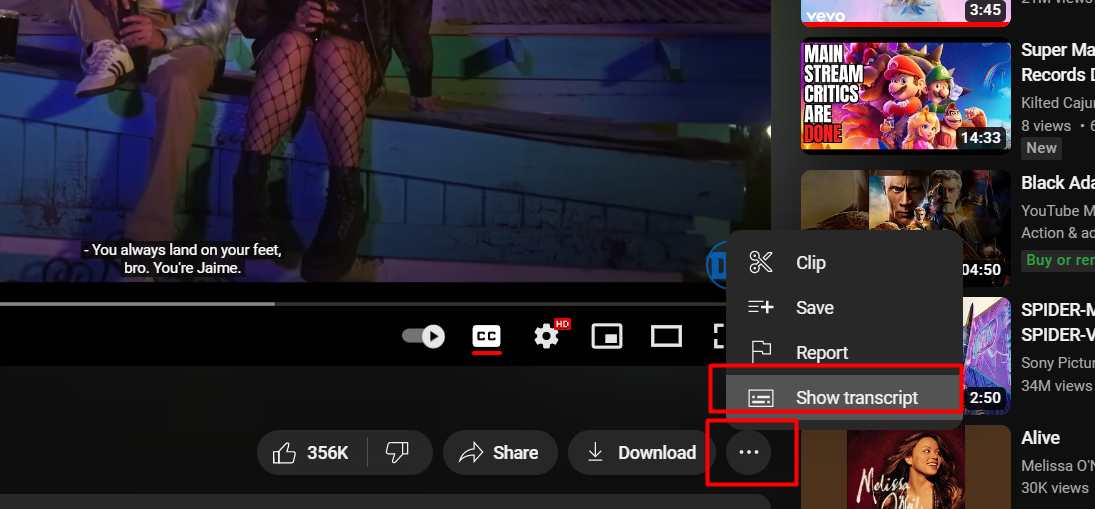
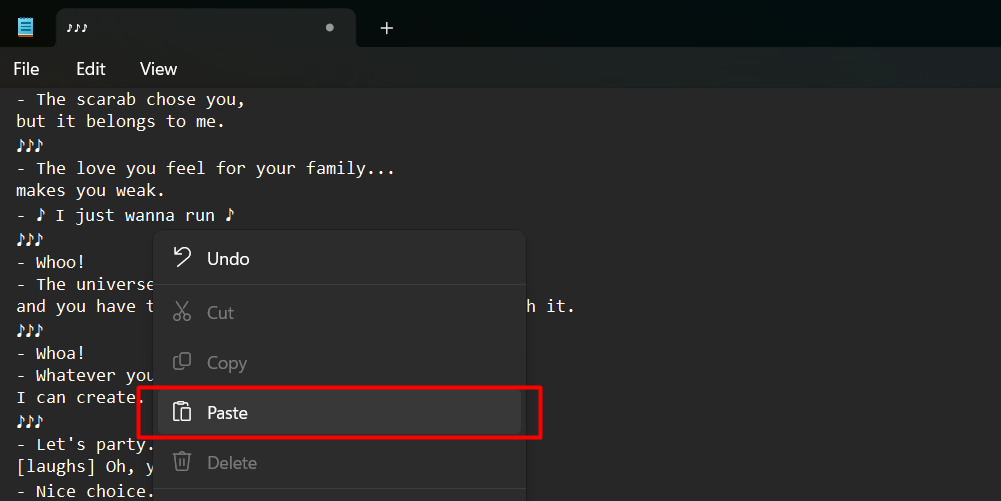
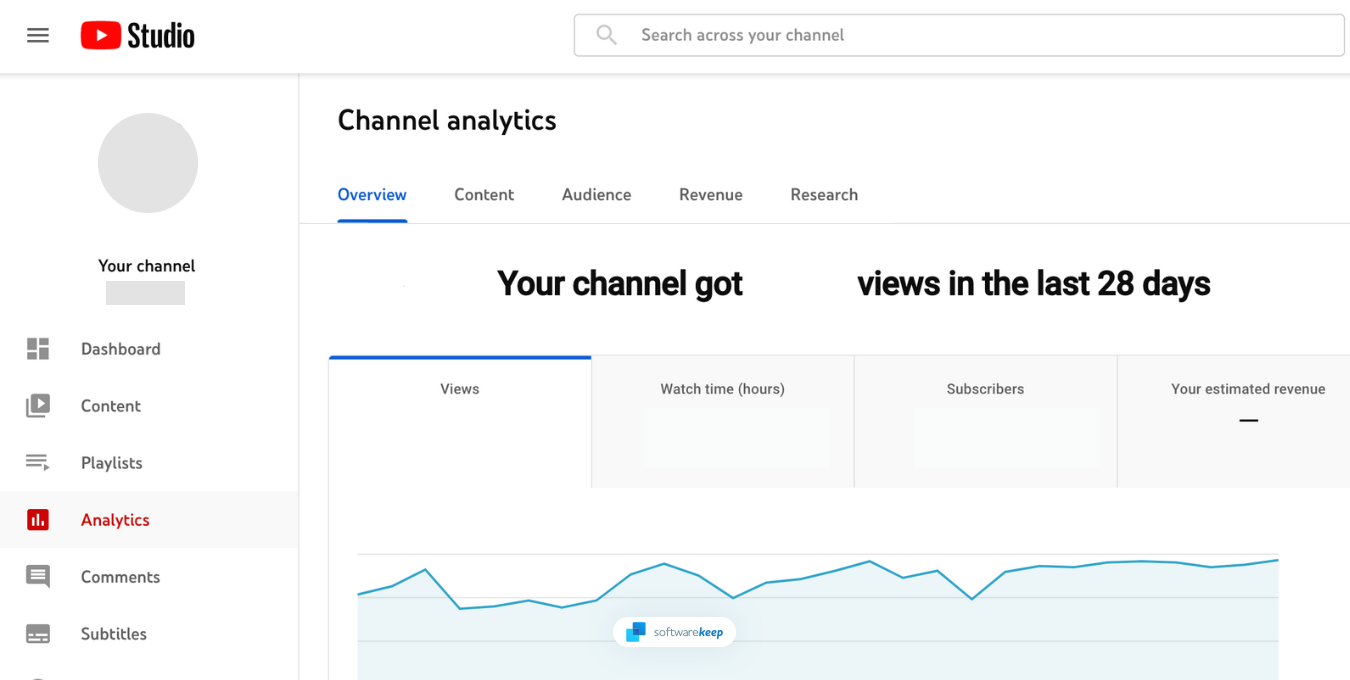
1. YouTube

YouTube analytics

YouTube is one of the most powerful tools for affiliate marketing. With an extensive user base of over 2.68 billion individuals worldwide, YouTube allows you to reach a wide audience and create videos videos that showcase your brand, products, or services.

YouTube's advanced algorithm helps push your content out to viewers who might be interested in what you have to offer. This is a great way to start with affiliate marketing, even if you don't have an audience yet. According to data from Social Video Plaza, the average time it takes to reach 1,000 subscribers on YouTube is between 6 and 12 months. This can vary widely depending on many factors, such as the quality of your content or the frequency of your uploads.

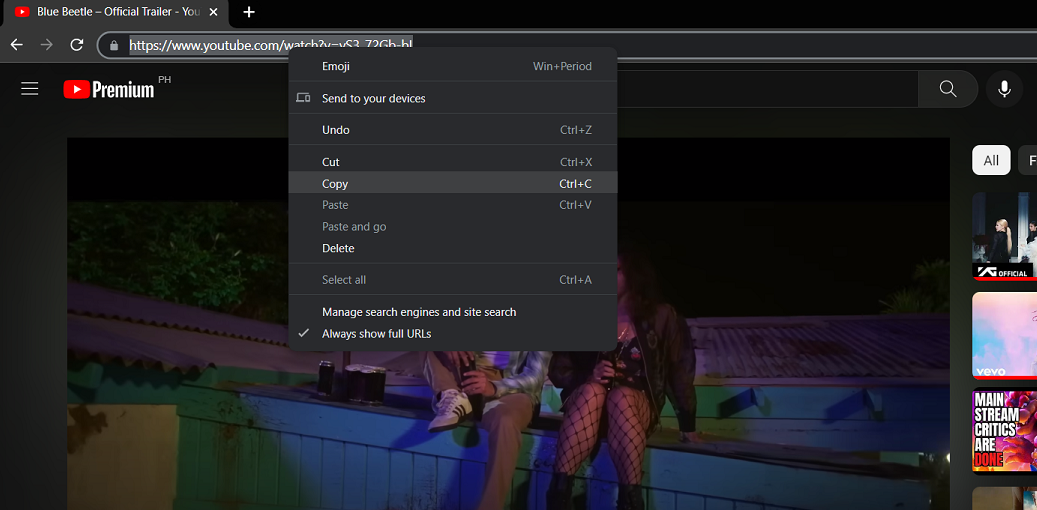
Another great thing about Youtube is that it allows you to add affiliate links to your videos, description, comments, and channel. Having your affiliate link clearly visible makes it easy for viewers to click on them and purchase products or services from your link. For example, you can place the link as the first line of your video description or create a pinned command under it with your affiliate link.

When your YouTube content becomes more popular, the analytics will start tracking views and interactions. This data can be beneficial in finding out which strategies are creating success or need some optimization. Numerous companies look for new affiliates through YouTube channels, too. You could potentially get extra income from sponsorships and affiliate deals with an impressive analytics page.

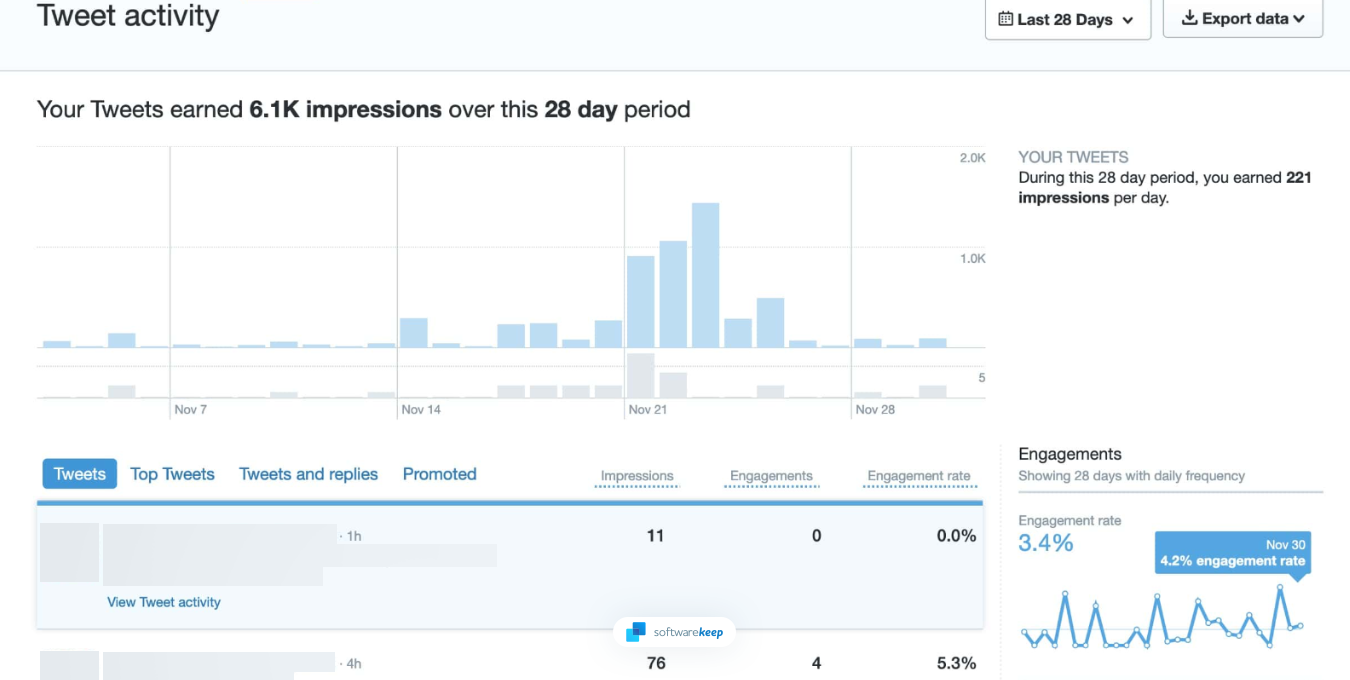
2. X (formally Twitter)

Twitter analytics

If you don't like the idea of creating videos, X (Twitter) is a perfect platform for affiliate marketing. It's highly efficient when connecting with possible clients and driving them toward your website. Despite its tight 280-character limit or more for paid X options - 4,000 characters if you have X Premium - it's still achievable to compactly communicate key points while adding value through tweets.

You can post links to blog posts, articles, or products you promote in your tweets. If your posts are missing some visuals, attaching an image or GIF is a great way to make it more attractive and eye-catching.

After you've crafted the perfect tweet, use Twitter's tools to reach your target audience quickly and check gained X or Twitter profile views. Hashtags are an effective way to gain visibility, allowing you to categorize and find related topics quickly. You can also use Twitter ads to boost specific tweets and target specific users.

Finally, X (Twitter) is an excellent platform for engaging with your followers and building relationships. If you create content that resonates with them, they're more likely to click on affiliate links placed in your tweets.

3. Facebook

Facebook still harbors many social media users, making it an ideal platform for affiliate marketers. You can create a page and post content about your products or services. Use visuals such as photos, videos, infographics, and GIFs to make the content more attractive and engaging.

Facebook also provides helpful analytics tools for measuring engagement levels with each post. This way, you can track which strategies are working and which need improvement.

Like Twitter, hashtags can categorize content according to topics or keywords. Additionally, using Facebook ads is a great way to reach more users faster. You can target specific interests and demographics with your ad campaigns for increased visibility. To understand what kind of content resonates with your target audience, explore what your competitors are doing through the Facebook Ad Library. This will help you refine your strategy and craft even more effective ad campaigns.

You should interact with your followers frequently and nurture relationships to make the most out of Facebook. This will help strengthen the trust between yourself and your audience, making them more likely to click on affiliate links posted in your content.
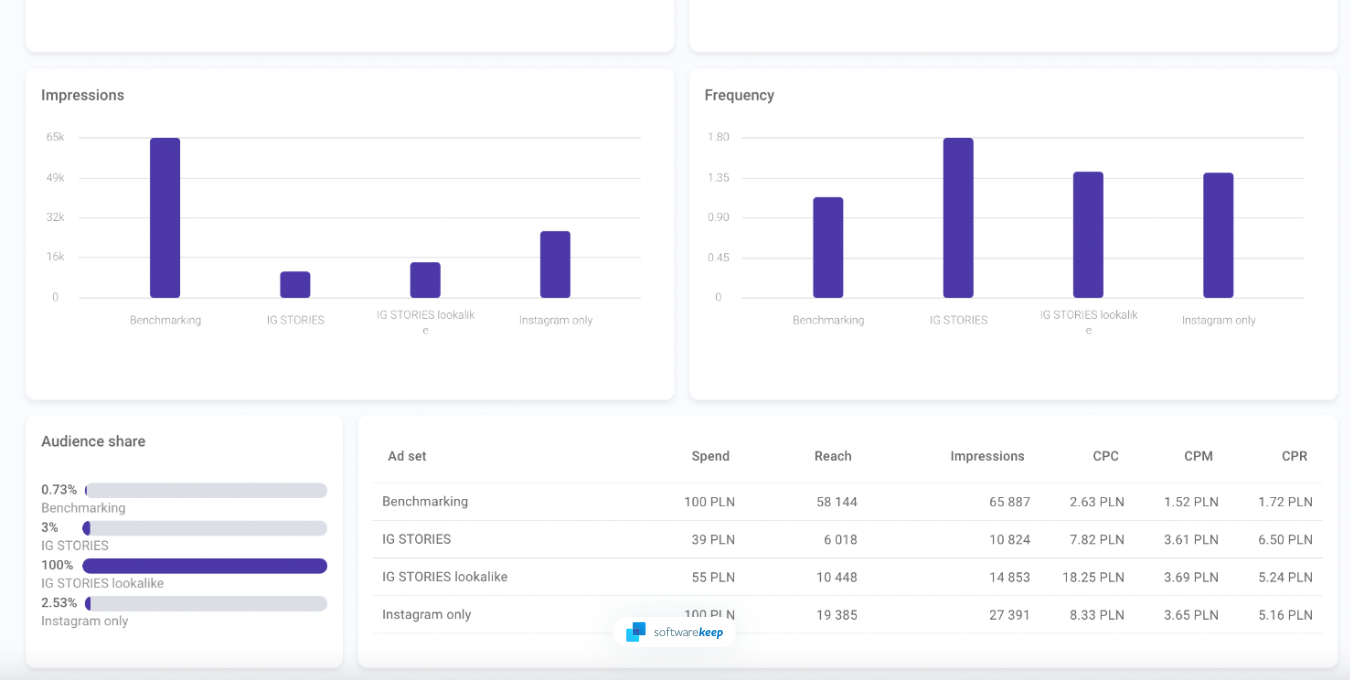
4. Instagram

Instagram insights

Instagram offers unique tools to affiliate marketers. While the platform is heavily built on sharing images and utilizing hashtags to push out your content, you can also use Stories and Reels to promote your affiliate products in a fun and unique way. Keeping the content fresh and exciting is key to success on Instagram, as people tend to be drawn in by visuals.

Crafting captions for images to include an affiliate link can be tricky. Get creative with your approach and encourage people towards your link without being too long-winded. Asking people to check your story or bio is a popular way of placing your affiliate link in an easily accessible spot.

With Instagram stories, you can add widgets that quickly integrate a link, making it easy for your viewers to tap or click. If you have more than 10,000 followers on Instagram, you can also use the "swipe up" feature on your stories. This feature allows you to add a link that viewers can access by simply swiping up the story.

Instagram also has helpful analytics and advertising tools to measure engagement levels and reach more users quickly. Additionally, you can use influencers or collaborate with other brands to increase the visibility of your posts.
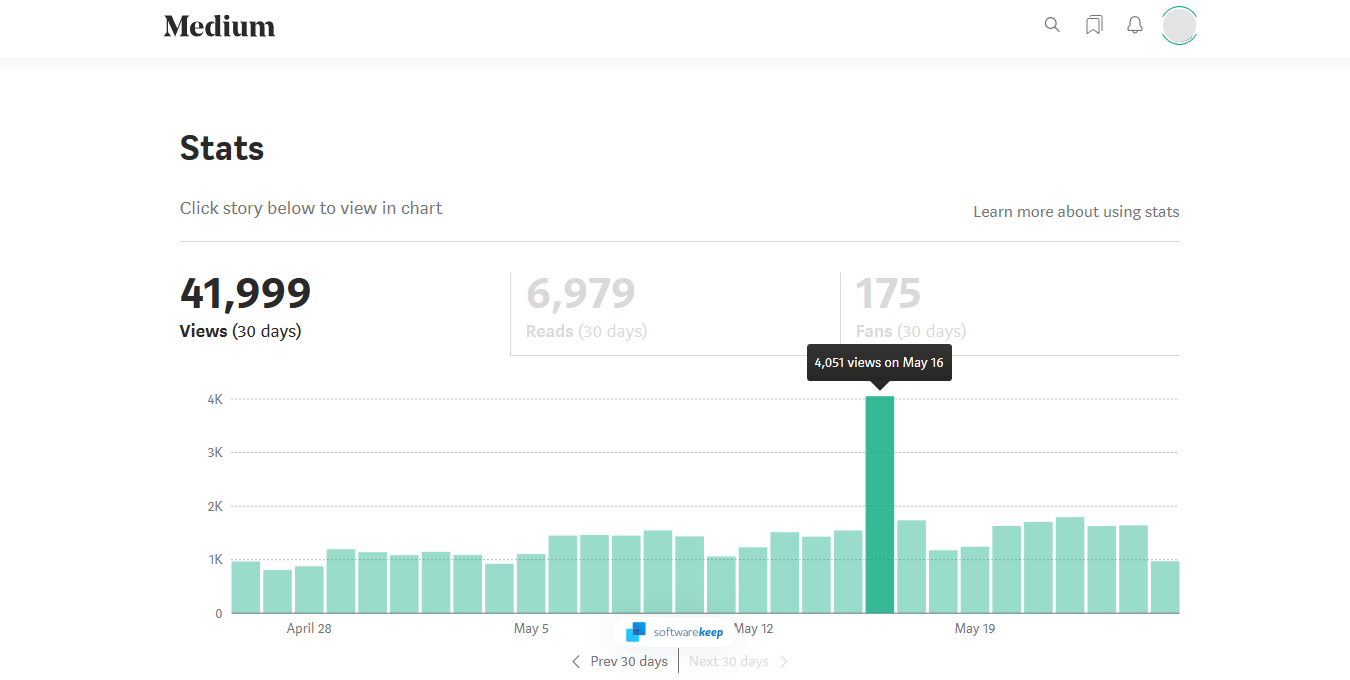
5. Medium

Medium analytics

Medium is a great platform for creating content related to your chosen niche and expressing your knowledge and ideas. You can post blog articles with affiliate links and use the built-in analytics tools to measure engagement. Writing engaging, factually correct posts that give you an edge over your competitors in the same niche is important.

Using keywords and hashtags can help you reach more users on Medium, as they are used for categorizing posts according to topics or keywords. You can also use the platform's newsletter feature to send your content to a larger audience. Learning more about SEO and using the right keywords can make it easier for people to find your posts.

Medium also has its own advertising tools, which allow you to reach more users with targeted ads and track which ones are performing optimally. Additionally, you can collaborate with other authors in the same niche to increase the visibility of your posts and gain more followers.
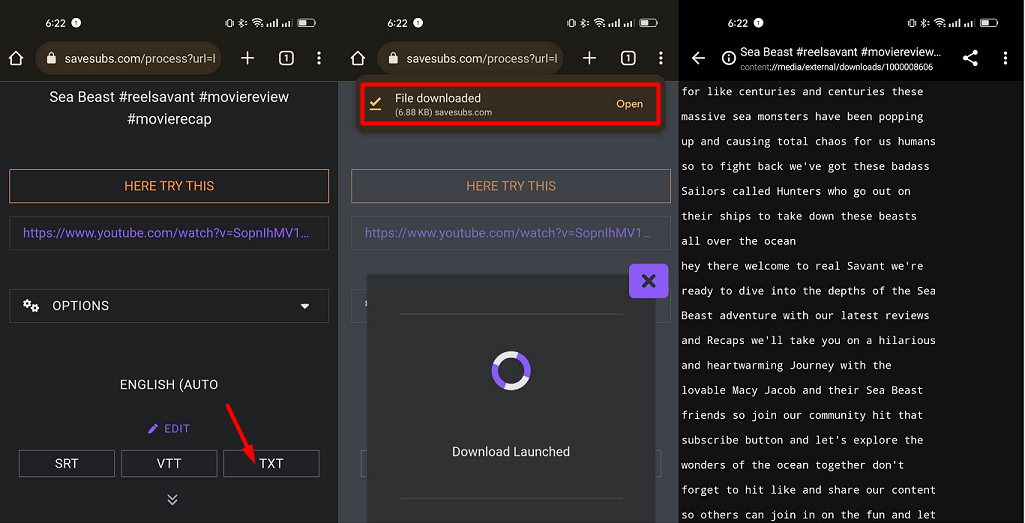
6. TikTok

TikTok analytics

Despite its lack of credibility amongst professionals, TikTok remains one of the top social media platforms. In 2021 and 2022, global users spent around 20% more hours each month using TikTok - a clear demonstration that it is here to stay, and it's your chance to take advantage of it.

TikTok is an excellent platform for affiliates. Thanks to its advanced and always-evolving algorithm, TikTok pushes your content out to local and global audiences who might be interested in what you have to offer. Using hashtags and keyword optimization, you can also target users likely to engage with your content.

Crafting creative videos encouraging viewers to check out a link or product is key for successful affiliate marketing on TikTok. On this platform, grabbing the attention of your viewers is especially important since most videos are short clips. Using catchy and trendy music combined with creative transitions can help you capture the attention of potential customers.

Promoting your content and channel on TikTok is relatively easy. You can Maximize TikTok followers by simply interacting with other users in your niche to boost your reach and push your content out to users who interact with the same creators. 

Additionally, buying TikTok likes can also enhance your content’s visibility and engagement on the platform faster. This unique feature of TikTok can help you take advantage of the platform. You can even do a live stream on TikTok to engage your audiences to buy products. In fact, you can even earn money by receiving virtual gifts like TikTok Galaxy, Lion, etc. It is a great way to not only interact with your audiences and build a strong relationship with them.

Unfortunately, you cannot place links in your video or its description on TikTok, making promoting your affiliate links tricky. We recommend creating a website or a Linktree page where you can place all your affiliate links in one place. You can then add the link to that in your TikTok bio. This way, your viewers can easily access all of your affiliate links in one place.

7. Websites

Creating your own website gives you the most control over your affiliate marketing efforts. You can design it to fit the needs of your target audience and customize the look and feel however you'd like. Your website is an effective platform for promoting yourself as a professional, providing information about your services or products, or publishing blog posts to get more leads.

While making a website from scratch might seem like a daunting task to take on, today's technology makes it much more accessible than ever before. With WordPress and content management systems, you can easily set up a website in no time at all and start promoting your affiliate links right away.

Once your website is up and running, several ways exist to promote your affiliate links to the right audience. You can use SEO tactics such as keyword optimization and link building to increase your website's rankings in the search engine results pages. Additionally, you can reach out to influencers or other websites in your niche and do cross-promotion activities with them.

No matter what approach you take, it is essential to remember that content is vital when it comes to successful affiliate marketing. The more engaging and informative your website content is, the more likely potential customers will click on your links and make a purchase. Quality content is essential for increasing conversion rates and achieving success with affiliate marketing.

Tips for Creating Content That Converts

Creating engaging content that converts requires careful planning and execution. Here are some tips to help you create content that can convert your audience into customers:

  • Know your audience: Understanding your audience's pain points and preferences can help you create content that resonates with them.
  • Choose the right products: Selecting the right products to promote can make a huge difference in your conversion rates. Choose products that align with your audience's interests and needs.
  • Use visuals: Incorporating visuals into your content can make it more engaging and memorable. Use images, videos, and infographics to convey your message effectively.
  • Provide value: Your content should provide value to your audience. Whether through informative product reviews or valuable tutorials, ensure your content is helpful and informative.
  • Be authentic: Authenticity is crucial when building trust with your audience. Be honest in your product reviews and recommendations, and only promote products you genuinely believe in.
  • Cross-promote: Post your content on other social media platforms to increase visibility and reach more users with your affiliate content. For example, share your new YouTube video on TikTok, to boost TikTok followers, or post snippets of your Medium blog post on Twitter with a link pointing back to the full video or article.

These tips can help create content that converts and increases your affiliate conversions.

Increasing Conversion Rates With Engaging Content

Crafting engaging content is essential for successful affiliate marketers, as it increases the likelihood of reaching potential customers and converting them into buyers. When you consistently give people helpful information, they will trust you and think of you as an expert. This way, more people will buy the products or services you're affiliated with.

Here are some tips to help you use content to boost your affiliate revenue:

  • Offer incentives: Discounts or free trials can encourage your audience to purchase.
  • Use calls to action (CTAs): Include CTAs in your content to encourage your audience to take action. Whether to click on your affiliate link or make a purchase, CTAs can be a powerful tool to drive conversions.
  • Leverage User Generated Content: UGC social proof, such as customer reviews or testimonials, can help build trust with your audience and increase your conversion rates.
  • Optimize your content: Optimize your content for search engines to increase its visibility and attract more potential customers.

These tips can help you create content that converts and boosts your affiliate revenue. With a well-thought-out strategy, you can earn more money with affiliate marketing.

Conclusion

In conclusion, affiliate marketing can be a great way to earn money by promoting products or services that you believe in. With the rise of social media, there are many platforms that you can use to promote your affiliate links, including Instagram, YouTube, TikTok, and more. Affiliate marketing on TikTok can be a great way to grow your TikTok followers and earn money by promoting and selling other company’s products or services for a commission.

Creating engaging content and strategically sharing your affiliate links can increase the chances of driving traffic and earning commissions from your efforts. It may take some time before you start making money, but dedication to high-quality, consistent content will pay off in the long run. Good luck on your affiliate journey!

One More Thing

We’re glad you’ve read this article. :) Thank you for reading.

If you have a second, please share this article on your socials; someone else may benefit too. 

Subscribe to our newsletter and be the first to read our future articles, reviews, and blog post right from your inbox. We also offer deals, promotions, and updates on our products and share them via email. You won’t miss one.

Related Articles 

» How to Be a Great Affiliate
» How to Reach More People When Affiliate Marketing
» Why Be a SoftwareKeep Affiliate?

]]>