http://oktec.kr/?big=blogs/product-guides.atom SoftwareKeep - Product guides 2024-04-05T02:32:53-07:00 SoftwareKeep http://oktec.kr/?big=blogs/product-guides/2023-24-cv-templates 2024-04-05T02:32:53-07:00 2024-04-14T13:41:03-07:00 Modern CV Templates for 2024 - Free Download Selection Calvince Nyawara More

]]>
In the ever-evolving landscape of job applications, staying ahead is paramount. As we step into 2023/24, your CV deserves to reflect the contemporary essence that sets you apart.

It's not just a template; it's your narrative, your journey. Crafted meticulously, these modern CV templates empower you to make your mark in a competitive world.

Each line, each achievement, a testament to your uniqueness. Your story, presented with precision, awaits.

Ready to seize that coveted role? Let's embark on this transformative journey and explore the realm of free, downloadable modern CV templates. Your future starts here.

Table of Contents

  1. The Power of Effective CV Templates:
  2. 10 Free Download CV Template Showcase
  3. Advantages of Using CV Templates
  4. How to Choose and Download
  5. Tailoring Your Template
  6. Final Thoughts

The Power of Effective CV Templates:

In today's competitive job market, a well-crafted CV is your ticket to getting noticed by potential employers. It's not just a document; it's your opportunity to make a lasting impression. Here's how top-notch CV templates can transform your job search journey:

  1. Showcasing Your Worth: CV templates are more than just visually appealing layouts. They act as a canvas to sell your skills and experiences effectively. By organizing your achievements clearly and structured, they tell employers you're the perfect fit for the role.
  2. Crafting a Memorable First Impression: In a job search that resembles speed dating, that initial interaction counts. And what's the first thing employers see? Your resume. A well-designed CV template ensures that the first impression is a lasting one. It captivates attention and entices employers to delve deeper into your profile.
  3. Tailoring for Success: Imagine this: a job description that perfectly matches your skills. Tailoring your CV using specific templates for different job roles lets you align your experiences with what employers seek. This tailored approach signals that you're not just any candidate – you're the candidate they've been searching for.
  4. Navigating the Crowded Market: With job markets flooded, it's crucial to stand out. The right CV template aids in presenting your accomplishments in a compelling way, highlighting what sets you apart. This instantly makes you a stronger contender in the eyes of potential employers.
  5. Securing That Interview: By demonstrating how your background aligns with the job's requirements, tailored templates increase the odds of being shortlisted for interviews. You'll breeze through the initial selection phase, inching closer to the coveted interview opportunity.

10 Free Download CV Template Showcase

Imagine having a treasure trove of CV templates at your fingertips, each tailored to suit your unique style and professional needs. Well, your job search just got a whole lot easier with this handpicked collection of the best 10 free CV templates:

Canva

From modern to creative, Canva offers an array of sample resume templates to spark your creativity. You can choose designs that align with your personality and aspirations.

Novoresume

Crafting a professional resume is a breeze with novoresume. Their free templates are designed to streamline the process, helping you create a standout resume in under 5 minutes.

Zety

Whether you're aiming for a job or academic pursuit, Zety's resume templates have you covered. Their free and professional designs cater to various roles and industries.

Resume.io

Speed up your job hunt with resume.oi's user-friendly templates. Choose from modern, simple, creative, or professional options and download your resume in no time.

MyPerfectResume

Gain access to an assortment of top-notch and free resume templates. You can even incorporate pre-written content from Certified Professional Resume Writers (CPRW).

Resume-Now

From classic to modern layouts, Resume-Now boasts a variety of industry-leading resume templates. Each design is geared toward helping you make a lasting impression.

Hloom

Download free basic resume templates from Hloom's library. Whether you're seeking an economic or exemplar design, these templates cater to various preferences.

Coolfreecv

Create a modern, professional CV in a flash with coolfreecv's downloadable templates. The easy-to-use builder ensures you have a polished resume ready in just 10 minutes.

ResumeGenius

With over 550 free resume templates, ResumeGenius has options aplenty. Their HR-approved designs make it a breeze to fill in the details and stand out.

Indeed

Harness the power of Indeed's resume templates. Choose from their library and customize your resume to showcase your strengths. When ready, you can share it on the platform.

Advantages of Using CV Templates

Professionally designed CV templates offer many benefits that significantly enhance your job-seeking journey. Here's a breakdown of why these templates are your secret weapon:

  1. Effortless Time Saver: Templates come to the rescue when time is of the essence. Imagine having a pre-designed format that only requires filling in your details. This eliminates the need to start from scratch, saving you valuable time and effort.
  2. Comprehensive Information: Templates act as a checklist, ensuring you don't miss out on crucial information. From contact details to work history and skills, every pertinent detail finds its place, leaving no room for oversight.
  3. Format Consistency: One of the most frustrating challenges is getting the formatting just right. CV templates eliminate this hurdle by adhering to established formatting rules. Your document remains visually appealing and professional without the headache.
  4. Tailored Solutions: Templates are designed with job seekers' common challenges in mind. They provide solutions for creating a polished document that captures attention and effectively communicates your capabilities.
  5. Accessibility for All: You don't need to be a graphic designer to create an impressive CV. Templates level the playing field, allowing individuals from all backgrounds to present themselves professionally.

In job applications, templates shine as a convenient and efficient tool. They cater to the needs of individuals who might not possess design skills yet aspire to make a lasting impression on potential employers. 

Using a CV template is absolutely acceptable and even recommended. It ensures your application stands out in a crowded field, bolsters your professionalism, and lets you focus more on the content that truly matters – your skills, experiences, and potential to excel in your desired role.

How to Choose and Download

Selecting the ideal CV template can be pivotal in your job search journey. Here's a simplified guide to help you navigate the process:

  1. Tailored to You: Consider your industry, job role, and personal style. Opt for a template that effectively aligns with your professional aspirations and showcases your strengths.
  2. Balancing Act: Choose a CV template that strikes the right balance between practicality and professionalism. Avoid excessive tables, charts, or flashy elements that might distract from your career story.
  3. Breathing Space: Your CV should be easy to read and navigate. Opt for a template that allows your career journey to shine, offering ample space for details without overwhelming the reader.
  4. Printability Matters: Keep in mind that recruiters might print your CV. Opt for a design with a clean, white background to ensure readability and professionalism even on paper.

Downloading and Customizing Your Chosen Template

  1. Download: Once you've found the perfect template, look for a download option. Many platforms offer both free and premium templates. Choose the one that suits your needs.
  2. File Format: Templates are usually available in formats like Microsoft Word. Download the file to your device.
  3. Customization: Open the downloaded template in the appropriate software. Replace the sample content with your own information. This includes personal details, work history, skills, and achievements.
  4. Formatting: Pay attention to formatting. Adjust fonts, colors, and spacing to ensure consistency and readability. Tailor the template to your unique story.
  5. Review: Once customized, carefully review your CV for accuracy, grammar, and clarity. It's your first impression, after all!

Tailoring Your Template

Customizing your CV template is more than just adding your details – it's about making it uniquely yours. Here's why personalization matters and how you can infuse your personality into your CV:

  1. Relevance to You: Personalization ensures your CV highlights your skills and experiences. By aligning the content with your strengths, you present a tailored narrative that resonates with potential employers.
  2. A Unique Touch: No two individuals are the same, so your CV should reflect your distinct qualities. Customize colors, fonts, and layouts to match your personal brand and make your CV instantly recognizable.
  3. Enhanced Engagement: Like how personalized learning material keeps students engaged, a personalized CV captures employers' attention. It demonstrates your dedication and efforts in crafting a CV directly addressing their needs.
  4. Connection Building: Personalization fosters a connection. Just as brands use it to build consumer trust, a personalized CV helps employers see you as an individual, not just another candidate.

Benefits of Personalization in Various Contexts

  1. Improved Training Engagement: In the workplace, personalizing training material makes learning more relevant and engaging for employees. This boosts knowledge retention and cultivates a culture of continuous learning.
  2. Customer Retention: In business, personalization helps retain customers by tailoring experiences, offers, and interactions to individual preferences. This fosters loyalty and trust, creating lasting relationships.
  3. Building Brand Loyalty: Brands leverage personalization to drive customer loyalty. The more you tailor experiences, the stronger the bond becomes, leading to repeat engagement and sustained loyalty.

Final Thoughts

The right CV can be your ticket to success in the ever-evolving landscape of job applications. With our collection of the best 10 free CV templates for 2023/24, we've aimed to provide diverse options to suit your unique journey. 

Each template serves as a canvas for your skills, experiences, and aspirations, enabling you to make a powerful first impression. Whether pursuing a creative role, a corporate position, or any other venture, these templates empower you to showcase your potential with style. 

Elevate your job application game today and download the template that resonates most – your path to professional achievement begins here.

One more thing

If you have a second, please share this article on your socials; someone else may benefit too. 

Subscribe to our newsletter and be the first to read our future articles, reviews, and blog post in your email inbox. We also offer deals, promotions, and updates on our products and share them via email. You won’t miss one.

Related Articles 

» 10 Best Microsoft Visio Alternatives and Competitors
» 10 Best Fonts for Microsoft Excel
» Fixing Run Time Error 1004 in Excel - Troubleshooting Guide

]]>
http://oktec.kr/?big=blogs/product-guides/free-student-software 2024-04-02T23:04:08-07:00 2024-04-02T23:04:08-07:00 Top 10 Software For Students - Boost Your Academic Journey Sara Alsaqaf More

]]>
Education has undergone a transformative shift, with students increasingly relying on various software tools to streamline their learning journey. These software solutions serve a multitude of purposes, from document creation and editing to efficient storage.

The possibilities are limitless when it comes to leveraging educational software, tailored to individual needs and fields of study. Yet, amidst this vast landscape, certain essential software applications are indispensable for virtually every student. 

In the following list, we'll explore the top 10 options to enhance your educational experience. So, let's embark on this journey towards academic success.

Table of Contents

  1. Truly Office
  2. WPS Office
  3. LibreOffice
  4. SoftMaker FreeOffice
  5. Google Workspace
  6. EaseUS Data Recovery Wizard
  7. Inkscape
  8. Grammarly
  9. Mendeley
  10. AppsAnywhere
  11. Getting Started with Truly OfficeFinal Thoughts
Truly Office

Truly Office

Enter Truly Base, a comprehensive office software suite meticulously designed with your educational journey in mind. With fully customizable packages, it's the ultimate companion for students, offering a wide array of features tailored to your needs.

Features

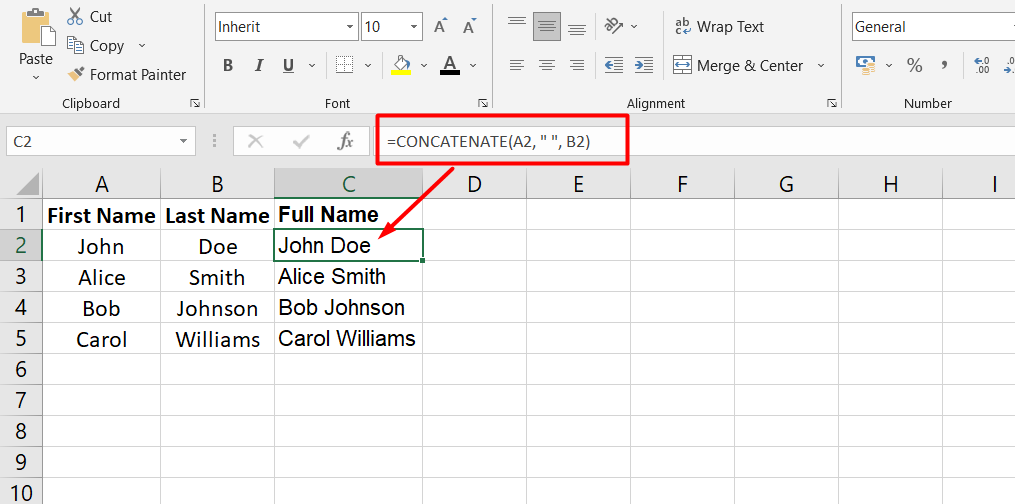
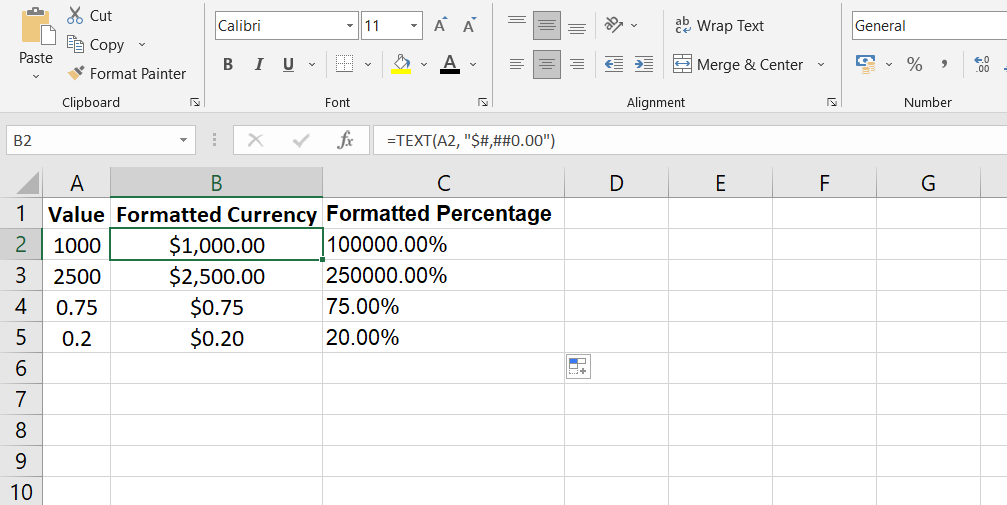
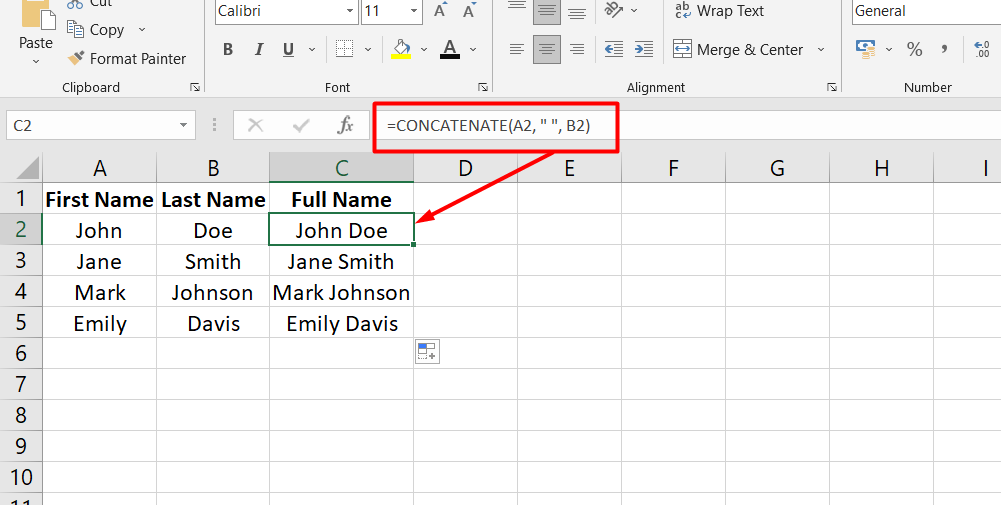
  1. Word Processing Excellence: Enjoy advanced editing tools that streamline document creation, making your academic papers and assignments stand out.
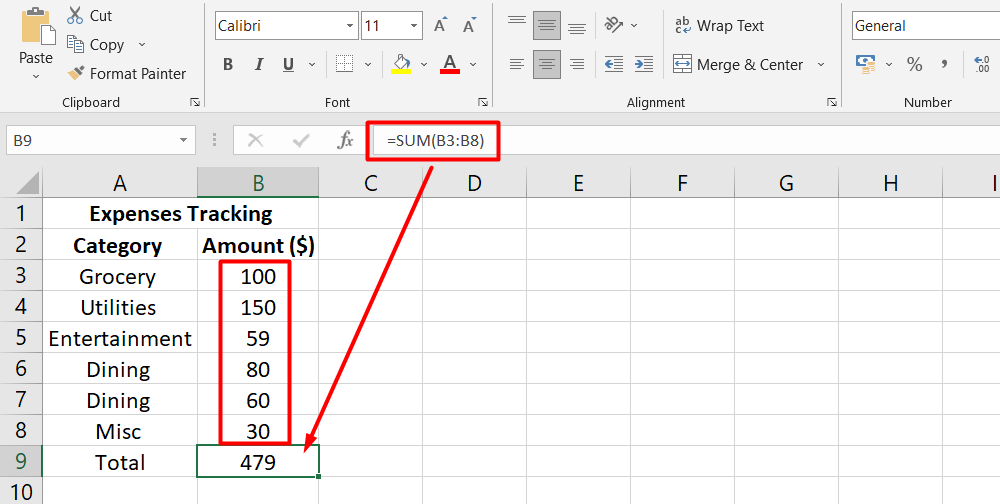
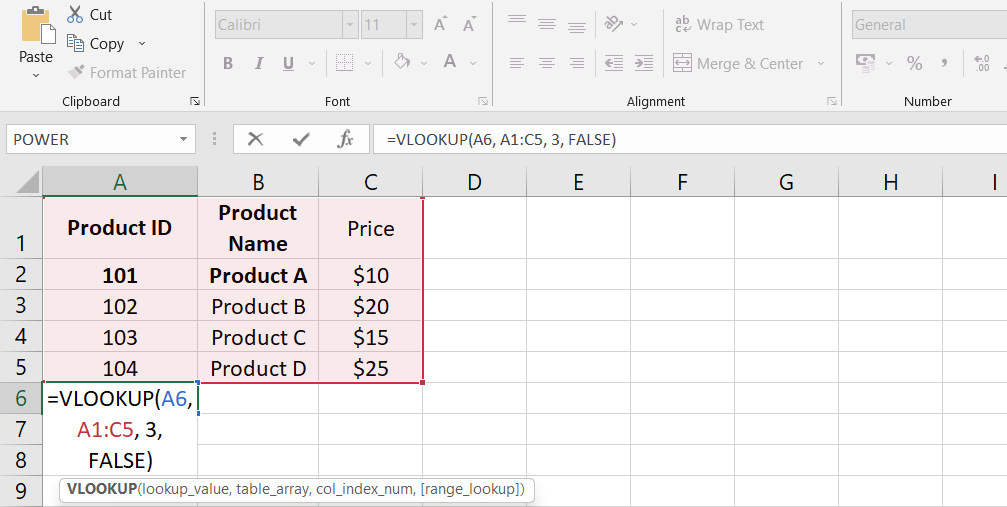
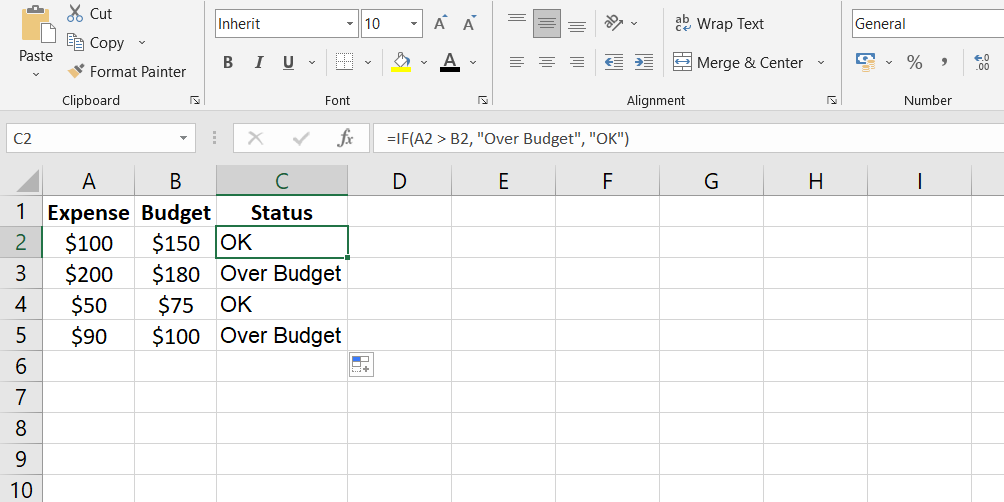
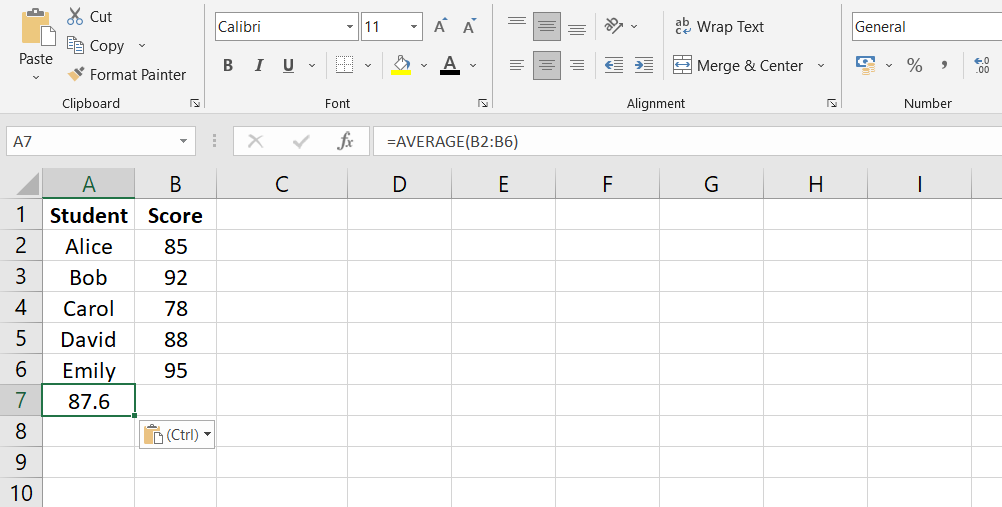
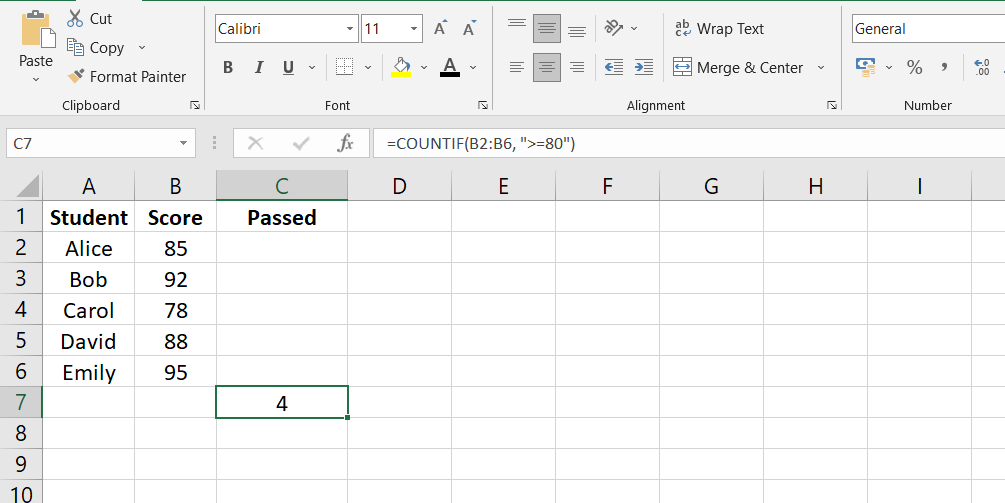
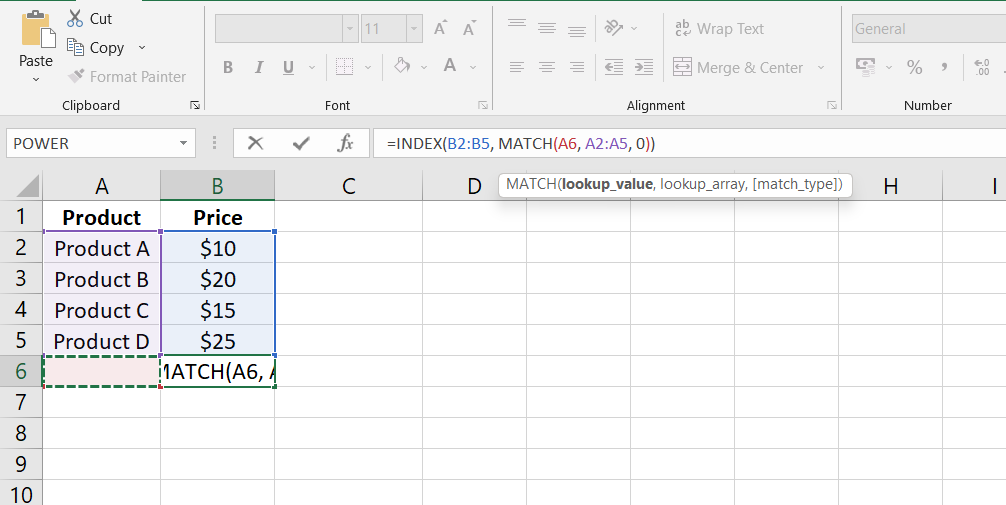
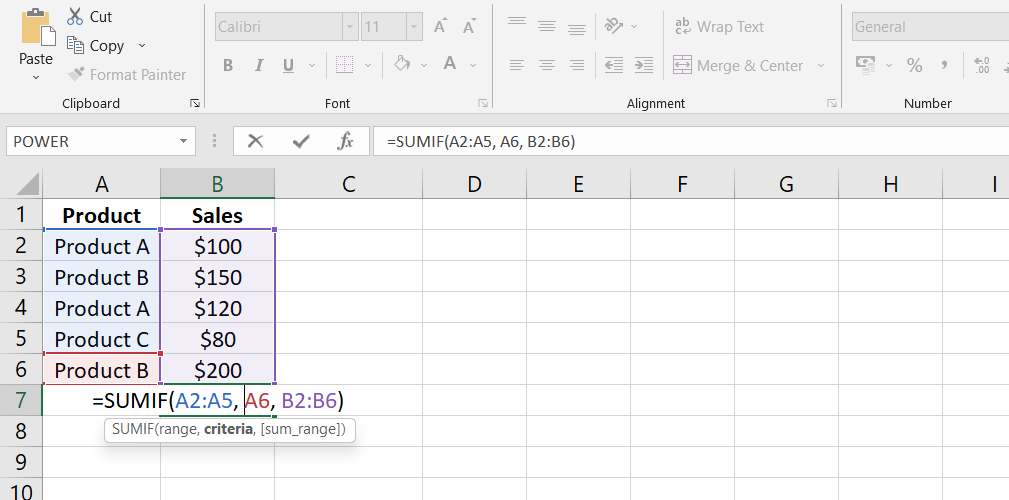
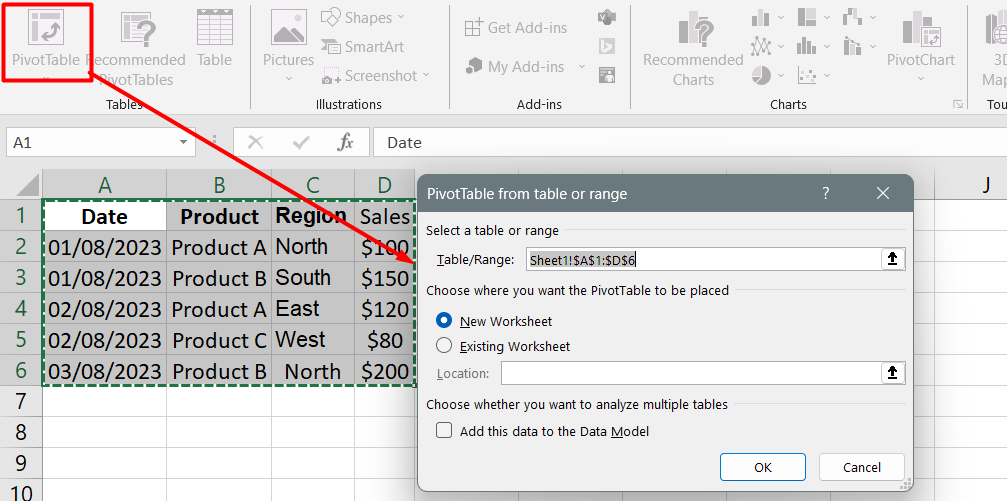
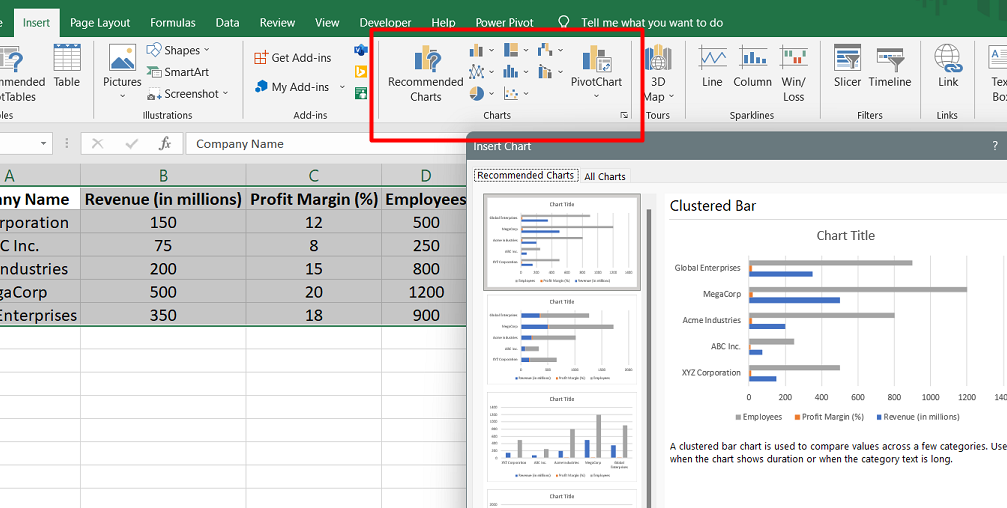
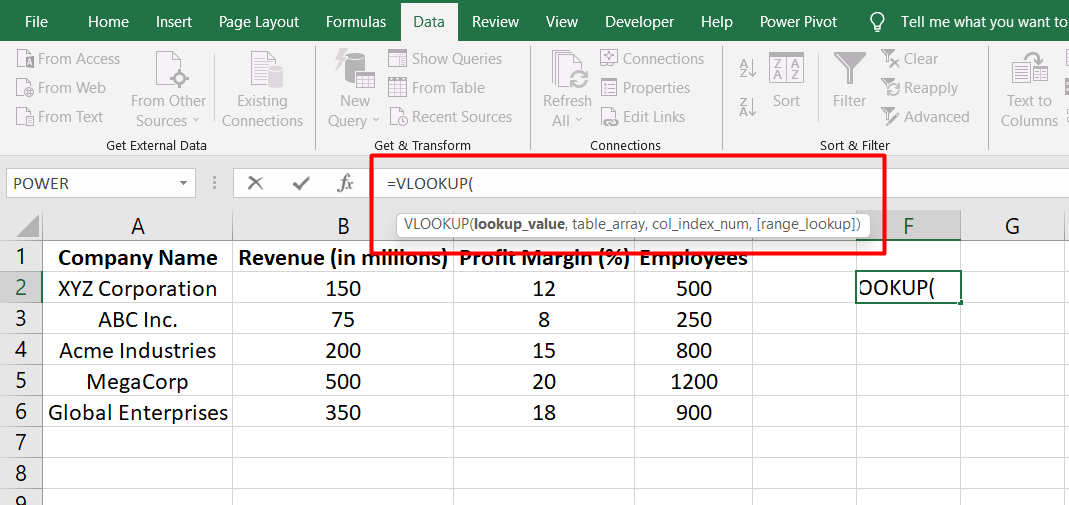
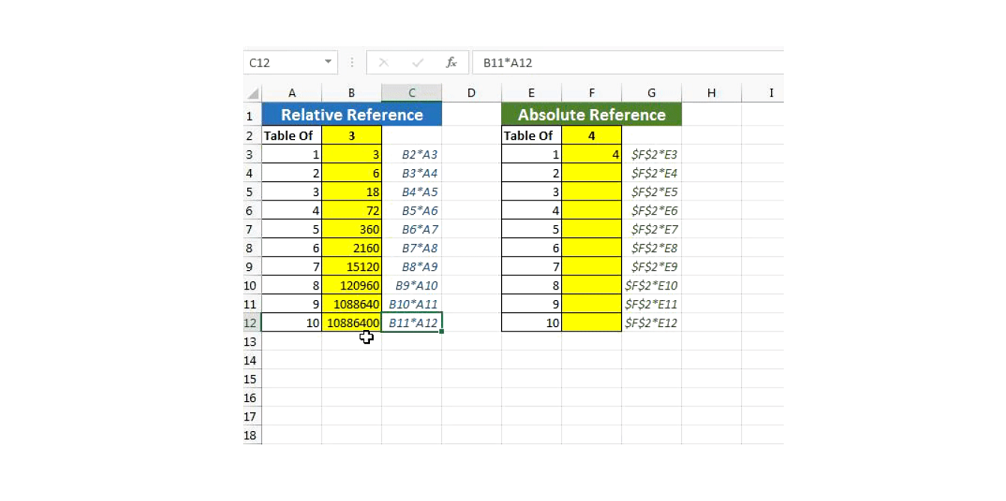
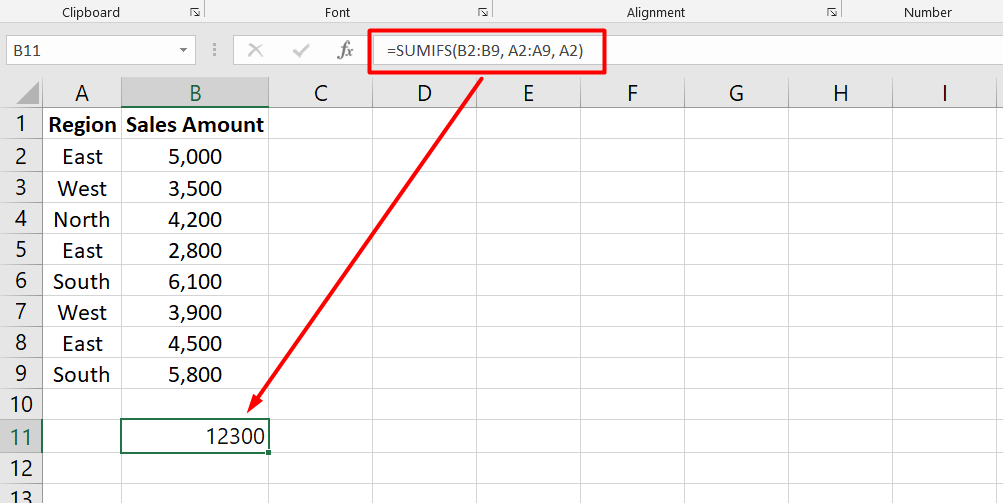
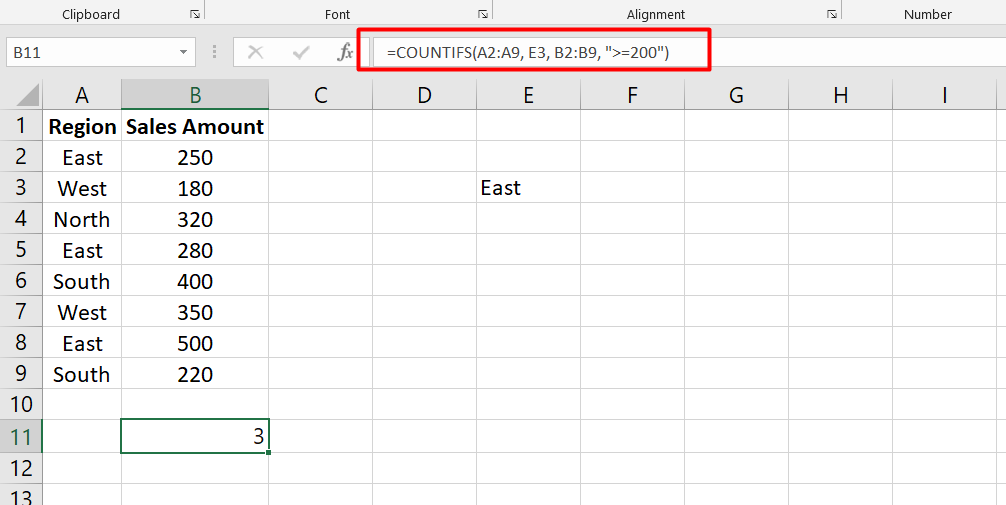
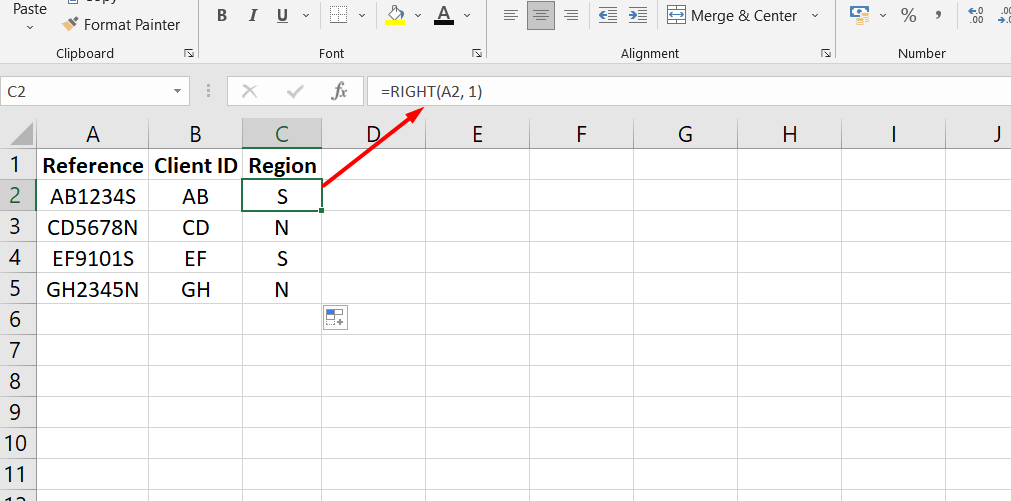
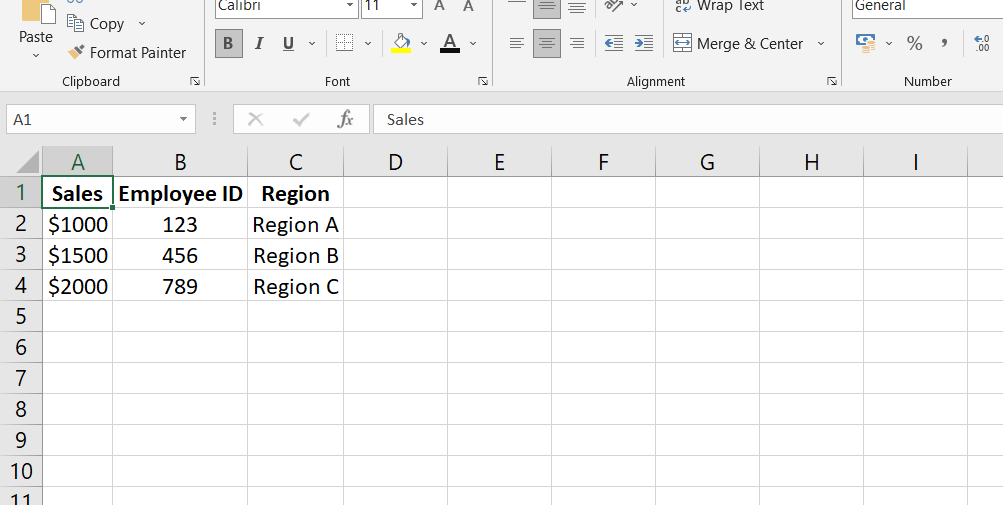
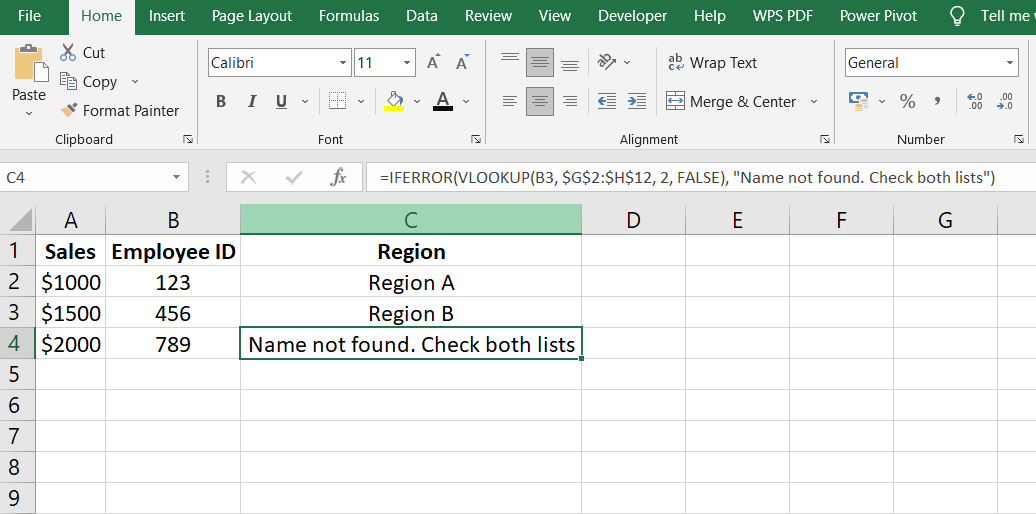
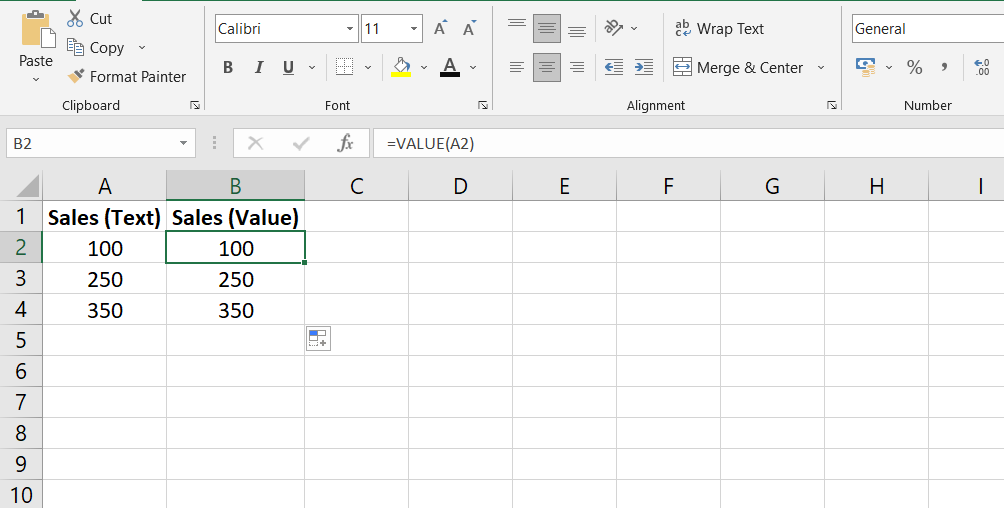
  2. Data Mastery: Harness the power of spreadsheets with built-in formulas and charts, simplifying complex data analysis.
  3. Dynamic Presentations: Create impactful presentations with customizable templates and animations, captivating your audience with every slide.
  4. Streamlined Communication: Manage your email inbox effortlessly, integrated seamlessly with a calendar to help you stay organized.

Pros

  • Multi-Platform: Access Truly Base on PC, tablet, and mobile devices, ensuring you can work from anywhere.
  • Cross-Compatibility: Compatible with Windows, Mac, Android, and iOS, ensuring flexibility across devices.
  • Truly Office Drive: Securely store your documents in Truly Office Drive, making them easily accessible.
  • User-Friendly Mobile Interface: Edit documents with ease on your iPhone/iPad, thanks to an intuitive user interface.
  • Web Accessibility: Access your documents from any browser, eliminating the need for separate MS Office installations.
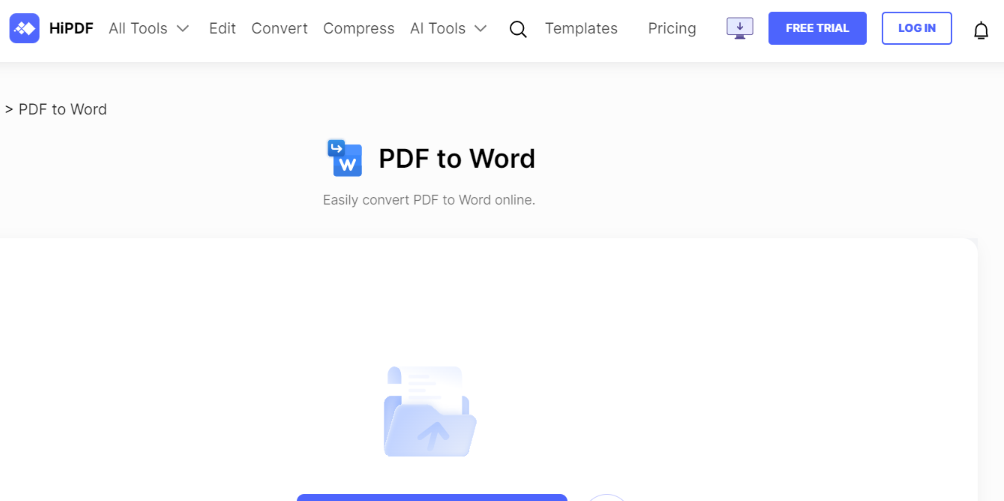
  • Versatile Tools: Perform PDF image conversion, compression, password management, merging, and dividing functions seamlessly.

Cons

  • Requires a License: Some advanced features may require a registered license key.

Truly Base is your key to academic success, offering a holistic suite of office software that adapts to your needs. Say goodbye to limitations and embrace productivity like never before. Unlock your potential with Truly Base and pave the way for educational excellence.

WPS Office

WPS Office, a remarkable software akin to Microsoft Word, emerges as a valuable asset for students seeking an efficient document processing tool. This versatile software is accessible across Windows, Android, Mac, and iOS platforms, ensuring seamless integration into your academic routine.

WPS Office

Features:

  1. Writer: Create and edit documents effortlessly, mirroring the functionality of Microsoft Word.
  2. Spreadsheets: Empower your data analysis with versatile spreadsheet creation and editing, supporting formats like .xlsx and .ods.
  3. Presentation: Deliver compelling presentations with this feature, ensuring you captivate your audience.
  4. PDF Editor: Seamlessly edit PDF documents, expanding your versatility in handling academic content.

Pros:

  • User-Friendly: WPS Office boasts an intuitive interface, making it accessible for all students.
  • Budget-Friendly: It offers an affordable alternative to pricier software options.
  • Cross-Platform Compatibility: Enjoy the convenience of using WPS Office on various operating systems.
  • Wide File Format Support: This software accommodates a diverse range of file formats, enhancing flexibility.

Cons:

  • Remarkably, there are no discernible cons reported by users.

LibreOffice

LibreOffice stands as a beacon of excellence in the realm of free and open-source software, offering a treasure trove of features essential for students in their document creation, presentations, and spreadsheet needs. This robust suite also includes a database, catering to research-oriented scholars, and Math, enabling the crafting of intricate formulas applicable across LibreOffice applications.

LibreOffice

Features:

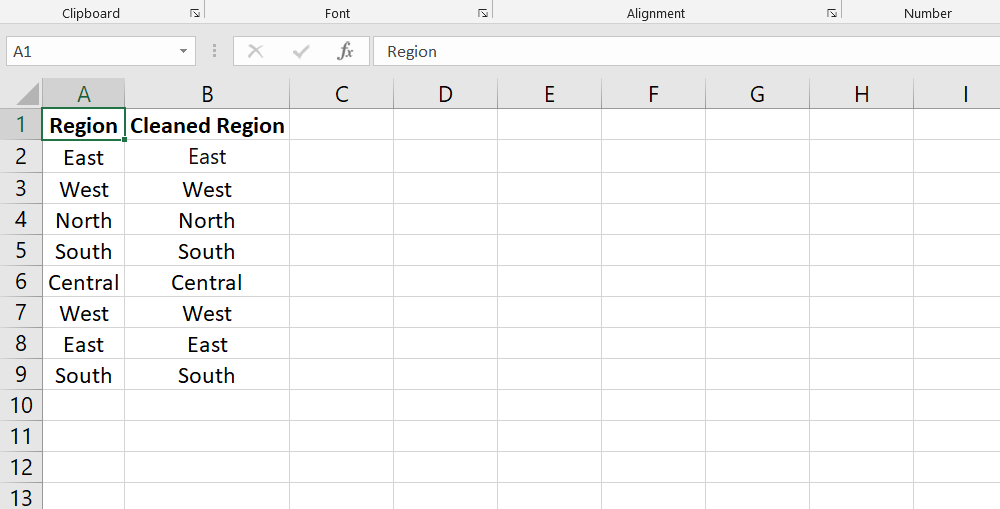
  1. Writer - Word Processor: Seamlessly create and edit text documents, meeting the core needs of students.
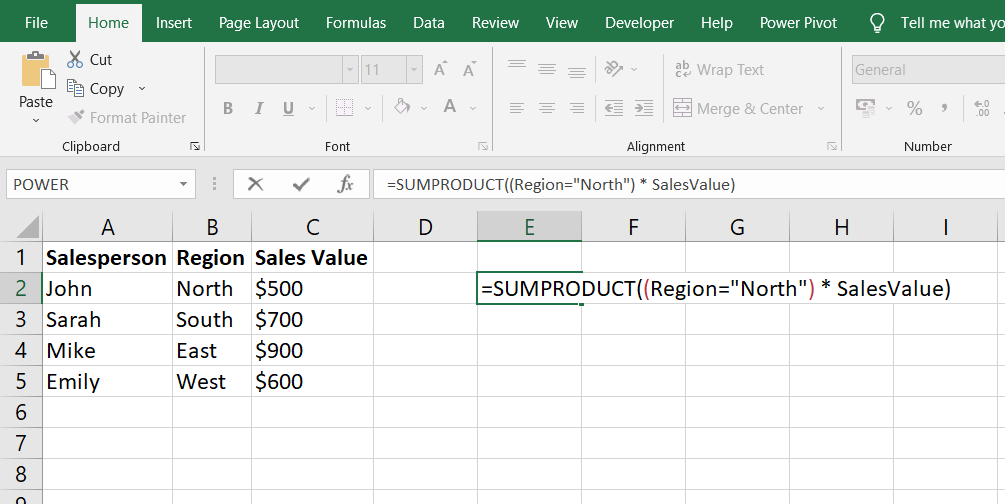
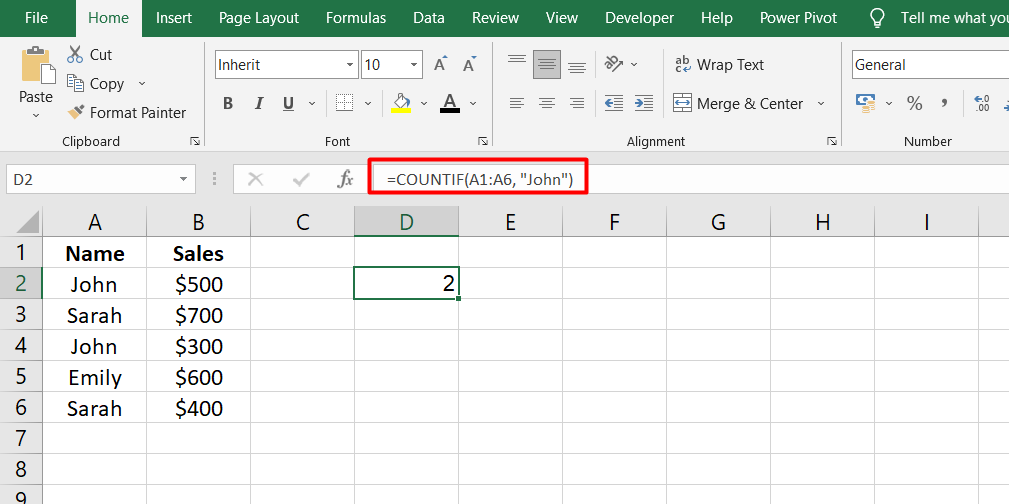
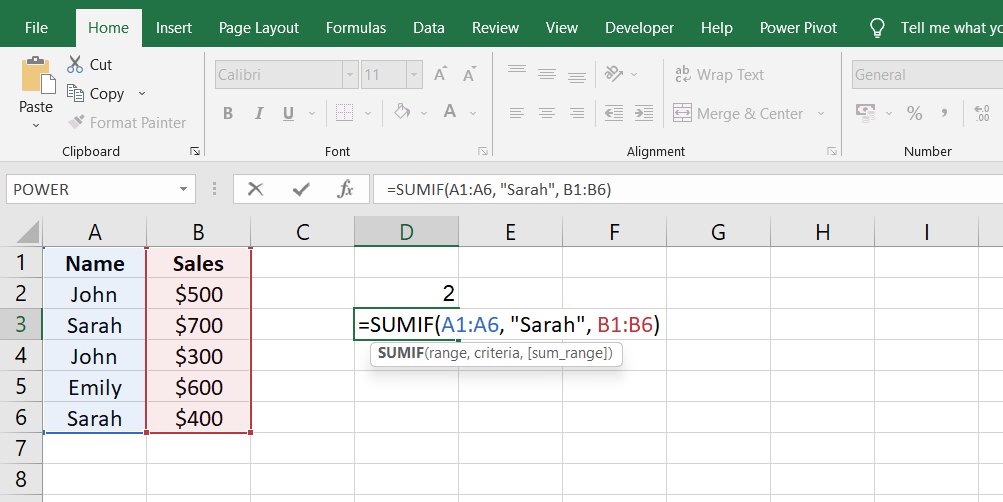
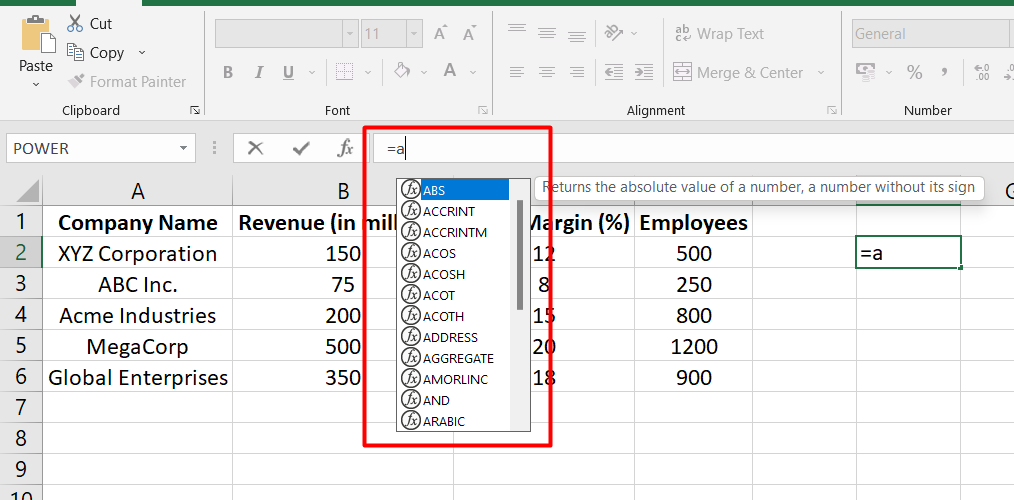
  2. Calc - Spreadsheet: This feature mirrors the functionality of popular spreadsheet applications like Google Sheets and Microsoft Excel.
  3. Impress - Presentation: Craft captivating slideshows, ideal for presentations and academic projects.
  4. Draw - Vector Drawing: Integrated graphic editing for creating compelling visuals.
  5. Base - Database: A valuable tool for research students seeking efficient data management.

Pros:

  • Offline Convenience: LibreOffice functions without the need for an internet connection, ensuring accessibility at all times.
  • Legacy Document Compatibility: Import and convert legacy documents effortlessly.
  • Cross-Platform Availability: Compatible with Windows, Linux, and macOS, catering to a diverse range of users.
  • Multilingual Support: LibreOffice accommodates various languages, fostering inclusivity.

Cons:

  • Lacks Collaboration Features: Missing collaborative functionalities that some students may require.
  • Absence of Mobile App: No dedicated mobile app for on-the-go productivity.
  • Interface Complexity: The interface may present a learning curve for some users.

SoftMaker FreeOffice

True to its name, SoftMaker FreeOffice emerges as a fantastic, cost-effective software solution for students, functioning in a manner akin to Microsoft Office. This versatile suite comprises a word processor, spreadsheet application, and a presentation program, catering perfectly to the academic needs of students.

SoftMaker FreeOffice

Features

  1. TextMaker: Empower your document creation with this versatile word processor.
  2. Spell Checker: Ensure impeccable writing with a built-in spell checker.
  3. PlanMaker: Dive into data analysis with the capable spreadsheet tool.
  4. Presentations: Craft engaging presentations for your academic pursuits.
  5. Automatic Hyphenation: Enhance document readability with automatic hyphenation.

Pros

  • Speed and Power: SoftMaker FreeOffice is known for its fast and robust performance.
  • Highly Customizable Interface: Tailor the menu-based interface to suit your preferences.
  • Version Backup: Enjoy the convenience of optional version backup.
  • Cross-Platform Accessibility: Access SoftMaker FreeOffice through dedicated apps for Windows and macOS.

Cons

  • Limited Collaboration Features: The software lacks collaborative functionalities.
  • No Document Viewing Option: Absence of a document viewing feature.
  • Performance Impact on Large Worksheets: Handling extensive spreadsheets may lead to performance slowdowns.
  • Macro Limitations: No support for recorded or scripted macros.

SoftMaker Office offers impressive features at an affordable price point, with the added benefit of a one-time lifetime purchase option, in contrast to subscription-based models. While it is more budget-friendly than Microsoft 365, it falls slightly above the affordability range of WPS Office.

Google Workspace

In the realm of free software for students, Google Workspace stands out as a powerhouse. With many educators adopting Google Docs as the standard for student submissions, this suite is indispensable for modern academic life.

Google Workspace

It fosters seamless collaboration between teachers and students while offering the convenience of centralized document storage.

Features

  1. Email: Efficient email communication integrated into the suite.
  2. Sheets: Powerful spreadsheet functionality for data organization.
  3. Google Docs: Create, edit, and collaborate on documents with ease.
  4. Google Slides: Craft compelling presentations to enhance academic projects.
  5. Google Drive: Store, access, and manage your documents in the cloud.

Pros

  • User-Friendly: Google Workspace's simple, intuitive products are easy for students to navigate.
  • Effortless Collaboration: Streamlined collaboration on documents enhances productivity.
  • Cloud-Based: With cloud-based functionality, students can access their work from anywhere.

Integration: It seamlessly integrates with a multitude of other tools, expanding its functionality.

Cons

  • Not as Advanced as MS Office: While powerful, Google Workspace may not match the advanced features of Microsoft Office.
  • Internet Access Requirement: It necessitates an internet connection for optimal use.

Google Workspace proves invaluable for online workflows among students and educators. It revolutionizes file organization in the digital realm, providing a convenient platform for storing academic and personal data online.

EaseUS Data Recovery Wizard

EaseUS Data Recovery Wizard emerges as a valuable tool for students, offering a lifeline when precious data is lost. This versatile software can be a savior in various scenarios, from accidental file deletions to sudden system crashes.

EaseUS Data Recovery Wizard

Moreover, students can use it for data backup, ensuring their important information remains safe.

Features

  1. Recovery of Deleted Files: Easily recover files that have been unintentionally deleted.
  2. Recycle Bin Recovery: Retrieve files even after they have been emptied from the recycle bin.
  3. Formatted Files Recovery: Restore data from formatted storage devices.
  4. Hard Drive Recovery: Salvage data from hard drives.
  5. Crashed OS Recovery: Recover data in the event of a system crash.

Pros

  • User-Friendly: EaseUS Data Recovery Wizard is designed for ease of use, making it accessible for students.
  • Automatic Document Backup: It offers automatic document backup, providing peace of mind.
  • No Imaging Feature: The absence of an imaging feature streamlines navigation.

Cons

  • No Thesaurus: Lack of a thesaurus feature for word-related tasks.

With EaseUS Data Recovery, students can reclaim deleted files, even after emptying the recycle bin. It's compatible with a wide range of storage devices, including hard disks, USB drives, and memory cards.

Inkscape

Inkscape stands as an invaluable tool for students, empowering them to craft intricate vector imagery. This versatile software offers a freehand drawing pencil feature, enabling students to express their creativity.

Inkscape

Moreover, Inkscape provides an array of additional tools for text, shape creation, and object cloning.

Features

  1. Drawing: Intuitive drawing tools to bring your ideas to life.
  2. Bitmap Tracing: Convert raster images into vector art effortlessly.
  3. Object Creation/Manipulation: Create, modify, and manipulate objects with precision.
  4. Node Editing, Alignment, and Distribution: Fine-tune your designs with precision.
  5. Text Support: Seamlessly integrate text into your artworks.

Students can leverage Inkscape to create logos and various visual projects. To kickstart their creative journey, they can easily download Inkscape for Windows, Linux, and Mac OS X.

Pros

  • Adobe Illustrator Alternative: Inkscape serves as a commendable alternative to Adobe Illustrator.
  • Diverse Templates: Access a wide range of templates to jumpstart your creative projects.
  • Cross-Platform Compatibility: Inkscape is cross-platform friendly, ensuring accessibility across different operating systems.

Cons

  • Unsuitable for Printing Projects: Inkscape may not be the ideal choice for intricate printing projects.
  • Limited Color Mode Options: It lacks the flexibility in choosing color modes found in some competitors like WPS Office.

Inkscape empowers students to embark on their creative journeys without the burden of cost. While it offers robust features, the software may have limitations in certain formatting aspects when compared to some of its competitors.

Grammarly

In your academic journey, written communication is paramount, and errors are bound to happen. That's where a dependable writing assistant like Grammarly steps in. It reigns as the most renowned editing software for students, offering invaluable suggestions for grammar, spelling, and style enhancements.

Grammarly

Moreover, it's adept at tailoring its editing prowess to various writing genres.

Features

  1. Grammarly Checker: Rely on Grammarly's precision for grammar and style improvements.
  2. Spelling/Punctuation Mistakes: It diligently identifies and rectifies spelling and punctuation errors.
  3. Plagiarism Checker: Safeguard academic integrity with a built-in plagiarism checker.
  4. Citation Generator: Simplify citation formatting with Grammarly's citation generator.
  5. Essay Checker: Enhance the quality of your essays with comprehensive feedback.

Grammarly seamlessly integrates with two prominent writing platforms, Google Docs and Medium. For the full Grammarly experience within Google Docs, you'll need to utilize the Chrome extension.

Pros

  • Accurate Spelling and Grammar Checker: Grammarly boasts precision in spotting and correcting errors.
  • Multi-Platform Interface: Its user-friendly interface spans various platforms, ensuring accessibility.
  • Mobile Adaptability: Enjoy Grammarly's benefits on mobile devices with ease.

Cons

  • Cost Considerations: The premium version of Grammarly can be relatively expensive.
  • Online Dependency: Grammarly operates primarily online, lacking an offline editing mode.

Grammarly's premium version is available at $29.95 per month, $59.95 quarterly, or $139.95 annually. However, the free plan offers a robust set of features that cater to the needs of many students, making it a compelling choice.

Mendeley

For students seeking a robust research assistance software with powerful document management capabilities, Mendeley emerges as an invaluable tool. It excels in helping students establish a comprehensive repository for their major research endeavors.

Mendeley

Key features include a versatile citation engine, seamlessly compatible with Microsoft Word, enabling users to cite while they write, covering a vast array of over 8,000 citation formats.

Features

  1. Reference Creation from UCI Databases and the Web: Seamlessly compile references from various sources.
  2. Automatic Bibliography and Citation Generation: Simplify citation formatting and bibliography creation.
  3. Annotate, Read, and Highlight PDFs: Enhance the reading experience with annotation and highlighting tools.
  4. Paper Imports from Different Research Software: Conveniently import research papers from diverse sources.
  5. Collaboration with Other Writers: Facilitate collaborative research efforts.

Mendeley's desktop application ensures accessibility to your notes and databases even without an internet connection. The web importer functionality empowers users to effortlessly add articles from the web, with the support of the application.

Pros

  • Cross-Platform Support: Mendeley offers support across various platforms, enhancing accessibility.
  • Drag and Drop Functionality: Simplify document organization with intuitive drag and drop features.
  • Integration with Zotero: Seamless integration with Zotero expands functionality.
  • 1GB of Free Cloud Storage: Enjoy generous cloud storage for research data.

Cons

  • Synchronization Sluggishness: Some users may encounter sluggishness during synchronization.
  • Microsoft Word Plugin Dependency: The Microsoft Word plugin requires Visual Basic.
  • User Confusion: The software's complexity may be daunting for some users.

Mendeley stands as a valuable, free resource for students, providing a comprehensive repository for their research endeavors. With Mendeley, students can effortlessly manage their research data and access it from anywhere, ensuring their scholarly work is organized and accessible.

AppsAnywhere

In today's dynamic educational landscape, remote work and study have become essential, and AppsAnywhere emerges as a pivotal software delivery program. Designed to empower both staff and students, this app facilitates work completion from any location, boasting a user base of over 2 million students worldwide.

AppsAnywhere

Its popularity stems from the ability to deliver any application to any device, on demand, at any time.

Features

  1. Dashboard: Streamlined access and management of applications through a centralized dashboard.
  2. Cross-Platform Support: Ensures compatibility across diverse operating systems and devices.
  3. Conflict Prevention: Prevents conflicts and compatibility issues when running multiple applications.
  4. Debugging: Simplifies troubleshooting and resolving software issues.
  5. Legacy App Support: Provides compatibility for legacy applications, ensuring a wide range of software can be accessed.

Installation of Multiple Apps: Facilitates the installation and access of multiple applications as needed.

Pros

  • Universal Accessibility: AppsAnywhere offers the flexibility to access programs from any device, promoting a truly mobile work environment.
  • Independence from Internet Access: It doesn't rely on constant internet connectivity, ensuring work can proceed even in offline scenarios.
  • Affordability: Provides a cost-effective solution for delivering essential software.

Cons

  • Limited Integrations: The app currently lacks integration options with other software or systems.
  • Unclear Pricing: Some users may find the pricing structure less transparent.

Within AppsAnywhere, students can engage in work, study, document editing, and discussions across any device. It fosters collaboration by enabling students to ask questions and interact with peers from their courses and colleges.

Getting Started with Truly Office

If you're pondering which of these ten excellent software options is the best fit for students, our top recommendation is Truly Office. With its Word, Sheet, and Presentation features, students can seamlessly create documents, perform calculations, and craft impressive presentations.

Embark on your Truly Office journey by visiting the official website at trulyoffice.com for a free download and start experiencing the exceptional features it offers.

Final Thoughts

Embrace the power of technology to streamline your work, enhance your creativity, and boost your performance in the academic arena. Whether you choose Truly Office, WPS Office, Grammarly, or any of the other recommended tools, you're equipping yourself with the resources to excel. 

Your academic journey just got a significant upgrade – seize the opportunity to make the most of it.

One more thing

If you have a second, please share this article on your socials; someone else may benefit too. 

Subscribe to our newsletter and be the first to read our future articles, reviews, and blog post right in your email inbox. We also offer deals, promotions, and updates on our products and share them via email. You won’t miss one.

Related Articles 

» Microsoft Office vs TrulyOffice - Choosing the Best Office Suite
» 9 Microsoft Office Alternatives for Students: Boost Your Productivity!
» Excel for Students: Mastering Excel for Education

]]>
http://oktec.kr/?big=blogs/product-guides/top-excel-functions-to-master 2023-08-28T20:33:00-07:00 2024-04-13T13:41:04-07:00 Excel Functions: Top 10 Must-Know Formulas for Data Mastery Rick Akura More

]]>
Excel Functions are the powerhouse tools that elevate your data prowess, enabling you to navigate the sea of information rapidly. Mastering these functions is a must in today's data-driven landscape, where insights steer decisions. Excel Functions are your guiding stars, whether you're tracking expenditures, analyzing trends, or making pivotal forecasts.

This article unveils the top 10 Excel Functions that form the data manipulation and analysis bedrock. Unlocking their potential will empower you to extract meaningful insights and present them flawlessly.

Table of Contents

  1. SUM Function: Foundation of Calculation
  2. VLOOKUP Function: Finding and Retrieving Data
  3. IF Function: Logical Data Handling
  4. AVERAGE Function: Calculating Central Tendency
  5. COUNT Function: Quantifying Data Entries
  6. CONCATENATE Function: Merging Text Strings
  7. INDEX and MATCH Functions: Advanced Lookup
  8. SUMIF Function: Conditional Summation
  9. TEXT Function: Data Formatting Mastery
  10. PIVOT TABLES: Dynamic Data Analysis
  11. Final Thoughts

1. SUM Function: Foundation of Calculation

The SUM function in Excel is the digital equivalent of tallying numbers on a calculator, making it remarkably efficient for adding values together. Think of it as your digital assistant that performs the grunt work of adding, allowing you to focus on the bigger picture.

How It Works

Imagine you have a list of numbers in cells A2 to A10. To sum these values, you simply type "=SUM(A2:A10)" in a cell.

It's not just limited to individual values. You can also use cell references or ranges like "B3:B8" in the formula.

SUM Function

Practical Examples

  • Basic Totaling: Let's say you're tracking your monthly expenses. You can use SUM to quickly add up your grocery bills, utility payments, and entertainment costs.
  • Budgeting Bliss: If you're planning a project budget, SUM can seamlessly calculate costs from various expense categories, giving you a comprehensive overview.

Benefits of SUM Function

  • Simplicity: Instead of manually adding rows of numbers, SUM automates the process, saving you time and reducing human error.
  • Large Datasets: When dealing with extensive data sets, SUM effortlessly handles the task, eliminating the need for painstaking manual calculations.
  • Dynamic Updates: If the values in your cells change, the SUM function dynamically updates the result, keeping your calculations accurate.

2. VLOOKUP Function: Finding and Retrieving Data

Ever felt lost in a labyrinth of data? That's where the VLOOKUP function comes to the rescue. Imagine it as your data GPS, helping you pinpoint information in a sea of numbers and text. Let's break it down:

Introducing VLOOKUP

Think of your data as a treasure map. VLOOKUP is the tool that follows the map's instructions to uncover the treasure—your desired data.

It's ideal for large datasets where manual searching would be a nightmare.

VLOOKUP Function

Setting Up VLOOKUP

  • Formula Entry: Type "=VLOOKUP()" in the Formula Bar.
  • Lookup Value: In the parentheses, enter the value you seek, like a product name.
  • Table Array: Specify the range of data where you'll hunt for the value, like a list of products.
  • Column Index: Define which column in the table contains your desired information.
  • Range Lookup: This is your choice between "TRUE" for approximate matches or "FALSE" for exact matches.

Business Scenarios

  • Inventory Management: Imagine you manage a warehouse. VLOOKUP can swiftly fetch product details—prices, quantities, and locations.
  • Customer Data: In a customer database, plug in a customer ID, and VLOOKUP instantly brings up their contact information, orders, and preferences.

VLOOKUP Rules

  1. Three vital components: lookup value, table array, and column index number.
  2. The lookup value must reside in the first column of the lookup table.
  3. It accommodates various data types, from numbers to text strings.

VLOOKUP with Multiple Criteria

  1. Sometimes, you need to refine your search. Insert a "helper column" alongside your data.
  2. Formulate the lookup value by combining criteria—for instance, product and category.
  3. VLOOKUP then locates matching data based on these compound criteria.

3. IF Function: Logical Data Handling

Imagine Excel as your own virtual decision-maker. The IF function is the wizard behind the curtain, making choices based on conditions you set. Let's unravel its magic:

Understanding the IF Function

  • IF is your digital yes-no switch, reacting to your data's condition.
  • It's perfect for scenarios where your actions hinge on specific situations.
    IF Function

Structuring IF Functions

  1. Formula Beginnings: Start with "=IF(" in a cell's Formula Bar.
  2. Condition Check: Enter your condition, like comparing values (A2>B2).
  3. Outcome If True: Specify what happens if the condition is met, such as "Over Budget."
  4. Outcome If False: Define the alternative action if the condition isn't satisfied, like "OK."

Significance in Decision-Making

  • Budget Assessment: Imagine you're tracking expenses. If costs exceed budget (A2>B2), Excel responds with "Over Budget," else it's "OK."
  • Stock Management: If stock levels are low, IF can alert you to reorder, else affirm that it's business as usual.

Syntax Simplified

IF evaluates conditions, returning values based on their truth or falsehood.

Syntax: IF(logical_test, [value_if_true], [value_if_false]).

IF AND Function Combo

  1. Sometimes, multiple conditions matter. IF AND comes into play.
  2. Combine the powers of IF and AND to make decisions based on multiple criteria.
  3. Excel checks all conditions. If they're all met, it says "true," otherwise "false."

4. AVERAGE Function: Calculating Central Tendency

Ever wondered how to make sense of a multitude of numbers? Enter the AVERAGE function—your statistical compass guiding you to the heart of your data's distribution. Let's break it down:

Defining the AVERAGE Function

  • The AVERAGE function isn't just a calculator; it's a way to uncover the core of your data.
  • Consider it finding the "typical" value amidst a sea of numbers.

Using AVERAGE with Data Ranges

  1. Data Collection: Imagine you have a range of numbers like 2, 3, and 4.
  2. Sum and Divide: AVERAGE adds these numbers (2+3+4) and divides the total by the number of observations (3).
  3. Result: Voilà! The average of 2, 3, and 4 is 3.
    AVERAGE Function

Applications in Data Analysis

  • Trend Insights: In business, AVERAGE assesses performance by calculating average sales or expenses, providing an overview of how things are going.
  • Academic Analysis: In a classroom, AVERAGE unveils class scores, allowing teachers to gauge students' performance.

Unlocking the AVERAGE Formula

  • It's straightforward: =AVERAGE(range) in a cell.
  • Excel counts the sum and divides it by the number of values, giving you the mean.

Categorized for Clarity

  • The AVERAGE Function falls under Excel's statistical toolkit.
  • It calculates the arithmetic mean of a series of numbers, revealing their collective midpoint.

5. COUNT Function: Quantifying Data Entries

Imagine organizing a collection of items and needing to know how many you have. That's where the COUNT function steps in—it's like your digital tally counter, quantifying data entries in a jiffy. Here's how it works:

Introduction to COUNT

  • COUNT is like a virtual head counter for cells with values in them.
  • It's handy for scenarios where you're curious about the frequency of occurrences.

Handling Different Data Types

  • It's versatile! COUNT doesn't just count numbers—it can tally text, dates, and even empty cells.
  • Whether it's people, items, or transactions, COUNT captures it all.

Importance in Auditing and Validation

Data Accuracy: COUNT plays a crucial role in auditing by confirming that the number of entries matches expectations.

Data Validation: When dealing with submissions or surveys, COUNT ensures all expected fields are filled. 

COUNT Function

Using COUNT in Excel

  1. Basic Count: Say you want to know how many cells in the range A1:A20 have values. Just type "=COUNT(A1:A20)".
  2. Conditional Count: For more specific counts, like numbers greater than a certain value, you can use COUNTIF.

Variations for Different Needs

  • COUNTA: Counts non-empty cells, perfect for assessing data completeness.
  • COUNT: Focuses on cells with numbers, helping you understand numeric occurrences.
  • COUNTBLANK: Tackles the blank cells, revealing gaps in your data.
  • COUNTIF: Acts as a detective, tallying cells that meet specific criteria.

6. CONCATENATE Function: Merging Text Strings

Ever wished you could merge different pieces of text into a single entity? Meet the CONCATENATE function—your digital glue, effortlessly binding text strings together. Here's how it works:

Explaining CONCATENATE

  • Imagine it as your text magician, conjuring seamless unions between text cells.
  • If you have a name in one cell and a title in another, CONCATENATE marries them into one elegant string.

Syntax and Customization

  1. Formula Basis: Begin with "=CONCATENATE(" in a cell.
  2. Text Duo: Add the text or cell references you want to combine, separated by commas.
  3. Customization: You can even insert symbols or spaces, like "=CONCATENATE(A1, " - ", B1)".
    CONCATENATE Function

Instances of CONCATENATE

  1. Personalized Reports: Create customized reports by joining customer names and their respective transactions.
  2. Contact Details: Easily craft full addresses by merging street names, cities, and postal codes.

In Layman's Terms

  • Step 1: Imagine two cells with names—A1 with "John" and B1 with "Doe".
  • Step 2: Type "=CONCATENATE(A1, " ", B1)".
  • Step 3: The result? "John Doe" in the new cell.

CONCATENATE Simplified

  • It's the digital equivalent of "combining" or "joining."
  • It merges different text pieces into a single, comprehensive string.
  • You're the creator—CONCATENATE is your tool for crafting text unions that make sense.

7. INDEX and MATCH Functions: Advanced Lookup

Ever wished you had a supercharged search tool capable of diving into data, regardless of its arrangement? Say hello to INDEX and MATCH—a power duo designed for advanced data retrieval. Let's dive in:

Introduction to INDEX and MATCH

  • INDEX and MATCH are like Sherlock and Watson, working together to find specific data in a table.
  • They outperform VLOOKUP by being flexible in both directions—horizontally and vertically.

Steps to Implement INDEX and MATCH

  1. INDEX Magic: Use INDEX to fetch an item from a particular spot in a list.
  2. MATCH Marvel: MATCH pinpoints the position of a value in a list.
  3. Combined Brilliance: INDEX and MATCH can hold hands to extract precise data, transcending VLOOKUP's limitations.
    INDEX and MATCH Functions

Real-World Examples

  • Sales Analysis: Imagine you have a vast sales record. INDEX and MATCH dynamically locate sales figures for specific products and time periods.
  • Cross-Referencing: INDEX and MATCH navigate through rows and columns to retrieve customer data based on criteria in a database.

Unleash INDEX and MATCH's Power

  • Unlike VLOOKUP's left-to-right limitation, INDEX and MATCH can perform bidirectional lookups—left to right or right to left.
  • No more rigid column queries—INDEX and MATCH seamlessly delve into both rows and columns.

Putting It Simply

  • Step 1: Think of a table with data-filled rows and columns.
  • Step 2: Imagine you want to fetch a specific piece of data. Instead of scrolling and squinting, use INDEX and MATCH.
  • Step 3: Type "=INDEX(table, MATCH(value, column, 0))", and behold—the data appears.

INDEX and MATCH Demystified

  • They're your dynamic detectives, always pinpointing data's exact location.
  • Together, they transcend traditional lookup constraints, offering versatility and accuracy.
  • INDEX and MATCH—when data hunting requires finesse, they're your trusty companions.

8. SUMIF Function: Conditional Summation

Ever wished you could make Excel smart enough to add only the numbers you need? Enter the SUMIF function—a digital accountant that calculates the sum of specific cells based on your conditions. Let's dive in:

Understanding SUMIF

  • SUMIF isn't your everyday calculator—it's a wizard that calculates only when certain criteria are met.
  • Consider it as summing up expenses from a specific category rather than just lumping everything together.

Setting Up SUMIF

  1. Basic Formula: Begin with "=SUMIF(" in a cell.
  2. Criteria Input: Define your condition, like selecting values less than or equal to 12.
  3. Range Selection: Specify the cell range where you want the sum to happen.
  4. Result: SUMIF adds values within the specified range that match your criteria.
    SUMIF Function

Use Cases for Precision

  • Expense Tracking: Imagine you have a list of expenses. SUMIF can calculate just the grocery expenses or those by a specific person.
  • Targeted Calculations: In sales records, SUMIF can sum up sales from a particular region, month, or product line.

Simplified Syntax

  • SUMIF computes the sum based on specific criteria.
  • You can also apply the criteria to one range and sum corresponding values from another.
  • It's your choice when to apply the rule—no more all-or-nothing adding.

In Everyday Language

  • Step 1: Visualize your data—may be expenses or sales records.
  • Step 2: Instead of tallying everything, say you want to sum sales by a certain person or products below a certain value.
  • Step 3: Use SUMIF: "=SUMIF(range, criteria)" and watch Excel work its magic.

SUMIF Unveiled:

  • It's your personal summing assistant that obeys your criteria.
  • Forget summing everything—SUMIF lets you extract specific insights from your data.
  • When numbers need to add up with a touch of finesse, SUMIF's your go-to function.

9. TEXT Function: Data Formatting Mastery

Imagine having the power to transform numbers into well-formatted, reader-friendly displays. Meet the TEXT function—a virtual makeover artist for your data. Here's how it works:

Introduction to TEXT

  • TEXT is like your data's personal stylist, changing the way numbers and dates appear.
  • It's your go-to when you need numbers to speak with the perfect format.

Applying TEXT for Clarity

  1. Formatting Magic: Use TEXT to craft numbers in the attire you prefer—like adding dollar signs, decimals, or commas.
  2. Data Fusion: Mix numbers with text or symbols, presenting information in a unified, coherent manner.
    TEXT Function

Significance in Data Presentation

  • Professional Reports: TEXT ensures consistent data representation in business documents, enhancing the document's appearance.
  • Data Communication: Whether in financial statements or project summaries, TEXT adds the polish that makes information shine.

Simplified Usage

  • Let's say you have a number like 1000 in a cell.
  • Instead of displaying it as 1000, you can use TEXT to show it as "$1,000.00".

10. PIVOT TABLES: Dynamic Data Analysis

Imagine having a tool that could transform your jumbled data into meaningful insights at the snap of your fingers. That's the power of Pivot Tables—a data magician that simplifies complex information and unveils patterns effortlessly. Here's how it works:

Brief on Pivot Tables

Pivot Tables are like your data's magic wand, waving away confusion and revealing clarity.

Their main job? Summarizing and analyzing massive amounts of data in ways that make sense.

Creating Pivot Tables

  1. Setup Magic: Create a Pivot Table from your raw data.
    PIVOT TABLES
  2. Field Selection: Handpick the fields you want to analyze—the ones that matter.
  3. Drag and Drop: Move your chosen fields into rows, columns, and values—forming a new perspective.

Enhancing Data Insights

  • Data Exploration: Pivot Tables allow you to dissect data like never before, seeing trends, patterns, and outliers.
  • Aggregation Expertise: Summarize numeric data, create custom calculations, and organize data by categories and subcategories.

Final Thoughts

As you journey through Excel's landscape, don't hesitate to explore and master these functions. Their potential lies beyond spreadsheets; they catalyze impactful decision-making, insightful analysis, and crystal-clear presentations. 

With these functions at your disposal, you can transform raw data into meaningful insights. So, dive in, experiment, and let these functions elevate your data handling prowess. 

Your mastery of Excel's functions will pave the way to data-driven success.

Related Articles 

» Excel Quick Analysis Tool: Streamline Data Analysis Effortlessly
» Creating a Data Entry Form in Excel: Simplify Your Data Input Process
» Create a Custom List in Excel | Step-by-Step Guide

]]>
http://oktec.kr/?big=blogs/product-guides/online-pdf-converters 2023-08-24T07:13:00-07:00 2024-04-14T13:41:31-07:00 Online PDF Converters: Streamline File Transformation Rick Akura More

]]>
With many PDF converters available online, it's essential to rely on trustworthy solutions that guarantee the security and accuracy of your document conversions. This article delves into the best free online PDF converters with proven track records in delivering reliable results. 

Discover how these online PDF converters can become your go-to allies for file conversion. We've covered everything from converting Word documents to PDFs, images to editable text, or merging multiple files into a single PDF. Join us as we explore the world of online PDF converters and revolutionize how you handle your documents today. 

Table of Contents

  1. Advantages of Online PDF Converters:
  2. Top Online PDF Converters
  3. Tips for Optimal Results
  4. Final Thoughts

Advantages of Online PDF Converters

Online PDF Converters offer numerous advantages, simplifying the task of transforming files into universally accessible PDF format. Here's why they've become indispensable tools for individuals of all technical levels:

Advantages of Online PDF Converters

Efficient Time-Saving

Online PDF Converters operate with remarkable speed, instantly translating files from one format to PDF. Unlike traditional methods that might require extensive time, these tools eliminate the need for waiting, ensuring swift access to converted files. Additionally, there's no need to install cumbersome software, reducing setup time and streamlining the process.

Versatile Format Compatibility

These converters excel in handling diverse file formats, enabling smooth translation between different types. Whether it's text documents, images, spreadsheets, or presentations, these tools bridge the compatibility gap effortlessly. This is especially crucial when dealing with files from various sources, eliminating the frustration of encountering format-related hurdles.

User-Friendly Interface and Process

Online PDF Converters are designed to cater to users of all technical proficiencies. Their interfaces are intuitively crafted, allowing individuals to navigate the conversion process seamlessly. The steps are straightforward – upload the file, select the desired output format, and initiate the conversion. This user-centric approach ensures that even those unfamiliar with technical jargon can easily harness the power of file transformation.

Enhanced Accessibility and Sharing

Once converted into PDF format, files become universally accessible and shareable. PDFs retain formatting, ensuring documents appear exactly as intended across various devices and platforms. This is particularly advantageous in educational settings, where students and educators can distribute and access learning materials.

In simple terms, a PDF converter acts as a translator, converting the content of a PDF file into a format that can be understood by other software. It's like turning a foreign language into one you're familiar with, making the information accessible and usable. This transformation occurs behind the scenes and varies based on the original and desired formats.

Top Online PDF Converters

Top Online PDF Converters

HiPDF Online PDF Converter

HiPDF stands out as a top-tier free online PDF converter, offering a range of valuable conversion options. This tool transforms your PDF files into PNG, JPG, Word, Excel, TIFF, HTML, and text formats. The reverse process, turning these formats into PDFs, is also supported. The process is simple: just upload your files, and HiPDF takes care of the rest. 

HiPDF Online PDF Converter

What's impressive is the conversion speed; HiPDF gets the job done swiftly while ensuring the results are of high quality. In other words, it won't compromise the clarity and integrity of your files during the process.

Here's why HiPDF is a standout choice:

  1. Diverse Conversion Possibilities:

HiPDF covers a wide spectrum of conversions, making it versatile for different file needs.

  1. User-Friendly Operation:

With HiPDF, you don't need to be tech-savvy. Uploading files and starting conversions is intuitive.

  1. Speed and Quality:

The tool doesn't make you wait. It processes conversions quickly without sacrificing file quality.

  1. Wide Format Support:

Whether it's images, documents, or spreadsheets, HiPDF can handle a variety of formats seamlessly.

  1. Hassle-Free Process:

No need for intricate installations or complex procedures. HiPDF keeps things straightforward.

Zamzar

Zamzar is a standout choice when it comes to online PDF converters. This tool doesn't just handle PDFs; it's your go-to solution for easily transforming various document types. Whether dealing with EPUBs, DOCs, images like JPG and GIF, or even more specialized formats like CR2 and DWG, Zamzar has got you covered. The beauty lies in its simplicity - converting a PDF or other documents is a breeze in just four clicks. 

Zamzar

Here's how Zamzar simplifies your conversion process:

  1. Format Versatility:

Zamzar supports various formats, from documents to images, making it versatile for different needs.

  1. User-Friendly Workflow:

The process is straightforward. Select your file, choose the desired output format, provide your email, and hit convert.

  1. Control Over Output:

Zamzar lets you fine-tune the output format, offering buttons to customize the final result.

  1. Added Security:

Worried about security? Zamzar's got you covered with options like adding watermarks and password protection.

  1. Email Delivery:

The tool sends your converted file to your email. While convenient, it's worth noting that this might take some time.

However, it's important to consider a couple of points. While Zamzar efficiently handles conversions, it does so one file at a time. This might be a slight inconvenience for bulk conversions. Also, waiting for your converted file via email could take longer.

Convertio

Meet Convertio, your go-to solution for hassle-free PDF conversions. This online converter is your versatile companion, turning PDFs into various formats such as Word, PowerPoint, EPUB, and more. Picture it as your trusty translator for digital documents. 

Convertio

Why Convertio Stands Out:

  1. Format Magic:

Convertio works like magic, turning your PDFs into formats like Word, PowerPoint, EPUB, and even images like JPG and PNG.

  1. Speed and Precision:

Think of Convertio as your speed demon. It's fast, accurate, and doesn't waste your time.

  1. Choose Your Way:

You're in control. Convertio offers two modes – batch for multiple files and partial for just a part of a PDF.

  1. Encryption Friendly:

Got encrypted PDFs? No problem. Convertio handles them while keeping quality intact.

  1. Lightning-Fast Bulk Conversion:

Imagine converting a hefty 200-page PDF in a single minute. Convertio makes it happen.

UniPDF

Enter UniPDF, your gateway to top-notch PDF transformations. Imagine having a tool that can effortlessly turn your PDF files into various formats, making them accessible and editable. UniPDF is like your document whisperer, ensuring high-quality conversions without the fuss. 

UniPDF

Why UniPDF Is Your Conversion Ally:

  1. Image and Word Magic:

Think of UniPDF as a magician for your PDFs. It can turn them into images like JPG, PNG, and more, as well as Word documents like DOCS, HTML, RTF, and plain Texts.

  1. Batch Brilliance:

UniPDF doesn't just stop at one. It efficiently handles multiple files in one go, saving you precious time.

  1. Layout and Image Integrity:

Your files matter, and UniPDF knows it. It keeps the layout, format, and images intact during conversion.

  1. Tailored Transformation:

Say you want only a specific PDF part in a particular format. UniPDF's covered you, letting you choose what to convert and how.

  1. Simple Selective Conversion:

Ever needed just a few pages from a PDF? UniPDF lets you cherry-pick pages and convert them with ease.

Go4Convert

Meet Go4Convert, your go-to solution for seamless PDF to EPUB conversions. Imagine having a tool that can effortlessly transform your PDF files into EPUB format, making them compatible with e-Readers. 

Go4Convert is like your personal translator, turning your documents into an easily readable format on your favorite devices. 

Go4Convert

What Makes Go4Convert Special:

  1. Multiformat Magic:

Go4Convert is versatile. It converts PDFs and handles formats like Word, Text, HTML, and MOBI, turning them all into EPUB.

  1. Batch Brilliance:

This isn't just a one-file-at-a-time tool. Go4Convert efficiently converts multiple files together, saving you time.

  1. Preservation Perfection:

Go4Convert values your content. During conversion, it ensures all your text, graphics, hyperlinks, and layout are preserved.

  1. eBook Compatibility:

You're not just getting any EPUB. Go4Convert provides a standard eBook format that works seamlessly on popular e-Readers.

Convert Online Free

Introducing Convert Online Free, your ultimate destination for quick and free file transformations. Imagine a service that effortlessly converts your files without needing personal information. It's like having your own digital conversion genie at your fingertips. 

Convert Online Free

What Sets Convert Online Free Apart:

  1. Zero-Cost Convenience:

Convert Online Free doesn't charge a dime. It's a free service to make your file conversions smooth and wallet-friendly.

  1. Wide Format Coverage:

CONVERT ONLINE FREE NAILS THE ESSENTIALS from PDF to Word, JPG, and TXT. It's not just about PDFs; it can also handle image and ZIP files, adding versatility to its repertoire.

  1. Privacy Priority:

Your personal information is safe. Convert Online Free doesn't ask for it. Your converted file is returned to your browser, ensuring your data remains secure.

  1. Lightning-Fast Results:

Say goodbye to long waits. The conversion process is immediate, saving you time and frustration.

  1. Size Considerations:

While it's efficient, Convert Online Free does have some limits. Files exceeding 50 MB can't be accepted due to technical constraints.

Online PDF Converter

When it comes to transforming files, the Online PDF Converter is your go-to tool. More than just a PDF converter, it handles various file types effortlessly, becoming your one-stop destination for all your conversion needs. 

Online PDF Converter

Key Highlights:

  1. Comprehensive Conversion:

It's not limited to PDFs. This tool accommodates various file formats, making it versatile for all your conversion requirements.

  1. Free Trial and Membership Options:

Experience the power of the online PDF converter with a free trial. Upgrade to a membership for unrestricted access to its full suite of tools, enabling seamless file transformations.

  1. Data Privacy:

Security matters. Your files are protected with 256-bit SSL Encryption, ensuring your data remains private and secure. Your information won't be shared with third parties.

  1. Automatic File Deletion:

Worried about clutter? Converted files can be downloaded and deleted from the server. Automatic deletion after three hours guarantees your information stays safe.

  1. Universal Compatibility:

Regardless of your Windows, Mac, or Linux operating system, this converter has you covered. You can convert files from any device if you're connected to the Internet.

  1. Versatile Tools:

Beyond conversion, this tool offers a suite of features. Compress, rotate, merge, or split PDFs – a complete file editing package.

ConvertPDF2Word

Meet ConvertPDF2Word, your straightforward solution for turning PDF files into Word documents. Imagine a website that makes conversion as easy as uploading a photo on social media. 

No registrations, no email addresses required – it's conversion simplified. 

ConvertPDF2Word

What Makes ConvertPDF2Word Shine:

  1. Hassle-Free Conversion:

ConvertPDF2Word is all about ease. Forget about lengthy registrations and email requirements. Just upload your PDF and let the magic happen.

  1. Instant Gratification:

No waiting around. The conversion process is quick, and your Word file is ready for download immediately.

  1. No Strings Attached:

Privacy matters. With ConvertPDF2Word, you're in control. No need to share your email – your information remains yours.

  1. Seamless Process:

Think of this as a digital translator. It takes your PDF language and translates it into Word so that you can edit and work with it.

  1. User-Friendly Interface:

Don't worry about tech hurdles. The website is designed for simplicity, making it a breeze for anyone to use.

Tips for Optimal Results

Converting files is a powerful tool, but getting the best results requires a bit of finesse. Here's how to ensure your document quality and layout stay intact during the process:

  1. Choose the Right Converter:

Start with a reputable converter that's known for maintaining document quality. A reliable converter ensures that your text, images, and layout remain untouched.

  1. Select the Right Format:

Opt for a format that closely matches your original file. This minimizes the chances of layout issues during conversion.

  1. Check Fonts and Formatting:

If possible, stick to standard fonts and formatting. Fancy fonts or intricate formatting might not translate well in all formats.

  1. Use High-Quality Images:

For image-heavy documents, ensure your images are of high quality. Lower-quality images can become blurry or pixelated after conversion.

  1. Preview Before Finalizing:

Many converters offer a preview option. Always check the preview to ensure your document appears as expected before finalizing the conversion.

  1. Edit After Conversion:

After conversion, review your document. Minor adjustments might be needed to perfect the layout and formatting.

  1. Consider PDF Preservation:

If maintaining your document's layout and formatting is crucial, consider using PDF format. PDFs are designed to retain layout integrity across different devices.

  1. Test with Sample Documents:

Before converting an important document, test the converter with a sample file. This helps you understand how the conversion process works and impacts your document.

  1. Follow Converter Guidelines:

Every converter might have specific guidelines for optimal conversion. Take a moment to read any provided instructions for the best results.

Final Thoughts

As we bid adieu, remember that the world of online PDF converters is brimming with potential. With offerings like HiPDF, Zamzar, Convertio, and many others, you have many tools at your fingertips. Harness their power to unlock new possibilities in document management, sharing, and collaboration.

Embrace the transformational journey today – explore these recommended tools and experience the convenience of streamlined file conversions. The digital realm is at your fingertips, ready to simplify your document-handling endeavors.

One more thing

If you have a second, please share this article on your socials; someone else may benefit too. 

Subscribe to our newsletter and be the first to read our future articles, reviews, and blog post in your email inbox. We also offer deals, promotions, and updates on our products and share them via email. You won’t miss one.

Related Articles 

» Microsoft Office vs ThinkFree - Comparing Productivity Suites
» Top 10 Best Free Logo Makers in 2023
» Top 11 Free Video Editing Software With No Watermark

]]>
http://oktec.kr/?big=blogs/product-guides/excel-fonts-top10 2023-07-10T18:58:00-07:00 2024-04-16T08:50:57-07:00 10 Best Fonts for Microsoft Excel Rick Akura More

]]>
Are you tired of the default fonts in Excel that make your spreadsheets look dull and unprofessional? In this article, we will guide you through the world of fonts in Excel and unveil the top five fonts that will elevate your spreadsheet game. 

By choosing the right font, you can enhance the readability and visual appeal of your data, making it more engaging and impactful. So, say goodbye to boring spreadsheets and join us as we explore the best fonts for Excel that will make your data stand out.

Table of Contents

  1. Top ten font styles for Microsoft Excel
  2. How To Install Custom Fonts In Excel
  3. What Is The Best Font Size For Excel
  4. Resolving Font Size Challenges in Excel
  5. FAQs
  6. Final Thoughts

Top ten font styles for Microsoft Excel

Here are the top ten font styles for Microsoft Excel:

Arial

Arial is a widely used sans-serif typeface known for its professional and clean look. It is highly readable and provides a sophisticated appearance to your text.

Arial

Segoe UI

Segoe UI is a popular sans-serif font that comes pre-installed in Microsoft applications. It offers excellent legibility and smooth readability, making it suitable for professional spreadsheets.

Segoe UI

Helvetica

Helvetica is a versatile typeface commonly used by designers and developers. It belongs to the sans-serif font family and works well for headings and larger font sizes, giving a clean and polished look.

Helvetica

Times New Roman

Times New Roman is a classic serif font that has been widely used since the 1930s. It is often associated with newspapers and is known for its legibility. It is a common choice for formal documents and reports.

Times New Roman

Comic Sans MS

Comic Sans MS is a casual and friendly sans-serif font originally designed for comic magazines. While it may not be suitable for professional work, it adds a playful touch to your text and can be a fun choice for certain applications.

Comic Sans MS

Fira Code

Fira Code is a sleek and downloadable font that works well for presenting numbers in Excel. It offers readability and adds a modern touch to your spreadsheets.

Fira Code

Verdana

Verdana is a widely used font that comes pre-installed in Windows. It is particularly useful when working with large datasets, as its excellent readability makes it ideal for reports and extensive data analysis.

Verdana

Source Code Pro

Source Code Pro is another downloadable font that works well for dashboards and reports, especially when using a larger font size. It has a sleek appearance and is well-suited for coding and programming purposes.

Source Code Pro

Calibri

Calibri is a commonly used sans-serif font that has gained popularity since its release in 2004. It is widely used as a default typeface in various applications and software. Adding Calibri to your Excel spreadsheets is a great idea as it offers a modern and professional look.

Calibri

Playfair

For those looking for something stylish and unique, Playfair is an excellent choice. It is a beautiful serif font that adds elegance to your spreadsheet projects. Despite its fancy appearance, Playfair remains highly readable, making it a great option for impressing colleagues and superiors with visually appealing sheets.

Playfair

How To Install Custom Fonts In Excel

To install custom fonts in Excel and use those not already available in the software, you can follow these simple steps:

  1. Download: Start by downloading your preferred font from a reliable website or source.
  2. Locate the Font: Open your file manager and navigate to the "Downloads" folder (or the folder where the font is saved).
  3. Unzip (if necessary): If the font is in a zipped file format, extract or unzip it using appropriate software. If it's already unzipped, proceed to the next step.
  4. Install: Double-click on the font file to open it. You should see an option to install the font. Click on "Install," and the operating system will handle the installation process.
  5. Check Availability: Open Excel and access the font selection options. If the newly installed font does not immediately appear in the list, try restarting Excel. After the restart, the font should be available for use.

What Is The Best Font Size For Excel

When it comes to selecting the best font size for Excel, experts generally recommend using a range of 10 to 12 points for most types of text. This size strikes a balance between being readable and fitting a sufficient amount of information within the cells.

Here's why a font size of 10-12 points is considered ideal for Excel:

  • Readability: Text set at this size is generally clear and legible, allowing users to comfortably view and comprehend the content.
  • Space Efficiency: A font size in the 10-12 point range ensures that you can fit a reasonable amount of text within each cell without it appearing too cramped or overwhelming.
  • Consistency: Using a consistent font size throughout your spreadsheet helps maintain a professional and organized appearance.

However, it's important to note that the optimal font size may vary depending on the specific requirements of your spreadsheet and the preferences of your audience. For headings or important labels, you may choose to use a larger font size to create emphasis or hierarchy within your data.

Resolving Font Size Challenges in Excel

Challenges with font sizes in Excel can arise, but there are various ways to address them:

  • Oversized Text: Sometimes, text may appear too large and cause overflow or disrupt the layout of cells. To resolve this, consider reducing the font size to fit within the designated cell or adjust the column width to accommodate larger text.
  • Small Text: When dealing with extensive data or complex information, small font sizes may strain readability. Increase the font size to ensure clarity, making it easier for users to read and interpret the data.
  • Inconsistent Font Sizes: Inconsistencies in font sizes across different worksheets or workbooks can make the presentation appear unprofessional. Establish a consistent approach to font sizes throughout your Excel documents, ensuring a cohesive and visually appealing layout.
  • Adjusting Headers: Headers often require larger font sizes to distinguish them from regular text. Experiment with different font sizes for headers to achieve the desired emphasis and hierarchy in your data.
  • Reviewing Print Layout: When preparing Excel sheets for printing, font sizes may need adjustments to ensure legibility on paper. Preview the print layout and make necessary font size modifications to optimize the printed output.
  • User Preferences: Consider the preferences and readability requirements of your intended audience. If you anticipate that users may struggle with smaller font sizes, be proactive in selecting larger sizes to enhance accessibility.

FAQs

How many font styles are there in MS Excel?

MS Excel offers a wide range of font styles, including various serif, sans-serif, and decorative fonts, totaling over 200 options.

What is the best font for Excel financial models?

When it comes to financial models in Excel, the best font choice is often a clear and readable option like Calibri, Arial, or Times New Roman.

What is the most popular font?

Arial is one of the most popular fonts due to its versatility, simplicity, and widespread use across different platforms and applications.

What are the top 5 font styles?

The top 5 font styles for Excel include Calibri, Arial, Times New Roman, Verdana, and Helvetica.

What are the 4 major font types?

The four major font types are serif, sans-serif, script, and decorative.

Final Thoughts

In conclusion, choosing the right font for Microsoft Excel can greatly impact the presentation and readability of your spreadsheets. The selection of fonts such as Arial, Segoe UI, and Helvetica provide a professional and clean look, ensuring your data is easily legible. 

Fonts like Times New Roman and Verdana offer familiarity and excellent readability, making them suitable for large data sets and reports. For a touch of style, fonts like Fira Code and Playfair can add visual appeal while maintaining readability. 

One more thing

If you have a second, please share this article on your socials; someone else may benefit too. 

Subscribe to our newsletter and be the first to read our future articles, reviews, and blog post right in your email inbox. We also offer deals, promotions, and updates on our products and share them via email. You won’t miss one.

Related articles 

» How To Add a Line of Best Fit in Excel
» How to Install Fonts in Windows 10
» How to Install Fonts to Word on Mac

]]>
http://oktec.kr/?big=blogs/product-guides/excel-for-mac-guide 2023-07-10T10:05:00-07:00 2024-03-20T00:04:53-07:00 Excel for Mac Guide: Price, Versions, Usage, Tips, and More Rick Akura More

]]>
In today's data-driven marketing landscape, proficiency in Microsoft Excel is no longer a mere checkbox on a resume. While you may be familiar with basic functions like summing cells or organizing data, true mastery of Excel for Mac is essential for effective metrics reporting and in-depth data analysis.

This comprehensive guide is designed to take your Excel skills to the next level. Whether you're tracking growth rates, conducting content analysis, or measuring marketing ROI, we'll equip you with the knowledge and techniques to excel in your data-driven marketing endeavors.

Table of Contents

  1. What is Microsoft Excel?
  2. How to Download Microsoft Excel
  3. Alternative Option
  4. Microsoft Excel Spreadsheet Basics
  5. Discounted Excel 2021 for Mac
  6. Discounted Microsoft Excel Versions for Mac
  7. FAQs
  8. Final Thoughts

What is Microsoft Excel?

Microsoft Excel is a powerful and widely used spreadsheet software program developed by Microsoft. It is a key tool for businesses, professionals, and individuals who deal with data management, analysis, and reporting. 

Here's a breakdown of what makes Microsoft Excel so indispensable:

  1. Data Entry and Management: Excel provides a grid-like interface where you can enter and organize data in rows and columns. It allows you to input and edit numerical, text, and date information efficiently.
  2. Calculation and Formulas: Excel offers a vast library of built-in formulas and functions, enabling you to perform complex calculations and automate repetitive tasks. From basic arithmetic to advanced financial and statistical computations, Excel has you covered.
  3. Data Visualization: Transforming raw data into visually appealing charts and graphs is effortless in Excel. It offers a wide range of customizable chart types, allowing you to present data in a visually compelling and easy-to-understand manner.
  4. Conditional Formatting: Excel's conditional formatting feature allows you to highlight cells based on specific criteria, making it easier to identify patterns, trends, and anomalies in your data.
  5. Data Analysis: With Excel, you can apply filters, sort data, and generate pivot tables to analyze large datasets effectively. It also supports advanced statistical analysis using add-ins and tools like regression analysis and data modeling.
  6. Collaboration and Sharing: Excel offers collaboration features that enable multiple users to work on a spreadsheet simultaneously. You can also share your Excel files with others, control access permissions, and track changes made by collaborators.
  7. Automation and Macros: Excel's macro functionality allows you to automate repetitive tasks by recording and executing a series of actions. This feature saves time and increases efficiency, particularly when dealing with large datasets.

How to Download Microsoft Excel

Downloading Microsoft Excel is a straightforward process. Here's a step-by-step guide to help you get started:

  1. Check System Requirements: Before downloading Excel, ensure that your PC or Mac meets the minimum system requirements specified by Microsoft. This information can usually be found on the official Microsoft website.
  2. Sign in to Microsoft 365: To access Microsoft Excel, you'll need to sign in to your Microsoft 365 account. If you don't have an account, you can create one or subscribe to a Microsoft 365 plan.
  3. Install Microsoft 365: After signing in, follow the prompts to install Microsoft 365 on your computer. The installation process may vary depending on your operating system and account settings.
  4. Download and Launch Excel: Once Microsoft 365 is installed, locate the Excel application on your computer. On a Mac, you can find it in the Launchpad or applications folder. Click on the Excel icon to launch the program.

Alternative Option

If you prefer a different method, you can visit the website Softwarekeep.com to download and purchase Microsoft Excel directly. Make sure to choose a legitimate and trusted source for software downloads.

Microsoft Excel Spreadsheet Basics

Microsoft Excel is a versatile spreadsheet software that offers a wide range of functions to enhance data management and analysis. Here are some basic Excel features and tips explained:

  1. Inserting Rows or Columns: Easily add multiple rows or columns by highlighting existing ones and right-clicking to select "Insert." This saves time when expanding your spreadsheet.
  2. Autofill: Use the fill handle (located in the lower-right corner of a cell) to quickly fill adjacent cells with data, series, or formulas. Drag or double-click the fill handle to populate the desired cells.
  3. Filters: When dealing with large datasets, apply filters to focus on specific rows based on criteria. Click the "Data" tab, select "Filter," and use the arrow next to column headers to choose sorting and filtering options.
  4. Sort: Alphabetize or organize data in ascending or descending order using the "Sort" feature. Select the column to sort, click the "Data" tab, and choose the appropriate sorting option.
  5. Remove Duplicates: Eliminate duplicate entries in your data by selecting the relevant rows or columns and clicking "Remove Duplicates" under the "Data" tab. This ensures only unique data remains.
  6. Paste Special: Transpose data from rows to columns or vice versa by highlighting the content, copying it, right-clicking on the destination cells, and selecting "Paste Special." Choose the transpose option for the desired outcome.
  7. Text to Columns: Split data in a single cell into multiple cells using the "Text to Columns" feature. Select the column, navigate to the "Data" tab, choose "Text to Columns," and follow the prompts to specify delimiters and preview the results.
  8. Format Painter: Save time formatting your spreadsheet by using the format painter. Select the cell with the desired format, click the format painter icon in the toolbar, and apply it to other cells or ranges.

Discounted Excel 2021 for Mac

In SoftwareKeep, Microsoft released Excel for Mac with a discounted price. The Microsoft Part Number (MPN) is not specified. The regular price of the software is $139.99, but it is currently available at a discounted price of $109.99, saving you 21% off the original price.

To purchase Excel for Mac, simply click on the "Add to Cart" icon. This will add the software to your shopping cart, allowing you to proceed with the purchase.

Excel for Mac offers all the powerful features and functionalities of Excel, tailored specifically for the Mac operating system. With this software, you can efficiently manage and analyze data, create charts and graphs, perform calculations, and collaborate with others on spreadsheets.

Discounted Microsoft Excel Versions for Mac

Microsoft offers different versions of Excel for Mac, each with its own pricing and savings. Here's a breakdown of the available versions:

  • Microsoft Excel 2021 for Mac: This version, with an unspecified MPN, is currently on sale. The regular price is $139.99, but it is discounted by 21% to $109.99.
  • Microsoft Excel 2019 for Mac: Another option is Excel 2019 for Mac, offering even greater savings. With an unspecified MPN, it is discounted by a substantial 52%. The original price is $144.99, but you can purchase it for just $69.99.
  • Microsoft Excel 2016: For those interested in Excel 2016, there are two options available.
  • Microsoft Excel 2016: This version, with MPN EXL2016DL, is discounted by 6% from $84.99 to $79.99.
  • Microsoft Excel 2016 for Mac: This version, with MPN 9781518646508, is discounted by 12%. The original price is $84.99, but it is available for $74.99.

To make a purchase, simply click on the "Add to Cart" icon or the "Buy It Now" icon associated with the specific version you want. These options allow you to add the software to your shopping cart or proceed with the purchase directly.

FAQs

What is Excel used for in Mac?

Excel for Mac is used for a wide range of tasks, including data organization, analysis, and visualization, creating charts and graphs, financial modeling, budgeting, and performing complex calculations.

What is the best way to get Microsoft Excel for Mac?

The best way to get Microsoft Excel for Mac is by subscribing to Microsoft 365, which includes access to Excel along with other Office applications, and provides regular updates and additional features.

Which Excel function can you use to calculate the maximum purchase price you can offer?

The Excel function commonly used to calculate the maximum purchase price you can offer is the MAX function, which returns the highest value from a range of cells.

 How do you use the price formula in Excel?

To use the price formula in Excel, you can use the PRICE function, which calculates the price per $100 face value of a security with a specified settlement date, maturity date, coupon rate, yield, and redemption value.

How do you calculate pricing in Excel?

Pricing can be calculated in Excel using various formulas and functions, depending on the specific scenario. For example, you can use formulas like SUM, AVERAGE, MAX, MIN, and mathematical operators (+, -, *, /) to perform calculations based on the given requirements and variables.

Final Thoughts

In conclusion, Microsoft Excel for Mac is an indispensable tool for data management, analysis, and reporting. Its versatility and powerful features make it a go-to choice for professionals across various industries. Whether you're a beginner or an experienced user, mastering Excel can greatly enhance your productivity and decision-making capabilities.

When it comes to pricing, Microsoft offers different subscription plans through Microsoft 365, providing access to Excel along with other Office applications and regular updates. Be sure to choose the plan that best suits your needs.

One more thing

If you have a second, please share this article on your socials; someone else may benefit too. 

Subscribe to our newsletter and be the first to read our future articles, reviews, and blog post right in your email inbox. We also offer deals, promotions, and updates on our products and share them via email. You won’t miss one.

Related articles 

» Set Excel as the Default Application on Mac | Excel for Mac
» Installing Microsoft Excel for Mac: Step-by-Step Guide
» Forgot Your MacBook Password? Here’s What to Do
» A Comprehensive Microsoft Excel 2019 for Mac Review
» Installing Microsoft Excel for Mac: Step-by-Step Guide
» Learn Office for Mac - for Beginners

]]>
http://oktec.kr/?big=blogs/product-guides/exploring-intuitive-language-translation-software 2023-07-09T07:52:00-07:00 2024-04-14T13:23:15-07:00 Translation Solutions: Exploring Intuitive Language Translation Software Rick Akura More

]]>
Navigating the vast sea of global communication can be overwhelming, especially when different languages come into play. Whether you're a business setting foot in international markets or a traveler wanting to understand local dialects, translation tools are handy. 

These are powerful allies that bridge the communication gap and help information flow smoothly across borders. But what makes a great translation tool, and how can you find the right one?  

What is Language Translation Software?

Let's imagine you're an ambitious entrepreneur with a global vision for your startup. You've got the perfect product, but there's one hiccup–you’re a global company, and you need to translate your web pages in another language. That's where language translation software steps in. 

These intelligent tools are designed to translate text from one language to another accurately. They provide real-time translations, helping businesses engage with customers globally. Similar to language accessory packs, translation tools break language barriers to help information flow unimpeded across different cultures and demographics around the world.

If you want to check out the latest language translator, ensure it comes with multiple languages. This allows you to scale your business with the same translator. 

How Does Translation Software Work?

Translation software works by utilizing natural language processing, machine learning, and advanced algorithms to decode the structure of the source language. After understanding the context and grammar, it translates the text into the target language as accurately as possible. 

For instance, if a phrase in English says, 'Cat got your tongue?', a simple word-for-word translation in another language won't make sense. The software recognizes idioms or colloquial phrases and provides accurate translations that convey the intended meaning instead of direct translations. It's technology mimicking human-like comprehension!

What Are the Standard Features of Translation Software?

There are a few things that make language translators what they are. Businesses looking to adopt this technology should become familiar with these features before they start shopping.

Here are 5 standard features of great translation software:

  1. Term Base: A database of fixed translation terms is crucial for maintaining consistency across multiple translations, especially for technical or industry-specific language.
  2. Translation Memory: This feature remembers previous translations to speed up repetitive tasks and ensure consistent use of phrases or terminologies.
  3. Quality Assurance: These include necessary tools to check the grammar, sentence structure, and appropriacy when needed, ensuring translation accuracy.
  4. Collaborative Framework: The software allows multiple linguists to collaborate in real-time or to use the software at least simultaneously to make collaboration a breeze.
  5. Machine Translations: All translators will utilize AI and machine learning algorithms to provide fast and efficient translation of text from one language to another.

It’s these features that make translation software so easy to use and user-friendly. Thanks to AI, we no longer have to rely on human translators to communicate in another language.

What Are the Benefits of Translation Software?

Maybe you’ve dabbled in translation software, but you’re unsure if you should adopt it in your business. This section will explain exactly why translation software is a necessary expense. 

Consistent Translations

An inconsistent translation can lead to misunderstanding and confusion, hampering your brand's reputation. Translation software keeps vocabulary and style consistent throughout each translation, ensuring accurate and professional communication across all languages. 

Increased Productivity

Think of all the hours spent translating documents manually. Now, envision saving that time and using it to focus on core business tasks instead. That's what language translation software does for you. It significantly boosts productivity, helping you accomplish more in less time.

Better Flexibility

The beauty of translation software lies in its flexibility. Whether you need to translate a technical document, a blog post, or even an entire website, these tools have got you covered! They easily handle multiple formats, providing support as your business scales and diversifies.

Improved Quality

Accuracy and quality are paramount when it comes to language translation. With advanced natural language processing and machine learning capabilities, these tools can recognize and interpret the nuances of languages, resulting in translations that mirror the original text's quality. 

Low Expense

Hiring professional translators for different languages can be quite expensive. However, language translation software offers a cost-effective solution without compromising on quality or efficiency (and it can even be free). It's all about maximum impact with minimum spend!

What Makes a Translation Software Great?

There are hundreds of translation tools out there, but a few things separate average software from the greats. Here are 3 things the best translation software will have.

Cloud-based and Doesn't Require a Download

Cloud-based translation software provides both flexibility and convenience. No heavy downloads, no hardware restrictions–all you need is internet access to tap into its capabilities from anywhere, anytime. This includes on multiple devices, such as mobile, tablet, or desktop.

Helps Your Business to Make More Money

Imagine expanding your business across borders without worrying about language barriers. Facilitating clear and accurate communication with global customers opens up avenues for revenue generation. It's not just a tool; it’s a gateway to unexplored market potential and profits.

Secures Your Content via ISO-certified Tools

Confidentiality is key when it comes to business communications. That's why the best translation tools incorporate ISO-certified security measures. It ensures your content is secure throughout the translation process, providing peace of mind while dealing with sensitive info. 

In Conclusion… 

Language translation tools are more than just tech marvels. And they’re game-changers for new startups as they propel businesses beyond borders and accelerate global interconnectivity. 

Take the leap and empower your enterprise with one such tool. It can be your trusted partner in navigating this multilingual world, helping you easily connect, converse, and convert.

]]>
http://oktec.kr/?big=blogs/product-guides/excel-mac-power-query-guide 2023-07-09T03:10:00-07:00 2024-04-16T08:52:28-07:00 Excel for Mac Power Query: Comprehensive Guide for Data Analysis Rick Akura More

]]>
While the journey to feature parity with the Windows version has taken time, Excel for Mac has been steadily improving its capabilities. From the introduction of data refreshing two years ago to data importing last year, each update has brought us closer to a comprehensive Power Query solution for Mac users.

Join us as we explore the latest milestone in Excel for Mac's Power Query journey. Learn how to leverage the Query Editor's powerful data cleaning and shaping capabilities, empowering you to unlock the full potential of data analysis in Excel for Mac.

Table of Contents

  1. Data Import and Transformation Made Easy
  2. Shape Data with Power Query Editor in Excel for Mac
  3. Refreshing Data Sources in Excel for Mac
  4. Refresh the First Time
  5. Refresh Subsequent Times
  6. Entering and Clearing Credentials in Excel for Mac
  7. Entering Credentials
  8. Clearing Credentials
  9. Transferring Code Modules
  10. Import the VBA file in Excel for Mac
  11. FAQs
  12. Final Thoughts

Data Import and Transformation Made Easy

To access Power Query in Excel for Mac, follow these steps:

  1. On the Data tab in the Excel ribbon, click the "Get Data (Power Query)" button. This button allows you to import and transform data using Power Query.
  2. Click "Launch Power Query Editor" to open the Query Editor. This powerful tool provides a user-friendly interface for shaping and transforming your data.
  3. In the Query Editor, you can perform various data transformations similar to Excel for Windows. This includes cleaning, filtering, merging, and more. Use the available options and functions to manipulate your data as needed.
  4. Once you've finished shaping your data, click the "Close & Load" button on the Home tab of the Query Editor. This will load the transformed data into a new sheet in Excel.
  5. The imported data will now appear in a new sheet within your Excel workbook, ready for further analysis and visualization.

Power Query in Excel for Mac supports a range of data sources, including:

  • Text, CSV, XLSX, XML, and JSON files: You can import data from these file formats directly into Power Query.
  • SharePoint: You can connect to SharePoint sites, lists, folders, and retrieve data using Power Query.
  • Local tables and ranges: Excel tables and ranges in your workbook can be used as a data source.
  • Microsoft SQL Server: Power Query enables you to connect to SQL Server databases and retrieve data.

Additionally, you can access the Query Editor from the data import flow by clicking the "Get Data (Power Query)" button, selecting a data source, and proceeding with the import process.

Shape Data with Power Query Editor in Excel for Mac

To shape and transform your data using Power Query Editor in Excel for Mac, follow these steps:

  1. Ensure you have the required version: This feature is available to Microsoft 365 subscribers running Version 16.69 (23010700) or later of Excel for Mac. Make sure you have the latest version of Office installed.
  2. Access Power Query: Go to the Data tab in the Excel ribbon and select "Get Data (Power Query)."
  3. Launch Query Editor: Choose "Launch Power Query Editor" to open the Query Editor interface. Alternatively, you can access the Query Editor directly by selecting "Get Data (Power Query)," choosing a data source, and clicking "Next."
  4. Shape and transform data: Use the Query Editor to apply various transformations to your data, such as cleaning, filtering, merging, and more. Leverage the available options and functions to manipulate your data according to your requirements.
  5. Review Power Query Help: If you need more information or guidance on using Power Query in Excel, refer to the Power Query for Excel Help documentation.
  6. Close and load: Once you have finished shaping your data, select the "Close & Load" option on the Home tab to load the transformed data into Excel.

Refreshing Data Sources in Excel for Mac

To keep your data up to date in Excel for Mac, you can refresh various data sources using the following steps:

Refresh the First Time

  1. Access Data Source Settings: Select the "Data" tab in the Excel ribbon, click the arrow next to "Get Data," and then choose "Data Source Settings." This will open the Data source settings dialog box.
  2. Update File Path: In the Data source settings dialog box, select the desired connection, and then click "Change File Path."
  3. Specify New Location: In the File path dialog box, choose a new location for the file, and then click "Get Data."
  4. Close the dialog box: After updating the file path, click "Close" to exit the Data source settings dialog box.

Refresh Subsequent Times

  1. Refresh All Data Sources: To refresh all data sources in your workbook, select "Data" and then choose "Refresh All." This will update all the data connections in your workbook.
  2. Refresh a Specific Data Source: If you want to refresh a specific data source or query table on a sheet, right-click the query table, and then select "Refresh" from the context menu.
  3. Refresh a PivotTable: If you have a PivotTable in your workbook, select any cell within the PivotTable, go to the "PivotTable Analyze" tab, and click "Refresh Data" to update the PivotTable with the latest data.

Entering and Clearing Credentials in Excel for Mac

To access data sources such as SharePoint, SQL Server, or OData in Excel for Mac, you may need to provide credentials for authentication. Here's how to enter and clear credentials:

Entering Credentials

  1. Refresh Query: When you refresh a query for the first time that requires authentication, you will be prompted to log in. Select the appropriate authentication method and enter the login credentials to establish a connection with the data source and proceed with the refresh.
  2. Enter Credentials Dialog Box: Depending on the data source, you will encounter an "Enter credentials" dialog box where you can provide the required login information. This dialog box will appear when authentication is necessary.

Clearing Credentials

  1. Access Data Source Settings: Select the "Data" tab in the Excel ribbon and click on "Get Data" followed by "Data Source Settings."
  2. Choose the Connection: In the Data Source Settings dialog box, select the connection for which you want to clear the credentials.
  3. Clear Permissions: At the bottom of the dialog box, select "Clear Permissions." This will remove the stored credentials for the selected connection.
  4. Confirm and Delete: Confirm that you want to clear the credentials by selecting "Delete."

Transferring Code Modules

Power Query authoring within the Power Query Editor is currently not available in Excel for Mac. However, you can still use VBA (Visual Basic for Applications) to support Power Query authoring in Excel for Mac. 

Import the VBA file in Excel for Mac

  1. Open Excel for Mac and select "Tools" from the menu.
  2. Choose "Macro" and then click on "Visual Basic Editor." This will open the Visual Basic Editor window.
  3. In the Project window of the Visual Basic Editor, right-click on an object (such as a workbook or module).
  4. Select "Import File" from the context menu. This will open the Import File dialog box.
  5. Locate the VBA file you downloaded in step one and select "Open."

FAQs

How do I add a Power Query to the ribbon in Excel for Mac?

To add Power Query to the ribbon in Excel for Mac, go to "Excel" on the menu bar, select "Preferences," choose "Ribbon & Toolbar," and then enable the "Power Query" checkbox.

How do I use the Power Query Editor in Excel?

To use the Power Query Editor in Excel, click on the "Data" tab in the ribbon, select "Get Data," and choose the data source. Then, use the Power Query Editor interface to transform and shape your data.

Why doesn't my Mac Excel have Power Query?

Power Query was introduced in later versions of Excel for Mac, so if you have an older version, it may not have this feature. Update your Excel to the latest version to access Power Query.

How do I enable Power Query editor on Mac?

Ensure you have the latest version of Excel for Mac installed, as earlier versions may not include Power Query. If you have the latest version, Power Query should be available under the "Data" tab in the ribbon.

Is Power Query compatible with Mac?

Yes, Power Query is compatible with Excel for Mac. However, it was introduced in later versions, so make sure you have an updated version of Excel for Mac to access Power Query.

Final Thoughts

In conclusion, the Power Query Editor in Excel for Mac provides Mac users with powerful data transformation and analysis capabilities. Although it took some time for the features to catch up with their Windows counterparts, Excel for Mac has made significant progress in incorporating Power Query functionality. 

With the ability to refresh data, import various data sources, and shape data using the Query Editor, Mac users can now enjoy a more comprehensive data analysis experience. The supported data sources, such as SharePoint, SQL Server, and file formats like CSV and XML, offer flexibility in accessing and transforming data. 

One more thing

If you have a second, please share this article on your socials; someone else may benefit too. 

Subscribe to our newsletter and be the first to read our future articles, reviews, and blog post right in your email inbox. We also offer deals, promotions, and updates on our products and share them via email. You won’t miss one.

Related articles 

» Set Excel as the Default Application on Mac | Excel for Mac
» Installing Microsoft Excel for Mac: Step-by-Step Guide
» Choosing the Right Operating System: Windows, macOS, or Linux?

]]>
http://oktec.kr/?big=blogs/product-guides/windows-12-release-date-reveal 2023-07-08T00:25:00-07:00 2024-04-16T08:52:02-07:00 Windows 12 News: Microsoft Ready to Reveal the Release Date? Rick Akura More

]]>
Prepare yourself for the ultimate Windows 12 experience! Microsoft could be gearing up to unveil details about their highly-anticipated new operating system. Stay tuned as they are on the brink of announcing the release date.

Microsoft, the tech giant known for its innovative operating systems, has been stirring up excitement in the tech world with rumors of the highly anticipated release of Windows 12. As Windows 11 continues to impress users with its sleek design and enhanced features, speculation about its successor, Windows 12, has steadily grown.

In this article, we will delve into the latest news surrounding Windows 12 and explore the possibility of Microsoft unveiling the release date for this next-generation operating system.

Table of Contents

  1. Is Windows 12 Coming?
  2. Windows 12 Release Date
  3. Windows 12 Leaks
  4. Windows 11 Success and Expectations
  5. Windows 12: Rumors and Speculations
  6. Frequently Asked Questions

Is Windows 12 Coming?

Just as we were getting used to the sleek and innovative features of Windows 11, news of Windows 12 has already started to make waves.

Windows 11 users and loyal Windows 10 enthusiasts eagerly anticipate the potential release of Windows 12, speculating on what new advancements and enhancements it may bring. With its impending arrival, we can expect significant changes that promise to redefine the user experience. This comes just as Windows 11 was gaining popularity and widespread acceptance among users, adding an extra layer of excitement and curiosity to the tech community.

The anticipation is building, and the future of Windows is looking brighter than ever. There have been rumors circulating that Windows 12 is set to launch towards the end of next year. Alongside this release, exciting new features, such as a floating taskbar, are expected to be introduced.

Windows 12 Release Date

Windows 12 design concept

Speculation suggests that Microsoft plans to launch Windows 12 in Q3 2024, with a broader rollout in 2025.

Numerous rumors have been circulating throughout the year about the potential release of Windows 12. Although Microsoft has not yet made any official announcements confirming its existence, several intriguing hints suggest its development is underway.

One significant clue that emerged during the Build 2023 developer conference was a video screenshot that alluded to a "next generation" of Windows. This reference has sparked speculation that it could indicate Windows 12, offering hope that it won't be a mere iteration of the cloud-based Windows 11.

Another interesting development is Microsoft's mention of a project called the "Next Valley Prototype Design," rumored to be a codename for the forthcoming iteration of the Windows operating system. This cryptic reference has piqued the curiosity of tech enthusiasts and further fueled the anticipation surrounding Windows 12.

Windows 12 Leaks

Windows 12 leaked design

Windows Latest, a trusted source for Windows-related news, highlighted an accidental teaser by Microsoft during the Ignite 2023 conference. The teaser showcased a version of the operating system featuring a floating taskbar, suggesting that Microsoft is actively exploring new design changes for the upcoming Windows.

While this revelation provides only a glimpse into the potential direction of Windows 12, it has undoubtedly stirred excitement and speculation among users.

Windows 11 Success and Expectations

Since its release, Windows 11 has garnered praise from users and critics alike for its modern and intuitive user interface, improved performance, and enhanced productivity features. Its redesigned Start menu, centered taskbar, and new Snap Assist options have breathed new life into the Windows experience.

With Windows 11 setting the bar high, the anticipation for its successor, Windows 12, is growing exponentially. This widespread success could set the stage for the next major release of the operating system to introduce a range of exciting and innovative features that transform the user experience.

Windows 12: Rumors and Speculations

Amidst the excitement surrounding Windows 12, various rumors and speculations have emerged about the features and enhancements it might bring. From an even more streamlined interface to advanced productivity tools, users eagerly await the next iteration of Microsoft's operating system.

Artificial Intelligence (AI)

Cortana

Microsoft has already dabbled in artificial intelligence with Cortana, but it's reported the company is working with Intel and possibly AMD to add cutting-edge AI features to Windows. This move reflects the industry's direction toward AI technology. Users can expect smarter interactions, personalized recommendations, and automated tasks by integrating AI into Windows.

While specific details are limited, Microsoft's partnership with leading chip manufacturers shows a commitment to innovation and improving user capabilities. Integrating AI into Windows 12 holds great potential and promises a more intelligent and personalized computing experience.

Compatibility and System Requirements

One crucial aspect of any new operating system release is its compatibility with existing hardware and software. Users want to ensure that their devices meet the system requirements to enjoy the full benefits of the new OS. Windows 12 will likely have specific hardware and software prerequisites, and users must evaluate their devices' compatibility before considering an upgrade.

Security and Privacy Enhancements

In an increasingly digital world, security and privacy are paramount for users. Microsoft has proactively addressed these concerns and continuously improved its security features. With Windows 12, users can expect enhanced security measures, such as advanced encryption options, robust antivirus solutions, and improved user authentication methods. These features will provide users with peace of mind and protect their sensitive information.

User Interface and Design Changes

Windows 12 interface concept

Windows 12 is expected to refine the user interface and design aesthetics further. Microsoft has been committed to creating a visually appealing and user-friendly environment, and Windows 12 is likely to build upon this foundation. Whether introducing new customization options, enhancing the touch and stylus experience, or refining the overall UI, Windows 12 will strive to provide users with an engaging and intuitive interface.

Integration with Other Microsoft Services

Microsoft offers a wide range of services, from cloud storage to productivity tools, seamlessly integrating with their operating systems. With Windows 12, users can anticipate deeper integration with these services, making accessing and utilizing Microsoft's ecosystem of applications and platforms easier. This integration will foster a more cohesive and productive user experience across various devices.

Competition and Market Impact

The release of Windows 12 will undoubtedly impact the competitive landscape of the operating system market. Competitors will closely analyze Microsoft's latest offering and potentially respond with their innovations and improvements. Windows 12's success will be measured not only by its features but also by its ability to maintain Microsoft's position as a market leader and satisfy the evolving needs of users.

FAQ

Is Windows 12 coming out?

As of now, there is no official confirmation from Microsoft about the release of Windows 12. However, given the company's hints, the tech community widely speculates that a Windows 12 release is inevitable. Users and enthusiasts should watch Microsoft's announcements for any official news about Windows 12.

Is Windows 12 out?

No, as of now, Windows 12 is not officially released. Microsoft has not made any announcements confirming its release. It is recommended to keep following Microsoft's official channels for the latest updates and accurate information regarding Windows 12.

Is Windows 11 better?

Windows 11 is a significant upgrade with a modernized interface and new features like Snap Assist and a centered taskbar, enhancing productivity and user experience. Microsoft regularly updates Windows 11, ensuring continual improvements and refinements over time.

Will there be Windows 13?

While it's too early to speculate on a Windows 13 release, the tech community anticipates that Microsoft will continue rolling out major updates and versions of its operating system. This means that a Windows 13 release, while unconfirmed, remains a possibility in the minds of many users.

Is Windows 12 official?

There are no official announcements from Microsoft about the development or release of Windows 12.

Will Windows 12 be free?

Based on Microsoft's past practices with Windows 10 and 11, it's reasonable to expect that Windows 12 could arrive as a free upgrade for existing users, although official confirmation from Microsoft is still pending.

Conclusion

While the exact release date of Windows 12 remains a mystery, the anticipation and excitement continue to grow. Microsoft has been tight-lipped about Windows 12, but the rumors circulating in tech circles have sparked curiosity and anticipation among Windows enthusiasts.

While we await official confirmation from Microsoft, these hints and glimpses into the development process have generated considerable buzz and anticipation surrounding the potential release of Windows 12. As more information becomes available, tech enthusiasts and Windows users worldwide eagerly anticipate discovering the future of Microsoft's iconic operating system.

One More Thing

We’re glad you’ve read this article. :) Thank you for reading.

If you have a second, please share this article on your socials; someone else may benefit too.

Subscribe to our newsletter and be the first to read our future articles, reviews, and blog post right from your inbox. We also offer deals, promotions, and updates on our products and share them via email. You won’t miss one.

Related Articles

» Windows 12: Release Date, Features, and Everything We Know
» Windows 10 End of Life: When Does Windows 10 Support End?
» 5 Reasons Why You Should Upgrade to Windows 11

]]>
http://oktec.kr/?big=blogs/product-guides/advanced-excel-key-areas-functions 2023-07-07T00:52:00-07:00 2024-04-15T12:59:00-07:00 Mastering Advanced Excel: Key Areas and Functions Rick Akura More

]]>
If you're passionate about Excel and want to take your skills to the next level, you're in the right place.

Excel offers a staggering array of over 450 functions, from popular ones like VLOOKUP and SUMIF to lesser-known gems that work wonders with your data. We'll explore 20 advanced Excel functions that will elevate your spreadsheet expertise.

Table of Contents

  1. XLOOKUP Function
  2. VLOOKUP Function
  3. INDEX / MATCH Function
  4. SUMPRODUCT Function
  5. SUMIF/COUNTIF & SUMIFS/COUNTIFS Functions
  6. FILTER Function
  7. FAQs
  8. Final Thoughts

XLOOKUP Function

XLOOKUP is a powerful and advanced function introduced in Excel 2021 and Excel for Microsoft 365. It is an enhanced alternative to the popular VLOOKUP function, addressing some limitations. 

However, it is important to note that XLOOKUP is not available in earlier versions of Excel.

The primary purpose of XLOOKUP is to search for a specific value (referred to as the lookup value) within a list of values arranged in rows or columns. It allows you to determine if the value exists in the list and retrieve any corresponding value from the same row or column.

XLOOKUP Function

It's worth mentioning that if you use XLOOKUP in your workbook and share it with someone using an older version of Excel, the XLOOKUP formulas will not work in their version. Therefore, avoiding using XLOOKUP in such cases is advisable to ensure compatibility.

VLOOKUP Function

VLOOKUP has long been recognized as one of the most widely used Excel functions, although the more advanced XLOOKUP function has now surpassed it. However, since not everyone has access to Excel 2021 or Excel for Microsoft 365, understanding VLOOKUP remains crucial for many users. 

For those well-versed in advanced formulas, having a thorough grasp of VLOOKUP can significantly enhance their work.

Similar to XLOOKUP, VLOOKUP scans a specified column in a list and can retrieve either the matching lookup value or any value from another column in the same row. It allows users to search for a particular value in the leftmost column of a table and return a corresponding value from a specified column within that table.  

VLOOKUP Function

The VLOOKUP function consists of four main components:

  • Lookup value (the value being searched for)
  • Table array (the range of cells containing the data)
  • Column index number (the column from which to retrieve the result)
  • Range lookup (an optional parameter determining whether an exact match is required)

INDEX / MATCH Function

The INDEX/MATCH combination is a highly effective and versatile tool in Excel, capable of performing impressive feats in advanced formulas. Before XLOOKUP was introduced, many experienced Excel users favored INDEX/MATCH over VLOOKUP, as it addressed some of VLOOKUP's limitations. 

Even with XLOOKUP now available, learning to use INDEX/MATCH remains essential for those seeking to master advanced Excel functions.

The INDEX function in Excel returns the value of a cell within a specified range based on its row and column numbers. It acts like a powerful retrieval tool, extracting data from a given location in a table.

INDEX/MATCH Function

On the other hand, the MATCH function is used to find the position of a lookup value within a range of cells. It returns the relative position of the value in the range, allowing you to locate specific data.

When you combine INDEX and MATCH, you create a dynamic lookup formula to search for a value in one column and return the corresponding value from another. This combination overcomes the limitations of VLOOKUP, such as the requirement for the lookup column to be the leftmost column in the table.

SUMPRODUCT Function

The SUMPRODUCT function in Excel is a favorite among advanced users, offering more than just basic arithmetic calculations. Although its name suggests it is used for multiplying and summing numbers, its capabilities extend beyond that.

Originally, SUMPRODUCT intended to calculate the sum of the products in two columns. While this is a valid use case, Excel users discovered its versatility and began utilizing it for more complex purposes.

Advanced Excel users often employ the SUMPRODUCT formula for conditional sums or calculations. 

SUMPRODUCT Function

For example:

If you have a dataset containing salespeople, their respective regions, and their sales numbers, you can utilize SUMPRODUCT to:

  • Add up sales values for specific regions or multiple regions.
  • Sum only the sales values that exceed a certain threshold.
  • Perform conditional calculations based on sales values above or below a specific threshold using the OR condition.

By incorporating logical conditions within the SUMPRODUCT function, users can tailor their calculations to extract specific subsets of data based on desired criteria. This makes it a powerful tool for performing complex analyses and deriving insights from large datasets.

SUMIF/COUNTIF & SUMIFS/COUNTIFS Functions

The SUMIF, COUNTIF, SUMIFS, and COUNTIFS functions are grouped together because they operate in a similar manner, allowing for conditional summing or counting within a dataset.

For instance, if you have a list of names and want to count how many times a specific name appears quickly, you can utilize the COUNTIF function.


SUMIF/COUNTIF & SUMIFS/COUNTIFS Functions

Similarly, if you have a dataset with sales representatives' names and corresponding sales values, and you want to calculate the sum of sales for a particular sales representative, the SUMIF function is the tool to use.

SUMIF/COUNTIF & SUMIFS/COUNTIFS Functions

In cases where multiple conditions need to be considered, such as obtaining the sum of sales for a specific sales representative in a specific month, the SUMIFS function comes into play. This function allows for applying multiple criteria, such as the sales representative's name and the date, to perform the summing operation. 

Likewise, the COUNTIFS function is used when counting based on multiple conditions in a dataset.

FILTER Function

The FILTER function is a valuable addition to Excel 2021 and Excel for Microsoft 365, providing an efficient way to filter and extract data from a dataset.

As the name suggests, the FILTER function allows users to apply filters to a dataset in Excel, enabling the extraction of specific results. Before introducing this function, achieving similar outcomes required complex and lengthy workarounds. Image 7

To illustrate the utility of the FILTER function, consider a dataset containing sales representative names, their respective regions or countries, and their sales values. With the FILTER function, filtering all the records associated with a particular country becomes effortless. 

The ability to use a cell reference instead of hard-coding the country name in the formula makes it even more powerful. By placing the country name in a cell and referring to it in the formula, users can easily change the country name in the cell, and the formula will automatically provide the corresponding records for that country.

FAQs

What is the areas function in Excel?

The "AREAS" function in Excel is not a built-in function. It does not exist in Excel's standard function library.

What are the 5 powerful Excel functions that make work easier?

Five powerful Excel functions that can make work easier include VLOOKUP, SUMIF, INDEX, MATCH, and IFERROR.

What are the 5 basic Excel skills?

Five basic Excel skills include understanding cell referencing, using formulas and functions, formatting data and cells, creating charts and graphs, and filtering and sorting data.

What is the difference between Excel and advanced Excel?

Excel refers to the standard spreadsheet software that includes basic functions and features, while advanced Excel typically refers to the utilization of complex formulas, advanced functions, data analysis tools, and automation techniques within Excel.

What are the levels of Excel skills?

Excel skills are often categorized into beginner, intermediate, and advanced. Beginner-level skills cover basic tasks and formulas, intermediate-level skills involve more complex formulas and data manipulation, and advanced-level skills encompass advanced functions, macros, and data analysis techniques.

Final Thoughts

Some key areas and functions in advanced Excel can significantly elevate your proficiency and effectiveness with the software. Functions such as XLOOKUP, INDEX/MATCH, SUMPRODUCT, SUMIF/COUNTIF, and the FILTER function offer powerful tools for data analysis, lookup, conditional calculations, and filtering. 

Mastering these functions allows you to manipulate and extract valuable insights from complex datasets. Understanding advanced areas like conditional formatting, pivot tables, data validation, and array formulas can further enhance your Excel skills. 

One more thing

If you have a second, please share this article on your socials; someone else may benefit too. 

Subscribe to our newsletter and be the first to read our future articles, reviews, and blog post right in your email inbox. We also offer deals, promotions, and updates on our products and share them via email. You won’t miss one.

Related articles 

» Mastering Data Modeling in Excel: Advanced Techniques and Best Practices
» Mastering Advanced Filtering in Excel: Tips and Techniques
» Calculate Square Root in Excel: Easy Steps for Accurate Results

]]>
http://oktec.kr/?big=blogs/product-guides/excel-skills-all-levels 2023-07-06T02:57:00-07:00 2024-04-15T13:03:57-07:00 Excel Skills: Essential 23 for Basic, Intermediate, and Advanced Levels Rick Akura More

]]>
Strong Excel skills are essential for professionals across all levels in today's data-driven world. Mastering Excel can significantly enhance your productivity and decision-making capabilities, whether you're a beginner, intermediate user, or advanced analyst. 

This article will explore 23 key Excel skills that will empower you to tackle various tasks and challenges. Employers highly seek these skills and can boost your career prospects in various fields such as finance, accounting, marketing, and project management. 

Get ready to unlock a world of possibilities and become a data wizard with our comprehensive guide. Let's get started.

Table of Contents

  1. What Is Microsoft Excel
  2. Top 23 Skills
  3. Importance and Benefits of Excel Skills
  4. Tips for Improving Excel Skills
  5. FAQs
  6. Final Thoughts

What Is Microsoft Excel

Microsoft Excel is a widely-used software application that allows users to create and manage spreadsheets, perform calculations, analyze data, and generate visually appealing reports. It was initially introduced in 1987 and has since become a staple tool for personal and professional use.

Excel offers a range of practical functions beyond its basic spreadsheet capabilities. Its extensive features and functionalities make it an essential tool for businesses, educators, analysts, and individuals who work with data regularly. 

Top 23 Skills

Below are 23 essential Excel skills:

Formulas and Functions

Understand and utilize various formulas and functions in Excel to perform calculations and automate tasks.

Formulas and Functions

Cell Formatting

Format cells to enhance the visual appearance and organize data effectively.

Cell Formatting

Data Entry and Navigation

Efficiently enter data and navigate through worksheets and workbooks.

Data Entry and Navigation

Sorting and Filtering

Sort and filter data to quickly analyze and find specific information.

Sorting and Filtering

Conditional Formatting

Apply formatting rules based on specific conditions to highlight important data.

Conditional Formatting

PivotTables

Create and manipulate PivotTables to summarize and analyze large data sets.

PivotTables

Charts and Graphs

Represent data visually using different chart types and customize them as per requirements.

Charts and Graphs

Data Validation

Set rules to control and validate data entry, ensuring accuracy and consistency.

Data Validation

VLOOKUP and HLOOKUP

Use these functions to search for data in tables and retrieve corresponding values.

VLOOKUP and HLOOKUP

Data Tables

Perform multiple calculations simultaneously by setting up data tables.

Data Tables

What-If Analysis

Analyze the impact of changing variables on formulas and make informed decisions.

What-If Analysis

Conditional Functions

Utilize IF, COUNTIF, SUMIF, and other conditional functions to perform calculations based on specified criteria. 

Absolute and Relative References

Understand and apply referencing techniques to maintain accurate calculations.

Absolute and Relative References

Named Ranges

Assign names to ranges of cells to simplify formulas and improve readability.

Named Ranges

Macros

Record and automate repetitive tasks by creating macros.

Macros

Data Analysis Tools

Utilize built-in data analysis tools such as Goal Seek, Solver, and Scenario Manager.

Data Analysis Tools

Error Handling

Identify and resolve errors in formulas and functions using error-handling techniques.

Error Handling

Array Formulas

Perform calculations on multiple values simultaneously using array formulas.

Hyperlinks

Create links to external sources or specific locations within the workbook.

Hyperlinks

Protecting Worksheets and Workbooks

Secure data by implementing password protection and restricting access to certain areas.

Protecting Worksheets and Workbooks

Collaboration

Share workbooks, track changes, and collaborate with others in real-time.

Conditional Formatting with Formulas

Apply complex formatting rules using formulas.

Excel Shortcuts

Master common keyboard shortcuts to boost productivity.

Importance and Benefits of Excel Skills

Excel skills are indispensable in various professional fields due to their wide applicability and numerous benefits. Here's a concise explanation of why Excel skills are essential, the advantages they offer, and how they contribute to efficiency and productivity:

Essentiality across Professional Fields

  • Excel is a versatile tool used in finance, accounting, data analysis, project management, marketing, and many other domains.
  • It enables professionals to handle large datasets, perform calculations, and create visual representations.

Advantages of Strong Excel Proficiency

  • Increased employability: Excel proficiency is highly sought after by employers, enhancing job prospects.
  • Enhanced data analysis: Excel allows for efficient sorting, filtering, and data manipulation, facilitating informed decision-making.
  • Improved accuracy: Excel's formulas and functions minimize manual errors, ensuring accurate calculations and analysis.
  • Streamlined workflows: Excel automates repetitive tasks, saving time and effort.
  • Clear communication: Excel's visual representations, such as charts and graphs, aid in presenting complex data in an easily understandable format.

Contribution to Efficiency and Productivity

  • Data organization: Excel's spreadsheet format enables systematic organization and easy access to data.
  • Quick calculations: Excel's formulas and functions enable swift and accurate calculations, eliminating manual computations.
  • Automation: Excel's features like macros and conditional formatting automate repetitive tasks, reducing manual effort and increasing productivity.
  • Data analysis: Excel's tools, such as PivotTables and data visualization options, enable efficient analysis and interpretation of data, leading to actionable insights.

Excel skills are essential in various professional fields due to their versatility. They offer advantages such as increased employability, improved data analysis, accuracy, streamlined workflows, and clear communication. 

Tips for Improving Excel Skills

Improving Excel skills is crucial for maximizing productivity and efficiency. Here are some tips to enhance your Excel proficiency:

Utilize Learning Resources

  • Online tutorials: Websites like Microsoft Excel's official support page, YouTube tutorials, and online learning platforms offer comprehensive Excel courses.
  • Excel books and guides: Explore recommended books and guides that provide step-by-step instructions and advanced techniques.
  • Webinars and workshops: Attend virtual seminars or workshops conducted by Excel experts to learn new skills and stay updated with the latest features.

Master Efficient Data Entry and Navigation

  • Keyboard shortcuts: Learn common keyboard shortcuts for tasks like copying, pasting, selecting cells, and navigating between sheets.
  • Autofill and Flash Fill: Utilize these features to quickly populate data and extract information from existing patterns, saving time and effort.
  • Cell referencing: Understand how to use absolute and relative cell references to streamline formulas and calculations.

Embrace Time-Saving Shortcuts and Productivity Hacks

  • Conditional formatting: This feature automatically highlights specific values or trends in your data, making it easier to interpret.
  • PivotTables: Explore PivotTables to summarize and analyze large datasets efficiently, allowing you to extract key insights quickly.
  • Macros: Automate repetitive tasks by recording and running macros, reducing manual effort and increasing productivity.

Practice Continuous Learning

  • Stay updated: Keep abreast of new Excel features and updates by following Microsoft's official announcements and blogs.
  • Join Excel communities: Engage with Excel forums, communities, and social media groups to learn from and share experiences with other Excel users.
  • Practice regularly: Consistent practice is key to improving Excel skills. Set aside dedicated time to work on Excel projects or solve practice exercises.

FAQs

What are all the Excel levels?

Excel can be categorized into three levels: basic, intermediate, and advanced, based on the complexity of the functions and features users are proficient in.

What is the importance of basic Excel skills?

Basic Excel skills are crucial as they provide a foundation for data entry, formatting, simple calculations, and basic data analysis, enabling users to effectively organize and manage data.

What are the 5 basic functions of Excel?

The five basic functions of Excel are SUM, AVERAGE, MIN, MAX, and COUNT, which allow users to perform calculations on numerical data and obtain useful insights.

What are the 10 basic functions of MS Excel?

In addition to the five basic functions mentioned earlier, other commonly used basic functions in MS Excel include IF, VLOOKUP, CONCATENATE, TODAY, NOW, LEFT, RIGHT, MID, LEN, and COUNTIF.

What is most important in Excel?

The most important aspect in Excel is its versatility and the ability to efficiently handle data, perform calculations, create charts and graphs, analyze information, and automate tasks, making it an indispensable tool for professionals in various fields.

Final Thoughts

Mastering Excel skills is essential in today's professional landscape, regardless of your expertise level. From basic data entry to advanced data analysis, Excel offers a wide range of capabilities to streamline work processes and boost productivity. 

By developing proficiency in Excel, you can effectively manage and manipulate data, create dynamic reports, and easily perform complex calculations. Excel skills are highly transferable across industries, making them valuable assets in various job roles. 

One more thing

If you have a second, please share this article on your socials; someone else may benefit too. 

Subscribe to our newsletter and be the first to read our future articles, reviews, and blog post right in your email inbox. We also offer deals, promotions, and updates on our products and share them via email. You won’t miss one.

Related articles 

» How to Filter Pivot Tables with Excel Slicers
» Mastering Complex Data Analysis with Excel Array Formulas
» Excel Tables: The Key to Effective Data Organization and Analysis

]]>
http://oktec.kr/?big=blogs/product-guides/top-6-great-tools-for-online-retailers-who-want-to-grow-their-business-fast 2023-07-03T05:12:00-07:00 2024-04-02T22:35:12-07:00 Top 6 Great Tools for Online Retailers to Grow Their Business Fast Rick Akura More

]]>
The online retail world is a dynamic arena where change is the only constant, and competition keeps you on your toes. It’s also a market that offers endless possibilities for the ones prepared to take on the challenges (which are not exactly easy to overcome or face).

ecommerce retail business tools

One of the most challenging aspects is your very own target audience. The modern shopper is perceptive, discerning, and well-informed and doesn’t shy away from raising their expectations when it comes to online shopping experiences.

So the only way to move forward as an online retailer is to adjust your business strategy to this fast-track rhythm. You can do this by implementing robust strategies and staying up to date with technological advances that can help speed up your growth rate.

This is where specialized tools can bring agility and efficiency into business functions, streamline operations, and help you make real-time data-driven decisions. In today’s article, we put together a short guide of the most important tools any eCommerce business should use or implement to promote growth at an accelerated pace.

1. A Reliable Payment Gateway System

A payment gateway system is the digital conduit between the customers’ bank accounts and your business's account. These systems validate and facilitate transactions, so your online retail business can't function without a reliable provider. 

Gateway systems also keep customers’ financial information secure and improve the overall user experience. Therefore, a well-chosen gateway can significantly bolster your success in the ever-competitive online retail space.

This is why it’s crucial to know how to choose a payment gateway platform that’s trustworthy and fit for your business’s needs. Some factors to consider are security features, compatibility with your eCommerce platform, transaction fees involved, and whether they accept global payments (if you're selling internationally).

2. Tools to Help Protect Against Chargebacks

Chargebacks are a common challenge for online retailers, as they can cause significant disruption and loss of revenue.

While you can't 100% prevent them due to the consumers’ federally mandated right to dispute credit card charges, there are numerous tools, solutions, and chargeback protection tactics that you can employ to safeguard your eCommerce business.

For starters, fraud detection software is an invaluable tool. These services help you get transactions for potential fraud before it becomes a problem, identifying suspicious patterns in real-time. 

Another lifeline could be dedicated chargeback management software. These platforms provide comprehensive insights into why chargebacks occur and help strategize responses to refute unwarranted ones.

3. Email Marketing Tools

In the world of online retail business, communication with your customers is of utmost importance. Here's where email marketing tools, like MailChimp, play a crucial role as they help you streamline communication processes and maintain a continuous connection with your audience.

Moreover, due to recent AI developments, you can use these tools to automate complex tasks like customer segmentation, personalized content generation, and analysis of real-time data. This allows you to send appropriate product recommendations based on customers' purchase history or browsing behavior, which will increase the efficiency of your email marketing campaigns.

4. SEO Tools

SEO tools, especially ones that fit your business needs, are a must-have if you want to make sure customers will find your business in the vast ocean of online content. Their main job is to help optimize your site visibility on search engines.

At their simplest, SEO tools help identify the right keywords to appeal to your target audience, ensuring your content aligns with what users are searching for. More sophisticated tools, like Semrush or Yoast SEO, offer in-depth analysis, including tracking your website’s ranking over time, peeking into competitors' tactics, and running comprehensive site audits.

5. Social Media Management Tools

Harnessing the power of social media is a game-changer for any online retail business. A well-managed presence on platforms like Facebook, Instagram, YouTube, or TikTook can catapult your brand's visibility and engagement. However, consistent and relevant posts across multiple platforms can get hectic and time-consuming.

Luckily, there is a wide collection of social media management tools out there, like Hootsuite, ContentStudio and Buffer (to name a few). Such tools let you consolidate your social media operations in one easy-to-use dashboard. You can schedule posts in advance across platforms, engage with comments or messages from customers, and monitor performance through analytics.

Alongside scheduling tools are AI-powered functions for data analysis designed to help you understand which posts perform best or reveal trends in customer engagement. In short, these management tools streamline your business's social media strategy making it more efficient while allowing more time for what matters most – growing your business.

6. Customer Service Software

In an online retail landscape, exceptional customer service can set you apart from your competitors. Satisfied customers translate to loyal clients and repeat purchases, but earning your customers’ loyalty is not an easy task without the right tools.

Customer service platforms like Zendesk or Freshdesk help manage, streamline, and improve your customer service operations. From ticketing systems that capture all customer queries to knowledge bases empowering self-service, these tools are designed to amplify user experience.

Plus, some platforms offer multi-channel support, allowing you to respond to customer queries whether they come in via social media, email, or chatbots. Additionally, they provide valuable data insights helping gauge service quality and identify areas for improvement.

In Summary

The right tools can help your business navigate the eCommerce world's frantic ebb and flow. So before you even launch your site, it’s best to invest in a basic toolkit that can help support your activity as an entrepreneur.

As your business grows, you must find new tools to maintain your competitive advantage and stay interesting in front of customers. In summary, your strategies and tools create an interconnected and ever-evolving support system that you can’t ignore if you want to keep growing.

]]>
http://oktec.kr/?big=blogs/product-guides/excel-pro-features 2023-06-30T12:30:00-07:00 2024-04-15T13:22:55-07:00 Excel for Professionals: Essential Features and Functionalities Rick Akura More

]]>
When it comes to Excel for professionals, the vast array of functions can be overwhelming, especially for those starting with data analysis. With over 475 functions available, it's challenging to determine the right one for specific tasks. 

That's why we're here to help.

This resource has identified the 12 most useful Excel functions for data analysis. These functions are the go-to tools that simplify complex tasks, saving time and effort. 

Table of Contents

  1. IF
  2. SUMIFS
  3. COUNTIFS
  4. TRIM
  5. CONCATENATE
  6. LEFT/RIGHT
  7. FAQs
  8. Final Thoughts

IF

To use the IF function, you provide three arguments: the logical test, the value to return if the test is true, and the value to return if the test is false. This enables you to create dynamic formulas that adapt based on specific conditions.

In this example, we have order dates in the "Order Date" column and delivery dates in the "Delivery Date" column. The "Result" column represents the IF function's outcome based on the delivery date being more than 7 days later than the order date.

In this example, we have order dates in the

The formula used in the "Result" column is:

=IF(D2 > 7, "Yes", "No")

For each row, the formula checks if the value in the corresponding cell of the "Delivery Date" column (e.g., D2, D3, D4, etc.) is greater than 7 days after the order date. If the condition is met, it displays "Yes" in the "Result" column; otherwise, it displays "No".

The IF function allows for many possibilities and can be nested within other functions to create even more complex logical tests and outcomes. It is a fundamental tool in Excel that enhances automation and enables customized data analysis and reporting based on specific conditions.

SUMIFS

To use the SUMIFS function, you must provide several arguments: the range of values to sum, followed by pairs of criteria range and criteria to test against.

In this example, we have sales data with the region in the "Region" column, the product in the "Product" column, and the sales amount in the "Sales Amount" column.

To calculate the total sales for a specific region entered in cell E3, we can use the SUMIFS function.

The formula used would be:

=SUMIFS(C2:C9, A2:A9, E3)

SUMIFS

In this formula, C2:C9 represents the range of sales amounts that we want to sum. A2:A9 represents the range of regions to test against, and E3 contains the specific region we want to sum the sales for.

Based on the sales data provided in the table and assuming that "South" is entered in cell E3, the SUMIFS function will add up the sales amounts that have the corresponding region as "South". In this case, the total sales for the South region would be $330.

COUNTIFS

To use the COUNTIFS function, you provide pairs of criteria ranges and criteria to test against.

In this example, we have sales data with the region in the "Region" column, the product in the "Product" column, and the sales amount in the "Sales Amount" column.

To count the number of sales from a specific region entered in cell E3 that have a value of 200 or more, we can use the COUNTIFS function.

The formula used would be:

=COUNTIFS(B2:B9, E3, C2:C9, ">=200")

COUNTIFS

In this formula, B2:B9 represents the range of regions to test against, E3 contains the specific region we want to count the sales for, C2:C9 represents the range of sales amounts to evaluate, and ">=200" specifies the criteria for counting sales with a value of 200 or more.

Assuming that "East" is entered in cell E3, the COUNTIFS function will count the number of sales that meet the conditions of being from the "East" region and having a sales amount of 200 or more. In this case, the count of such sales would be 2.

TRIM

A common issue with trailing spaces is that they are not visible to users, causing unexpected errors or undesired results in formulas or functions. However, the TRIM function rescues by removing these hidden spaces, ensuring accurate data analysis and processing.

This example has a column labeled "Region" with the region names listed.

Let's assume there is an accidental space at the end of cell B6. This space may not be visible to the user but can cause issues using functions like COUNTIFS.

TRIM

You can use the TRIM function in a separate column to clean the data and remove the trailing space. Let's say we use column C for the cleaned data.

In cell C2, you can enter the following formula:

=TRIM(B6)

This formula uses the TRIM function to remove any trailing spaces from the text in cell B2. The TRIM function ensures that the cleaned data in column C does not contain any hidden spaces.

You can then drag the formula down to apply it to the rest of the cells in column C.

CONCATENATE

To use the CONCATENATE function, you provide the text or cell references you want to combine.

In this example, we have a column labeled "First Name" and another column labeled "Last Name" where the corresponding names are listed.

We can use the CONCATENATE function to create a full name by merging the values from the "First Name" and "Last Name" columns.

Let's assume we want to combine the values from the "First Name" and "Last Name" columns and display the full name in column C. 

CONCATENATE

In cell C2, you can enter the following formula:

=CONCATENATE(A2, " ", B2)

This formula uses the CONCATENATE function to combine the value in cell A2 (the first name), a space (" "), and the value in cell B2 (the last name). The result is a full name.

You can then drag the formula down to apply it to the rest of the cells in column C.

LEFT/RIGHT

To use the LEFT or RIGHT function, you provide the text or cell reference from which you want to extract characters and the number of characters to extract.

In this example, we have a column labeled "Reference" where each cell contains a reference consisting of a client ID, a transaction ID, and a region code.

We can use the LEFT function to extract the client ID from the references.

We can use the LEFT function to extract the client ID from the references.

In cell B2, you can enter the following formula:

=LEFT(A2, 2)

This formula uses the LEFT function to extract the first two characters from the reference in cell A2, representing the client ID. The result will be the client ID portion.

We can use the RIGHT function to extract the region code from the references.

In cell C2, you can enter the following formula:

=RIGHT(A2, 1)

This formula uses the RIGHT function to extract the last character from the reference in cell A2, which represents the region code. The result will be the region code.

You can then drag the formulas down to apply them to the rest of the cells in columns B and C.

FAQs

Why is MS Excel important for a professional?

MS Excel is important for professionals because it allows for efficient data organization, analysis, and presentation, enabling better decision-making and increased productivity.

How do I use Excel like a professional?

To use Excel like a professional, you should focus on mastering key functions, formulas, and shortcuts, organizing data effectively, creating dynamic charts and graphs, and utilizing advanced features such as pivot tables and data validation.

What are the important uses and advantages of Microsoft Excel?

The important uses and advantages of Microsoft Excel include financial analysis, budgeting, data tracking, project management, statistical analysis, creating professional reports, and collaborating with others through shared workbooks.

What is the importance of MS Excel for students?

MS Excel is important for students as it helps them organize research data, create study schedules, analyze project data, manage budgets, and develop valuable analytical skills applicable across various fields.

What is the most important use of Excel?

The most important use of Excel is its ability to efficiently manage and analyze large sets of data, making it indispensable for tasks like data analysis, financial modeling, forecasting, and decision-making in various industries.

Final Thoughts

In conclusion, Excel offers many important features and functionalities that make it a crucial tool for professionals across various industries. Its extensive range of over 475 functions allows for complex data analysis, automation, and decision-making within spreadsheets. 

Functions like IF, SUMIFS, COUNTIFS, TRIM, CONCATENATE, LEFT, and RIGHT are powerful for manipulating data, performing calculations, and extracting specific information. Excel's versatility extends beyond calculations, with features like conditional formatting, data validation, pivot tables, and charts enabling effective data visualization and reporting. 

Creating macros and utilizing VBA programming further enhance Excel's automation and customization potential. With its user-friendly interface and extensive capabilities, Excel remains essential for professionals seeking efficient data management, analysis, and reporting.

One more thing

If you have a second, please share this article on your socials; someone else may benefit too. 

Subscribe to our newsletter and be the first to read our future articles, reviews, and blog post right in your email inbox. We also offer deals, promotions, and updates on our products and share them via email. You won’t miss one.

Related articles 

» Microsoft Excel is Attempting to Recover Your Information - How to Fix
» Mastering the Basic Parts of MS Excel for Improved Productivity
» How to Copy a Formula in Excel | Step-by-Step Guide

]]>
http://oktec.kr/?big=blogs/product-guides/excel-students-education 2023-06-29T09:54:00-07:00 2024-04-15T13:24:44-07:00 Excel for Students: Mastering Excel for Education Rick Akura More

]]>
Microsoft Excel® has been a staple in computer labs for over two decades, revolutionizing the way students approach calculations. It's high time we prioritize Excel over calculators and cell phones as tools for academic assignments. 

By embracing Excel in assignments, students can enhance their problem-solving skills, develop critical thinking abilities, and streamline their workflow. It's time to empower our students with modern tools that transcend the limitations of calculators. 

Join us as we delve into the vast capabilities of Excel and unlock its potential to revolutionize education.

Table of Contents

  1. Copying Exercises into Worksheets
  2. Quick Tips and Techniques for Students
  3. Sharing Excel Solutions and Grading Methods
  4. How can Microsoft Excel help you as a Student?
  5. Importance of Microsoft Excel for Students
  6. FAQs
  7. Final Thoughts

Copying Exercises into Worksheets

Copying an exercise or problem directly into an Excel worksheet effectively streamlines the learning process and fosters a practical problem-solving approach. By doing so, students can skip the time-consuming task of inputting data and focus on creating a solution. 

This approach offers several advantages.

  1. Time-saving: Students can immediately begin working on the problem without manually entering data by providing a pre-populated template in Excel. This allows for more efficient use of classroom time.
  2. Practical approach: Working directly in Excel enables students to develop a practical mindset when it comes to problem-solving. They can manipulate data, perform calculations, and visualize results, gaining a deeper understanding of the subject matter.
  3. Easy file sharing: Cloud storage services like Box allow teachers to save and share files with students conveniently. By synchronizing Box folders to their computers, any updates or changes made to the files will automatically reflect in the shared link provided to students.
  4. File security: To avoid potential issues such as accidental modifications or deletions, it is advisable to restrict student access to downloading the files rather than allowing direct editing. This ensures the integrity of the original files while still enabling students to work with them.

Quick Tips and Techniques for Students

To optimize the learning experience, a flipped classroom approach can be adopted. This involves forming student groups to solve in-class assignments collaboratively, fostering peer-to-peer assistance and allowing the instructor to provide individualized attention. 

By walking around the classroom and working with different groups and students individually, the teacher can address specific challenges and provide guidance where needed.

Motivation can be increased by assigning point values to in-class assignments. This incentivizes active participation and encourages students to put their Excel skills into practice. 

The answers to these assignments can then be transferred to online homework platforms for automatic grading, simplifying the grading process and ensuring accurate student progress tracking.

The answers to these assignments can then be transferred to online homework platforms for automatic grading, simplifying the grading process and ensuring accurate student progress tracking.

In terms of grading, the in-class assignments can account for approximately 50 points in a 1,000-point class, representing around half a letter grade. This provides students tangible rewards for their effort and encourages them to engage actively with Excel.

Sharing Excel Solutions and Grading Methods

To maintain academic integrity and promote independent thinking, it is advised not to share Excel solutions with the class or require students to email their answers for grading. Sharing solutions can lead to students passing them on to future classes, undermining the learning experience. Similarly, accepting Excel files for grading may enable students to copy and modify each other's work, compromising the integrity of their assignments.

To foster collaboration and understanding, providing the same in-class assignment to all students is beneficial while ensuring that end-of-chapter exercises are algorithmic, generating unique numbers for each student. This approach encourages students to work on homework assignments, promoting collaboration while allowing for individualized results and understanding.

Embracing modern business practices involves letting go of outdated methods and embracing new educational approaches. By doing so, students can better prepare themselves for internships and future jobs where collaboration and critical thinking with Excel are valued skills.

How can Microsoft Excel help you as a Student?

Microsoft Excel offers several benefits for students, making it a valuable tool in their academic journey. Here are some reasons why MS Excel is helpful for students:

  1. Quick and Accurate Calculations: Excel provides various mathematical operations and logical formulas, allowing students to perform calculations more precisely. It saves time and reduces the chances of human error, enhancing students' ability to handle large amounts of data efficiently.
  2. Improved Analytical Skills: Excel helps students enhance their analytical skills by enabling them to handle financial calculations, manage budgets, and analyze data effectively. Proficiency in financial education translates into excellence in subjects like mathematics, economics, and accounting, opening doors to better financial results and money management.
  3. Data Visualization: Excel offers a range of visualization tools such as charts, graphs, and histograms, allowing students to present and interpret data in a visually appealing manner. Developing skills in data visualization is valuable for future studies and careers, particularly in fields like commerce and finance.
  4. Time Management Enhancement: Excel equips students with shortcut tools and efficient techniques that enhance time management. Students can streamline tasks and improve productivity by utilizing Excel's various features and functionalities.
  5. Comprehensive Data Analysis: Excel's features like conditional formatting enable students to analyze large amounts of data accurately. They can visualize and interpret data effectively, reducing the chances of errors and simplifying data presentations through charts and graphs.

Importance of Microsoft Excel for Students

Microsoft Excel is an essential tool for students because it can effectively organize and manipulate large amounts of data. It offers several advantages that contribute to improved time management and faster, more accurate calculations.

  1. Data Organization: Excel allows students to organize and structure data in a systematic manner, making it easier to analyze and interpret information. Whether it's organizing research data, creating budgets, or managing project timelines, Excel helps streamline and simplify complex data sets.
  2. Time Savings: Excel's formulas and functions enable students to perform calculations quickly and automatically. This eliminates the need for manual calculations, which can be time-consuming and prone to errors. With Excel's advanced features, students can easily tackle complex calculations, saving valuable time in their academic tasks.
  3. Accuracy and Precision: Students can ensure accurate and precise calculations by leveraging Excel's formulas and built-in functions. This reduces the likelihood of errors and provides reliable data analysis and problem-solving results.
  4. Data Analysis and Visualization: Excel offers powerful data analysis and visualization tools. Students can use features like charts, graphs, and pivot tables to analyze data trends, identify patterns, and present their findings visually compellingly. This enhances their ability to draw insights from data and communicate their findings effectively.
  5. Transferable Skills: Proficiency in Excel is highly valued in various professional fields. By gaining proficiency in Excel during their student years, students acquire a valuable skill set that can be applied in future academic, personal, and professional endeavors

FAQs

How can you Excel as a student?

You can excel as a student by mastering Microsoft Excel, which enables efficient data organization, analysis, and problem-solving.

What are the benefits of learning Microsoft Excel for students?

Learning Microsoft Excel equips students with valuable skills for data management, analysis, visualization, and enhanced productivity.

How will you use Excel professionally, personally, or academically?

Excel can be used in various aspects of professional, personal, and academic life, such as organizing data, creating budgets, tracking progress, and conducting data analysis.

How does learning to use Excel benefit you today and in the future?

Learning Excel provides immediate benefits by improving productivity and efficiency, while also offering long-term advantages for career advancement and adaptability in a data-driven world.

Why are spreadsheets important in education?

Spreadsheets are vital in education as they facilitate data analysis, problem-solving, critical thinking, and provide practical skills applicable across various subjects and disciplines.

Final Thoughts

Excel is a powerful tool for students to enhance their learning experience in education. Students can develop essential skills such as data organization, analysis, and problem-solving by incorporating Excel into their academic pursuits. 

Excel enables students to handle and manipulate large amounts of data efficiently, saving them time and effort. Its various functions and formulas also promote critical thinking and logical reasoning. 

Additionally, Excel's visual representation capabilities aid in presenting data meaningfully and comprehensibly. Overall, embracing Excel in education empowers students with valuable skills applicable across disciplines and prepares them for future academic and professional endeavors.

One more thing

If you have a second, please share this article on your socials; someone else may benefit too. 

Subscribe to our newsletter and be the first to read our future articles, reviews, and blog post right in your email inbox. We also offer deals, promotions, and updates on our products and share them via email. You won’t miss one.

Related articles 

» How to Use Data Tables in Excel: A Step-by-Step Guide
» How to Use Conditional Formatting to Make Your Excel Data Stand Out
» Microsoft Office Guide: An Ultimate Guide for Canada  Users

]]>
http://oktec.kr/?big=blogs/product-guides/excel-2023-features-updates 2023-06-27T06:05:00-07:00 2024-04-15T14:18:17-07:00 Excel Features Unveiled: Enhancements and Upgrades in 2023 Rick Akura More

]]>
Get ready to explore the exciting new features in Excel 2023 that will revolutionize your data analysis and management experience.

In this article, we will delve into the key features of Excel 2023, ranging from improved analysis capabilities to enhanced visualizations. Join us as we look at how these advancements can boost productivity and streamline data workflows. Let's dive in and discover the possibilities together.

Table of Contents

  1. Narrator Enhancements
  2. Implicit Measures Support for PBI PivotTables (CC)
  3. Enable Proper Date Support for PBI PivotTables (CC)
  4. Check your Formula with Value Preview Tooltip (CC)
  5. Excel for Mac Updates: User Feedback and Feature Requests
  6. FAQs
  7. Final Thoughts

Narrator Enhancements

In the Insiders Preview of Microsoft Excel, significant enhancements have been made to the Narrator feature to provide users with a more streamlined and efficient reading experience. When working in Excel, Narrator now delivers concise and concise announcements on the essential information needed for skimming through a workbook. 

This improvement allows users to grasp the key details without unnecessary verbosity quickly.

The latest Narrator updates also introduce customization options through convenient keyboard shortcuts. Users can personalize the reading experience according to their specific requirements and preferences. 

By leveraging these shortcuts, users can tailor Narrator's behavior, such as adjusting the level of detail in the announcements or choosing the specific elements they want Narrator to highlight.

The improvements in Narrator's functionality offer several benefits to Excel users. Here are the key points:

  1. Succinct Announcements: Narrator now delivers concise announcements, enabling users to grasp important information efficiently.
  2. Skim Workbooks Effectively: The streamlined reading experience helps users navigate workbooks quickly, allowing them to locate the necessary data without distractions.
  3. Customization Options: Keyboard shortcuts empower users to customize Narrator's behavior, tailoring it to their needs and preferences.
  4. Improved Accessibility: The enhanced Narrator feature enhances accessibility by providing a more efficient reading experience for users with visual impairments or those who rely on screen readers.

Implicit Measures Support for PBI PivotTables (CC)

Power BI-connected PivotTables have received an update that introduces support for implicit measures. Previously, to perform aggregations such as sum, average, or distinct count in a PivotTable, users were required to define explicit measures in the underlying Power BI datasets. 

However, with the latest enhancement, users can now leverage drag-and-drop functionality to directly aggregate fields without needing pre-defined measures.

Here's a breakdown of the key details regarding the support for implicit measures in Power BI PivotTables:

  1. Drag-and-Drop Aggregations: Users can now easily perform common aggregations (e.g., sum, average, distinct count) by simply dragging and dropping fields directly within the PivotTable, eliminating the need for creating explicit measures beforehand.
  2. Streamlined Analysis: The introduction of implicit measures streamlines analyzing data in Power BI-connected PivotTables. Users can quickly explore and gain insights from their datasets without the extra step of defining explicit measures.
  3. Enhanced Flexibility: This update provides users with increased flexibility in data analysis. They can dynamically choose which fields to aggregate and experiment with different aggregations on the fly, empowering them to discover new patterns and trends.

It's important to note that while implicit measures offer convenience and agility in PivotTable analysis, explicit measures are still valuable for more complex calculations and custom aggregations that may require specific logic.

Enable Proper Date Support for PBI PivotTables (CC)

In Power BI PivotTables, an enhancement has been implemented to enable proper date support. Previously, when working with dates in PivotTables, they were treated as strings rather than date-and-time objects. 

This limitation hindered the ability to perform accurate time-based filtering and sorting of data within the PivotTable. However, with the recent improvement, dates are now recognized as date-and-time objects within PivotTables.

The introduction of proper date support brings several benefits to users working with Power BI PivotTables:

  1. Accurate Filtering: With dates now recognized as date-and-time objects, users can apply time-based filters more accurately within the PivotTable. This allows for precise analysis and data exploration based on specific time periods.
  2. Sorting Capabilities: The enhancement enables proper sorting of dates within the PivotTable. Users can arrange data chronologically, facilitating easier identification of trends and patterns.
  3. Improved Data Integrity: By treating dates as date-and-time objects, the integrity of the data is preserved, ensuring consistency and reliability in reporting and analysis.

It is important to note that this improvement is specific to PivotTables and does not extend to formulas outside of the PivotTable. Date-related calculations and formulas outside the PivotTable will continue to function as before.

Check your Formula with Value Preview Tooltip (CC)

Excel introduces a new "Formula with Value Preview Tooltip" feature that enhances formula evaluation and understanding. With this feature, users can select any portion of a formula and Excel will display a tooltip showing the current value of that specific parameter.

Here are the key points to understand about the "Formula with Value Preview Tooltip" feature:

  1. Enhanced Formula Evaluation: Users can now easily evaluate specific parts of a formula without complex workarounds. By selecting a parameter within a formula, Excel instantly generates a tooltip displaying the current value associated with that parameter.
  2. Quick Data Validation: This feature enables users to validate the accuracy of formula inputs and troubleshoot any issues effectively. By inspecting the value preview tooltip, users can verify if the expected values are correctly passed to the formula, facilitating error identification and resolution.
  3. Improved Formula Understanding: The value preview tooltip helps users comprehend the impact of different parameters on the formula's overall calculation. It provides real-time visibility into the values being processed, enabling users to understand better how the formula works.
  4. Streamlined Debugging: When encountering formula errors or unexpected results, users can utilize the value preview tooltip to inspect the intermediate values within the formula, making the debugging process more efficient and effective.

The "Formula with Value Preview Tooltip" feature simplifies the evaluation and comprehension of formulas in Excel, empowering users to verify data inputs, troubleshoot issues, and better understand complex calculations. It enhances productivity and accuracy while working with formulas in Excel.

Excel for Mac Updates: User Feedback and Feature Requests

In the recent updates from Microsoft, there was no dedicated section for updates to Excel for Mac. This suggests that the platform may not have been a priority for the company during that period. If you are an Excel for Mac user with feedback or suggestions for Microsoft regarding existing features or new features you'd like to see, it is important to provide your input to the company.

Here are the key points to understand:

  1. Lack of Updates for Mac: The absence of a dedicated section for Mac updates indicates that the platform may not have received significant attention in recent weeks.
  2. Importance of User Feedback: As a user, you can provide feedback to Microsoft about existing features in Excel for Mac or request new features that would enhance your experience. Your feedback can help shape future updates and improvements.
  3. Ways to Provide Feedback: Microsoft provides various channels for users to provide feedback. These can include official feedback forms, community forums, or contacting Microsoft support. By sharing your thoughts, suggestions, and concerns, you contribute to the ongoing development of Excel for Mac.

It is crucial for Excel for Mac users to actively engage with Microsoft and express their feedback and feature requests. This helps ensure the platform receives the necessary attention and improvements based on user needs and preferences.

FAQs

What is the latest version of Excel in 2023?

The latest version of Excel in 2023 is Microsoft Excel 2023.

Is there Microsoft Excel 2023?

Yes, there is Microsoft Excel 2023.

How do I get a 2023 calendar in Excel?

You can find and download 2023 calendar templates for Excel from various sources, such as Microsoft Office templates website or third-party template providers.

Is there MS Office 2023?

As of my knowledge cutoff in September 2021, Microsoft Office 2023 has not been released. Please check with official Microsoft sources for the most up-to-date information on the release of MS Office 2023.

How do I change the date to 2023 in Excel?

To change the date to 2023 in Excel, you can simply input the desired date as "1/1/2023" or use the DATE function, e.g., "=DATE(2023,1,1)".

Final Thoughts

The new features introduced in Excel 2023 bring exciting advancements that enhance data analysis and management. From improved Narrator functionality for a more efficient reading experience to proper date support in PivotTables enabling accurate time-based filtering and sorting, these updates address key user needs. 

The support for implicit measures in PivotTables streamlines data aggregation without the need for pre-defined measures, while the Formula with Value Preview Tooltip empowers users to evaluate formulas and troubleshoot with ease. Although there may have been a lack of dedicated updates for Excel for Mac in recent weeks, user feedback remains crucial in shaping future improvements. 

As Excel continues to evolve, these new features pave the way for enhanced productivity, data exploration, and a more intuitive user experience.

One more thing

If you have a second, please share this article on your socials; someone else may benefit too. 

Subscribe to our newsletter and be the first to read our future articles, reviews, and blog post right in your email inbox. We also offer deals, promotions, and updates on our products and share them via email. You won’t miss one.

Related articles 

» Unable to Add or Create New Cells in Excel
» Excel Hacks: Master Adding a New Line in a Single Cell
» Microsoft Excel is Attempting to Recover Your Information - How to Fix

]]>
http://oktec.kr/?big=blogs/product-guides/essential-excel-functions 2023-06-07T10:42:00-07:00 2024-04-16T05:26:23-07:00 Essential Excel Functions: 10 Most Important Excel Functions Rick Akura More

]]>
When it comes to data analysis in Excel, the abundance of functions can be overwhelming for beginners. With over 475 functions at your disposal, it's challenging to determine which ones are essential for specific tasks. 

However, the good news is that most Excel users rely on a handful of functions covering most of their needs. This resource will unveil the top 10 most useful Excel functions for data analysis. 

Table of Contents

  1. IF Function
  2. SUMIFS function
  3. COUNTIFS Function
  4. TRIM function
  5. CONCATENATE function
  6. LEFT and RIGHT functions
  7. VLOOKUP function
  8. IFERROR function
  9. VALUE function
  10. UNIQUE function
  11. FAQs
  12. Final Thoughts

IF Function

The IF function in Excel is a powerful tool that allows for automated decision-making within spreadsheets. With the IF function, you can perform different calculations or display different values based on the outcome of a logical test or decision.

Here's how the IF function works: it requires three components - the logical test to perform, the value to return if the test is true, and the value to return if the test is false. The syntax of the IF function is as follows: =IF(logical test, value if true, value if false).

IF Function

For example, you have a spreadsheet with order dates in column B and delivery dates in column C. You want to display "Yes" if the delivery date is more than 7 days later than the order date and "No" if it is not. In this case, you would use the IF function as follows: =IF(C2-B2>7, "Yes", "No").

This simple IF function formula checks if the delivery date in cell C2 is more than 7 days later than the order date in cell B2. If it is true, it returns "Yes"; otherwise, it returns "No".

SUMIFS function

The SUMIFS function in Excel is an incredibly useful tool for summing values based on multiple criteria. It allows you to specify conditions or criteria to determine which values should be included in the sum.

While Excel also has a function called SUMIF, which can sum values based on a single condition, SUMIFS offers more flexibility as it can test multiple conditions simultaneously. This makes SUMIFS a superior choice when you need to sum values based on multiple criteria. 

The syntax of the SUMIFS function is as follows: =SUMIFS(sum range, criteria range 1, criteria 1, ...)

SUMIFS function

Let's assume the specific region is entered in cell E3 as "East". To calculate the sum of sales amounts for the East region using the SUMIFS function, the formula would be:

=SUMIFS(B2:B9, A2:A9, E3)

In this formula, the sum range is column B (sales amount), the criteria range is column A (region), and the criterion is the value in cell E3 ("East"). The SUMIFS function will sum all the sales amounts that meet the condition of being in the East region.

The result will be the sum of $12,300, representing the total sales amount for the East region based on the given data.

COUNTIFS Function

The COUNTIFS function in Excel is a powerful tool for counting the number of values that meet specific criteria. It works similarly to the SUMIFS function but does not require a sum range.

In addition to COUNTIFS, other similar functions like AVERAGEIFS, MAXIFS, and MINIFS allow you to calculate the average, maximum, and minimum values, respectively, based on multiple criteria.

The syntax of the COUNTIFS function is as follows: =COUNTIFS(criteria range 1, criteria 1, ...)

COUNTIFS Function

Let's assume the specific region is entered in cell E3 as "East", and we want to count the number of sales from the East region with a value of 200 or more. To calculate this using the COUNTIFS function, the formula would be:

=COUNTIFS(B2:B9, E3, C2:C9, ">=200")

In this formula, the criteria range 1 is column B (region), and the criterion 1 is the value in cell E3 ("East"). The criteria range 2 is column C (sales amount), and the criterion 2 is ">=200". The COUNTIFS function will count the number of sales that meet both conditions.

The result will be the count of 3, indicating that there are three sales in the East region with a value of 200 or more based on the given data.

TRIM function

The TRIM function in Excel is a powerful tool that removes excess spaces from text within a cell, except for the single spaces between words. It is particularly useful for cleaning up data and resolving issues caused by trailing or unnecessary spaces.

One common scenario where TRIM is handy is copying and pasting content from external sources, leading to hidden spaces at the beginning or end of the text. These spaces are not visible to the naked eye but can cause problems when working with the data.

Let's assume there's an accidental space at the end of cell B6, which is causing issues with the COUNTIFS function. To clean up the data and remove any trailing spaces, we can use the TRIM function in a separate column.

In cell C2, you can enter the formula =TRIM(B2), and then drag the formula down to apply it to the remaining cells in column C. The TRIM function will remove any leading or trailing spaces from the region names.

After applying the TRIM function, the modified table will look as follows:

TRIM function

CONCATENATE function

The CONCATENATE function in Excel allows you to combine or concatenate the values from multiple cells into a single cell or text string. It is particularly useful when you merge different parts of text, such as names, addresses, reference numbers, file paths, or URLs.

To use CONCATENATE, you provide the text or cell references you want to join together as arguments within the function. The syntax is as follows: =CONCATENATE(text1, text2, text3, ...).

For example, you have a spreadsheet with first names in column A and last names in column B. You want to create a full name by combining the first and last names with a space in between. In this case, you would use CONCATENATE as follows: =CONCATENATE(A2, " ", B2).

CONCATENATE function

This formula instructs Excel to concatenate the value in cell A2 (the first name), followed by a space, and then the value in cell B2 (the last name). The resulting cell will display the full name.

LEFT and RIGHT functions

The LEFT and RIGHT functions in Excel are useful tools for extracting a specified number of characters from the start or end of a text string, respectively. They offer the opposite action to CONCATENATE and can be utilized to extract specific portions of text, such as parts of an address, URL, or reference, for further analysis.

The LEFT and RIGHT functions require two arguments: the text from which you want to extract characters and the number of characters to be extracted. The syntax for LEFT is =LEFT(text, num chars), while for RIGHT it is =RIGHT(text, num chars).

LEFT and RIGHT functions

For example, consider a scenario where column A contains references consisting of a client ID (first two characters), a transaction ID, and a region code (final character). To extract the client ID from the references, you would use the LEFT function as follows: =LEFT(A2, 2).

This formula instructs Excel to extract the leftmost two characters from cell A2, representing the client ID. Similarly, the RIGHT function can extract the last character from the cells in column A, indicating whether the client is in the South or the North: =RIGHT(A2, 1).

VLOOKUP function

The VLOOKUP function in Excel is a widely used and essential tool for data analysis. It allows you to search for a value in a table and retrieve information from another column based on that value. This function is particularly valuable for combining data from different lists or comparing two lists for matching or missing items.

To use VLOOKUP, you need to provide four pieces of information:

  1. The value you want to look for.
  2. The table in which you want to search.
  3. The column index number of the column containing the desired information.
  4. The type of lookup you want to perform (exact match or approximate match).

The syntax for VLOOKUP is as follows: =VLOOKUP(lookup value, table array, column index number, range lookup).

The sales table contains sales amounts in the first column and employee IDs in the second column. We want to bring the corresponding region for each employee from another table into the "Region" column.

Assuming the employee information table is located in cells G2:H12, where column G contains the employee IDs and column H contains the corresponding regions, we can use the VLOOKUP function to retrieve the regions.

In cell C2, you can enter the formula =VLOOKUP(B2, $G$2:$H$12, 2, FALSE). This formula instructs Excel to search for the employee ID in cell B2 within the range $G$2:$H$12. It retrieves the corresponding value from the second column of the range (column H), which represents the region. Copy the formula down to apply it to the remaining cells in the "Region" column.

After applying the VLOOKUP function, the modified table will look as follows:

VLOOKUP function

IFERROR function

The IFERROR function in Excel provides a way to handle and manage errors that may occur in formulas or calculations. It allows you to specify an alternative action or value to display when an error is encountered, providing more meaningful feedback to users and preventing the disruption of data analysis processes.

To use IFERROR, you need to provide two arguments: the value or formula to check for an error and the action or value to perform or display in case of an error.

IFERROR function

In this table, we have the sales amounts in the first column, employee IDs in the second column, and the corresponding regions in the third column.

Assuming we are using the VLOOKUP function to retrieve the regions based on the employee IDs, we can incorporate the IFERROR function to handle any errors that may occur.

In cell C3, you can enter the formula =IFERROR(VLOOKUP(B3, $G$2:$H$12, 2, FALSE), "Name not found. Check both lists"). This formula wraps the VLOOKUP function, searching for the employee ID in cell B3 within the range $G$2:$H$12. If a matching ID is found, it retrieves the corresponding region. However, if an error occurs (e.g., the ID is not found in the range), the IFERROR function will return the specified message "Name not found. Check both lists" instead of the standard error message.

You can copy the formula down to apply it to the remaining cells in the "Region" column. The IFERROR function will handle any errors that occur during the VLOOKUP and display the custom message for those cases.

The modified table will reflect the error handling through the IFERROR function, as shown above.

VALUE function

The VALUE function in Excel plays a crucial role in converting text values stored as numbers into actual numerical values. When importing or copying data from other sources, it is common for numbers to be mistakenly stored as text, preventing accurate data analysis and calculations. In such cases, the VALUE function comes to the rescue.

To use the VALUE function, you must provide the text you want to convert into a number as the argument.

VALUE function

The syntax for the VALUE function is as follows: =VALUE(text).

For example, you have a dataset where sales values are stored as text in column B. You would use the VALUE function to convert these text values to numbers for further analysis. The formula =VALUE(B2) would be applied in a separate column to convert the text in cell B2 to its corresponding numerical value.

UNIQUE function

The UNIQUE function is a powerful feature available exclusively in the Microsoft 365 version of Excel. It enables users to extract a list of unique values from a given range, making it easier to analyze and work with distinct data.

To use the UNIQUE function, you must provide three parameters: the array or range from which you want to extract unique values, whether you want to check uniqueness by column or row, and whether you want only unique values or distinct values (occurs only once).

The syntax for the UNIQUE function is as follows: =UNIQUE(array, by col, exactly once).

For example, let's consider a scenario where you have a list of product sales and you want to extract a unique list of product names. Excel will automatically generate a spilled range with only the unique product names by applying the UNIQUE function and providing the range containing the product names, such as =UNIQUE(B2:B15).

This spilled range dynamically adjusts as new unique values are added or existing values are modified. You can then use these unique values for further data analysis or calculations. For instance, you can utilize functions like SUMIFS to calculate the total sales for each unique product name.

FAQs

What are the 10 Excel functions?

The 10 Excel functions are SUM, AVERAGE, COUNT, MAX, MIN, IF, VLOOKUP, CONCATENATE, DATE, and PMT.

What are the 5 basic Excel skills?

The 5 basic Excel skills include navigating through spreadsheets, entering and editing data, formatting cells, creating basic formulas, and using functions.

What are some useful functions in Excel?

Some useful functions in Excel include SUM, IF, VLOOKUP, COUNTIF, CONCATENATE, TEXT, TODAY, and PMT.

What are the 5 powerful Excel functions that make work easier?

The 5 powerful Excel functions that make work easier are VLOOKUP, INDEX MATCH, SUMIFS, CONCATENATE, and PIVOT TABLE.

What is the most popular Excel function?

The most popular Excel function is probably SUM, which adds up values in a range of cells.

Final Thoughts

Excel is a powerful tool for data analysis, and understanding the most important functions is key to maximizing its potential. 

The top 10 essential Excel functions covered in this resource provide the fundamental tools for performing common data analysis tasks, making calculations, and manipulating data effectively. 

By mastering these functions, users can enhance their Excel skills, improve efficiency, and unlock the full capabilities of this versatile software for data-driven decision-making.

One more thing

If you have a second, please share this article on your socials; someone else may benefit too. 

Subscribe to our newsletter and be the first to read our future articles, reviews, and blog post right in your email inbox. We also offer deals, promotions, and updates on our products and share them via email. You won’t miss one.

Related articles 

» Guide to Using COUNTIF Function with Examples for Index Match Excel Formula
» Mastering Excel Formatting with the TEXT Function - A Guide
» How to Use the CONCATENATE Function in Excel: Guide with Examples

]]>
http://oktec.kr/?big=blogs/product-guides/excel-business-financial-modeling-analytics 2023-06-01T17:38:00-07:00 2024-04-16T23:54:40-07:00 Excel for Business: Financial Modeling, Analytics & Project Management Rick Akura More

]]>
Excel for business is a powerful tool that enables professionals to Excel in various aspects of their work. 

With Excel's extensive range of functions and formulas, you can perform intricate calculations, create dynamic charts and graphs, and generate insightful reports. 

This article will delve into the intricacies of utilizing Excel for these specific business functions.

Table of Contents

  1. What is Financial Modeling in Excel?
  2. How to Build a Financial Model in Excel?
  3. Benefits of Excel in Business
  4. How to use Excel at your business
  5. Marketing
  6. Sales
  7. FAQs
  8. Final Thoughts

What is Financial Modeling in Excel?

Financial modeling in Excel involves using Excel's features and functions to create mathematical models that project a company's financial performance in the future. These models are built based on assumptions and historical data to estimate the company's revenues, expenses, cash flows, and other financial metrics.

Financial modeling in Excel is widely used in various areas of finance, including investment banking, mergers and acquisitions, private equity, and project finance. It helps professionals analyze the financial viability of business ventures, make informed investment decisions, and assess the potential value of companies.

https://api.softwarekeep.com/media/nimbus/helpcenter/excelbusiness-1.png

Here are some key points about financial modeling in Excel, explained in a simple and easy-to-understand manner:

  1. Purpose: Financial modeling helps predict a company's financial performance by creating models that simulate various scenarios and outcomes.
  2. Tools and Techniques: Excel provides various tools and functions to perform calculations, create formulas, build dynamic charts, and generate reports, making it an ideal platform for financial modeling.
  3. Assumptions and Historical Data: Financial models rely on assumptions, such as revenue growth rates, expense projections, and market trends, combined with historical performance data to create accurate projections.
    Assumptions and Historical Data
  4. Applications: Financial modeling in Excel is used in various financial activities, such as valuing companies, analyzing investment opportunities, assessing project feasibility, and conducting financial due diligence.
  5. Learning Resources: Many resources are available online to learn financial modeling in Excel, including tutorials, courses, and practical examples used by professionals in investment banking and research analysis.

Financial modeling in Excel is a valuable skill that enables professionals to make data-driven decisions, evaluate investment opportunities, and analyze the financial health of businesses. It empowers individuals to understand and interpret complex financial data, contributing to better financial planning and strategic decision-making.

How to Build a Financial Model in Excel?

Building a financial model in Excel can seem complex, but following a step-by-step approach makes it easier to create a comprehensive model. Here is a simplified explanation of the process:

  1. Historical Data: Start by gathering the historical financial data of a company, such as Colgate Palmolive, to serve as a foundation for the model.
  2. Ratio Analysis: Analyze the company's financial ratios to gain insights into its performance and trends.
  3. Income Statement Projection: Use historical data and other assumptions to project the company's future revenue, expenses, and profitability.
    Income Statement Projection
  4. Working Capital Forecast: Estimate the company's working capital needs by considering accounts receivable, accounts payable, and inventory.
  5. Depreciation Forecast: Forecast the depreciation expenses based on the company's asset base and the expected useful life of the assets.
  6. Amortization Forecast: Estimate the amortization expenses related to intangible assets like patents or trademarks.
  7. Other Long-Term Forecast: Consider any other long-term expenses or investments that might impact the company's financials.
  8. Completing the Income Statement: Combine all the projected revenues and expenses to complete the income statement.
  9. Shareholder's Equity Forecast: Predict the changes in shareholder's equity by considering factors like retained earnings and dividends.
    Shareholder's Equity Forecast

  10. Shares Outstanding Forecast: Estimate the number of shares outstanding, which affects the calculation of earnings per share.
  11. Completing the Cash Flow Statements: Prepare the cash flow statement by incorporating the projected cash flows from operating, investing, and financing activities.
  12. Debt and Interest Forecast: Forecast the company's debt levels and interest payments to assess its financial obligations.

By following these steps and linking the different components of the financial model, one can create a comprehensive and dynamic financial model in Excel. It allows for better understanding of a company's financial performance, aids in decision-making, and helps assess its future prospects.

Benefits of Excel in Business

Excel is an essential tool in business due to its versatility and wide range of applications. It is used for various tasks, such as accounting, stock management, sales reporting, product information management, and automation. Excel can power an entire business!

Here are some simplified examples of how Excel is used in business:

  1. Accounting: Excel helps businesses maintain financial records, track expenses, create budgets, and perform calculations for financial statements.
  2. Stock Management: Excel tracks inventory, monitors stock levels, and generates reports on stock movements and availability.
  3. Sales Reporting: Excel enables businesses to analyze sales data, track customer purchases, and generate reports to identify trends and make informed decisions.
  4. Product Information Management: Excel is used to organize and manage product information, such as pricing, specifications, and inventory data.
    Product Information Management

  5. Automation: Excel's formulas and functions allow businesses to automate repetitive tasks, such as data entry, calculations, and report generation, saving time and improving efficiency.

Excel has been around since 1985 and has become a fundamental tool in various industries. Whether analyzing stocks, budgeting, or organizing client sales lists, businesses in any function or industry can benefit from Excel's capabilities.

How to use Excel at your business

Excel can be utilized in various departments and functions within your organization to analyze data and improve efficiency. While the list below is not exhaustive, it provides examples of how Excel can be applied:

  1. Human Resources (HR): Excel can be used for managing employee data, tracking attendance, calculating payroll, and analyzing performance metrics.
  2. Marketing: Excel helps in analyzing marketing campaign data, tracking leads and conversions, managing customer databases, and creating marketing budgets.
  3. Sales: Excel enables sales teams to track sales activities, manage customer information, create sales forecasts, and generate sales reports.

    Sales
  4. Supply Chain: Excel can track inventory levels, manage procurement and supplier data, analyze supply chain performance, and optimize logistics.
  5. Event Management: Excel is useful for managing event attendee lists, tracking RSVPs, creating seating arrangements, and calculating event budgets.

Marketing

In marketing, Excel can be a valuable tool for managing sales data, analyzing customer information, and optimizing product information. Here's a simplified explanation:

  1. Sales Data Management: Excel allows marketing professionals to organize and manage sales data, such as customer information, sales figures, and targets. This helps track sales performance, identify trends, and plan future marketing strategies.
    Sales Data Management

  2. Pivot Tables: With Excel's pivot table feature, users can easily summarize and analyze customer and sales data by categories. This drag-and-drop functionality makes it simple to gain insights and make data-driven decisions.
  3. Product Information Management: Many website platforms may have limitations when handling large amounts of product data. Excel can come to the rescue by allowing marketers to export and import product information in formats like CSV and XLSX. This provides greater control over the data and enables marketers to optimize product information using Excel's features.
  4. eCommerce Growth: By leveraging Excel's capabilities, marketers can drill into their data, make necessary changes, and optimize product information to fuel eCommerce growth. Once the changes are made in Excel, the updated sheet can be easily imported into the website's backend, leading to improved sales and performance.

In summary, Excel assists marketers in managing sales data, analyzing customer information, and optimizing product information for better marketing strategies and eCommerce growth. Its user-friendly features and data manipulation capabilities make it a valuable tool in the marketing field.

Sales

Using Excel for sales analysis can help businesses identify trends and patterns in their sales data, leading to strategies for revenue growth. Microsoft Excel provides user-friendly tools for manipulating and visualizing data, making it accessible even without extensive training.

Sales

One useful technique in Excel is heat mapping, simplifying the interpretation of large data sets. With conditional formatting, users can assign different colors to different ranges of values in the data. This creates a visual heat map highlighting high and low values, quickly identifying positive and negative sales trends.

To create a heat map, simply select the data in Excel, access the conditional formatting menu, and apply color scales to the data range. The colors will automatically highlight the highs and lows, making it easier to take prompt action based on sales trends.

FAQs

How can I use Excel for my small business?

Excel can be used for various purposes in a small business, such as managing financial records, tracking expenses and income, creating budgets, analyzing sales data, and generating reports.

Is Excel essential for business?

Excel is essential for businesses of all sizes as it provides a versatile platform for data organization, analysis, and decision-making.

Is Excel still used in business?

Yes, Excel continues to be widely used in business due to its flexibility, familiarity, and robust data manipulation, analysis, and reporting functionality.

Why is Excel important?

Excel is important because it allows businesses to effectively organize, manipulate, and analyze large amounts of data, enabling informed decision-making, financial modeling, and performance tracking.

What are the benefits of using Excel?

The benefits of using Excel include increased efficiency in data management, the ability to perform complex calculations and analysis, easy customization of reports and templates, and seamless integration with other business tools and software.

Final Thoughts

In conclusion, Excel is an indispensable tool for businesses across various domains. Its versatility in financial modeling allows businesses to forecast future performance and make informed decisions. 

Excel's analytical capabilities also empower organizations to extract valuable insights from data and drive business analytics initiatives. Moreover, Excel's project management features enable efficient planning, scheduling, and tracking of projects, enhancing productivity and ensuring successful execution. 

By leveraging Excel's powerful functionalities, businesses can streamline operations, improve decision-making, and achieve their goals effectively. 

One more thing

If you have a second, please share this article on your socials; someone else may benefit too. 

Subscribe to our newsletter and be the first to read our future articles, reviews, and blog post right in your email inbox. We also offer deals, promotions, and updates on our products and share them via email. You won’t miss one.

Related articles 

» What-if Analysis in Excel: Making Informed Decisions
» Mastering Data Modeling in Excel: Advanced Techniques and Best Practices
» Step by Step Guide to Set Up Microsoft 365 Business eMail

]]>
http://oktec.kr/?big=blogs/product-guides/how-to-install-language-accessory-packs-for-office 2023-04-15T11:26:00-07:00 2024-04-03T01:44:04-07:00 How To Install Language Accessory Packs for Microsoft Office Rick Akura More

]]>
Microsoft Office is one of the most popular productivity suites in the world, offering a range of powerful tools for creating and managing documents, presentations, spreadsheets, and more. While Office comes with several language options, including English, French, Spanish, and German, it's not always enough for users who need to work with documents in other languages.

Fortunately, Microsoft offers Language Accessory Packs that can be downloaded and installed to add support for additional languages. Depending on your version, these packs are available for Office 2016, 2019 and 365.

How To Install Language Accessory Packs for Microsoft Office

In this article, we'll guide you through the steps required to download and install a Language Accessory Pack for your version of Office. We'll also discuss the benefits of using different languages in Office and why you should consider installing a language pack to get more out of your software.

Table of Contents

  1. Why Use Different Languages in Office?
  2. How To Download a Language Accessory Pack for Office
  3. How To Install a Language Accessory Pack for Office
  4. Frequently Asked Questions

Why Use Different Languages in Office?

You might want to use different languages in Office for many reasons. Perhaps you're collaborating with colleagues in another country or studying a foreign language and want to practice using it in real-world scenarios. Maybe you're working on a document that includes quotes or references in a foreign language, or you simply prefer to use Office in your native language.

Whatever your reason, Office offers a range of language options to meet your needs. With Language Accessory Packs, you can unlock support for additional languages and take advantage of all the powerful features that Office has to offer.

How To Download a Language Accessory Pack for Office

Before you can start using a Language Accessory Pack, you'll need to download it from the Microsoft website. There are a few easy steps to follow:

  1. First, you'll need to identify which version of Office you are using — Office 2013, Office 2016, 2019, or Microsoft 365. You can find this information in the Help menu on your copy of Office.
  2. Navigate to the Language Accessory Pack for Microsoft 365 page using any web browser. This is Microsoft's official page for downloading Language Accessory Packs for compatible Office products.
  3. Use the drop-down menu and select the language you want to install, then click on either "Download (32-bit)" or "Download (64-bit)," depending on your operating system.
  4. Check if there are any download instructions for your language. In some cases, you might have to perform a few extra steps to get the pack working. If the "Download Instructions" column is empty, you can install the language pack right away.
  5. Wait for the download to complete. Once it's done, you can install the pack on your computer.

Which Architecture to Choose?

You must check your system's information if you’re unsure which architecture to choose. To determine your system architecture, open the Control Panel, select "System," and then click on "System" again. Here, check the "System type" entry to see which type of processor your system uses — 32-bit or 64-bit.

Most modern computers run on a 64-bit processor, but it's best to double-check before you download and install a Language Accessory Pack.

How To Install a Language Accessory Pack for Office

After downloading the language pack, you'll need to install it on your system. Luckily, this process is made simple by the Office Installer. Here are the steps you need to follow.

  1. Double-click on the file you downloaded. It should have a name like "OfficeSetup.exe" or similar.
  2. When prompted, click "Yes" to allow the installer to make any necessary changes on your device. Please note that you require an administrator account to make these changes.
  3. The installer will automatically begin installing the selected Language Accessory Pack. This may take several minutes, depending on your device and the language pack.

When the installer finishes, you should be able to use the new language in Office without any further changes. Repeat this process for all language packs you wish to install.

FAQ

What is a Microsoft Office language pack?

A Microsoft Office language pack is a set of supplementary tools that can be added to Microsoft Office to improve functionality. They include display options, help features, and proofreading capabilities for many languages.

How many language packs are there for Microsoft Office?

There are over 100 language accessory packs available for Office.

Do I need to uninstall a language pack before installing another one?

No, you don't have to uninstall an existing language pack before downloading and installing another one.

Are Office language packs free?

Language packs used to be sold separately, but today they can be downloaded directly from Microsoft for free. To ensure a clean installation of the language pack, you should first make sure all your Office apps are installed first and then install the language pack after.

Where are Office language packs stored in Windows?

A language pack is installed in the directory "%SystemRoot%\System32%Language-ID%," where "%Language-ID%" is the identifier for the language in question. For instance, the directory for Spanish would be "C:\Windows\System32\es-ES."

Conclusion

Microsoft Office comes with several language options, but if you need more variety or special features for a certain language, downloading and installing Language Accessory Packs is the way to go. Microsoft makes it easy to find the right accessory pack for your version of Office, and with just a few clicks you can have access to all sorts of extra features that add value to your Office experience.

We hope this article has helped you understand how to install Language Accessory Packs on your computer and what the benefits of doing so are. Have fun exploring all the new languages!

One More Thing

We’re glad you’ve read this article. :) Thank you for reading.

If you have a second, please share this article on your socials; someone else may benefit too. 

Subscribe to our newsletter and be the first to read our future articles, reviews, and blog post right from your inbox. We also offer deals, promotions, and updates on our products and share them via email. You won’t miss one.

Related Articles 

» Language Accessory Pack for Office Newer Versions
» How to Change the Language in Word for Mac 2016
» How to Change the Windows 11 Widgets Language

]]>
http://oktec.kr/?big=blogs/product-guides/how-to-manage-contacts-and-calendars-outlook 2023-04-13T11:10:00-07:00 2024-04-18T23:13:32-07:00 How To Manage Your Contacts and Calendars in Outlook Rick Akura More

]]>
Do you need help keeping track of your contacts and calendars in Microsoft Outlook? Good news – managing them with Outlook is easier than ever! With Outlook's features, you can seamlessly organize your emails, meetings, appointments, addresses, birthdays, and more. You'll never miss an important date or a necessary contact again.

In today's fast-paced world, staying organized is crucial for success. One of the best ways to manage your day-to-day tasks is by utilizing Microsoft Outlook's contacts and calendar features. Outlook offers a range of tools and features that can help streamline your daily tasks, making it easier to stay on top of your emails, contacts, and calendar events.

Here are some tips on how to use Outlook to manage your busy schedule and contacts list.

Table of Contents

  1. How to Manage Your Calendar in Outlook
  2. How to Add Schedules to Your Outlook Calendar
  3. How to Import Calendars in Microsoft Outlook
  4. How to Use the Scheduling Assistant in Outlook
  5. How to Set Up Reminders in Outlook
  6. How to Manage Your Contacts in Outlook
  7. How to Add a Contact in Microsoft Outlook
  8. How to Edit a Contact in Outlook
  9. How to Create Contact Groups in Outlook
  10. How to Import Contacts to Microsoft Outlook

How to Manage Your Calendar in Outlook

The Outlook calendar is great for staying organized and attending your appointments. You can view upcoming events, add new meetings, schedule reminders, and more! Launch the app and select "Calendar" from the navigation menu to start calendar management in Outlook. From here, you can view a list of all upcoming events.

To manage individual events on your calendar, click on an event to bring up its details page. Here you will be able to edit or delete the event as needed. You can also create a recurring event by clicking "Create Recurring Event" at the bottom of the page. Recurring events are great for those with regular meetings or tasks that come up consistently.

If you want to remove an event from your calendar, select "Remove" from the event details page. This will delete the event from your calendar, but if you need to keep a record of it, you can always choose "Archive" or "Save to Archive" instead.

How to Add Schedules to Your Outlook Calendar

Adding calendar items to Outlook is a simple and helpful feature that can help keep you organized and on track with your daily schedule. You can add any event or appointment to your Outlook calendar, such as:

  • Business meetings or conferences
  • Project deadlines
  • Doctor or dentist appointments
  • School or extracurricular activities
  • Birthdays or special occasions
  • Personal or social events

Adding events to your Outlook calendar is a simple and effective way to stay on top of your schedule and ensure you never miss an important appointment or meeting. Here are some steps to follow to add an event or appointment to your Outlook calendar:

  1. Open Outlook and go to the Calendar tab.
  2. Click on "New Appointment" to create a new event.
  3. In the "Subject" field, give your event a name or a brief description. This can be anything from a meeting, a doctor's appointment, a school project deadline, or a social event.
  4. Type in the name of the event's location in the "Location" field. It can be a physical location like an office or a park or a virtual location like a Zoom meeting or a conference call.
  5. Select the start and end times for your event. Use the drop-down menu to select the date and time, or type it in manually.
  6. If you want to invite others to the event, click the "Invite Attendees" button. Type in the names or email addresses of the people you want to invite, and Outlook will automatically send them a meeting invitation.

When you're finished, click "Save & Close" if it's just an appointment or "Send" if it's a meeting.

How to Import Calendars in Microsoft Outlook

If you use other calendars outside of Outlook (such as Google Calendar or Apple Calendar), you can import them into Outlook! This is a great way to sync all of your events and appointments in one place. Outlook makes the transition from one calendar to another easy and hassle-free.

Select "File" from the ribbon bar at the top of your screen to import a calendar into Outlook. Then click "Import & Export," followed by "Import an iCalendar (.ics) or vCalendar file (.vcs)." You will then be prompted to select the file you want to import. Once you select the file, Outlook will import all your other calendar events into its platform!

import calendar

Once imported, these events will be displayed alongside any existing events that you have already created in Outlook.

How to Use the Scheduling Assistant in Outlook

The Scheduling Assistant is a helpful tool in Outlook that helps you find the best time for your meeting or appointment. It allows you to see your attendees' availability and conference rooms, so you can schedule your event at a time that works for everyone. Here are some steps to follow to use the Scheduling Assistant:

  1. Create a new meeting request by clicking "New Meeting" in the Calendar tab.
  2. Click on "Scheduling Assistant" to open the Scheduling Assistant window.
    scheduling assistant
  3. In the "To" field, add the names or email addresses of the attendees that you want to invite to the meeting.
  4. In the "Location" field, add the conference room or location where the meeting will occur.
  5. Use the vertical bars in the shaded area to adjust the meeting time to a time that works for everyone. Drag the bars to the left or right to change the duration of the meeting.
  6. The grid below the shaded area shows when each attendee is available. Look for a time slot where all attendees are available and select that time slot.
  7. To the right of the meeting request, Outlook shows suggested times and the number of conflicts. Use this information to find the best time for your meeting.
  8. When you're finished, click "Send" to send the meeting request to your attendees.

Using the Scheduling Assistant in Outlook is a simple and effective way to find the best time for your meeting or appointment. By following these easy steps, you can easily schedule your event at a time that works for everyone and avoid scheduling conflicts or misunderstandings.

How to Set Up Reminders in Outlook

Reminders are essential if you want to stay on top of your calendar. They help you remember important dates, tasks, and events. With Outlook, you can easily set up reminders for your meetings, appointments, and other events.

Here are some steps to follow in order to set a reminder in Outlook:

  1. Click on the "File" tab in Outlook.
  2. Click "Options" and select "Advanced" from the left-hand menu.
  3. In the "Reminders" section, check the box next to "Show reminders on top of other windows."
    show reminders on top of other windows
  4. Click on "OK" to save your changes.
  5. To set a reminder for a specific task or event, create a new task or appointment in Outlook.
  6. In the "Due Date" or "Start Time" field, enter the date and time when you want to be reminded.
  7. When the reminder pops up on your screen, you can choose to snooze it for a few minutes, hours, or days, or you can dismiss it if you've already completed the task.

Reminders are not available for Outlook 2013, Outlook 2016, or 2019. Microsoft 365 subscribers can use reminders on Version 1804 (Build 9226.2114) or higher.

How to Manage Your Contacts in Outlook

Your Outlook contacts list is essential if you want to stay organized and in touch with your contacts. With Outlook, you can easily store contact information such as phone numbers, email addresses, and physical addresses. An organized contacts list makes sending emails to specific contacts or groups of contacts easier.

How to Add a Contact in Microsoft Outlook

Adding a contact in Outlook is a great way to keep track of important information for people you communicate with. A contact is a person or organization you add to your address book, allowing you to quickly and easily send emails or schedule meetings with them. Here are some steps to follow to add a contact in Outlook:

  1. Click on the "People" icon in Outlook, located in the screen's bottom left-hand corner.
  2. Click on "New Contact."
    new contact
  3. Enter the name of the person or organization you want to add in the "Full Name" field.
  4. Fill out any other information that you want to include for the contact, such as their email address, phone number, or job title.
  5. Once you have entered all the information you want to include, click on "Save & Close" if you are done creating the contact.
    add contact
  6. If you want to create another contact, click "Save & New" instead, and then repeat the process for the next contact.

Adding contacts in Outlook is a simple way to keep track of important information for people you communicate with. By following these easy steps, you can easily manage your address book and stay organized.

How to Edit a Contact in Outlook

Editing a contact in Outlook is a great way to update information for someone you communicate with regularly. Whether their email address has changed or you need to add additional information to their contact information, it's easy to make these updates in Outlook. Here are some simple steps to follow in order to edit a contact in Outlook:

  1. On the Navigation Bar, click on the "People" icon, which is located in the bottom left-hand corner of the screen.
  2. Click on the "People" tab to view your address book.
  3. Double-click on the contact you want to edit to open their contact information.
  4. Add or update any information for the contact you want to change, such as their phone number, address, or job title.
  5. Once you have made the necessary updates, click "Save & Close" to update the contact information.

How to Create Contact Groups in Outlook

A contact group in Outlook is a collection of contacts you can use to send emails, schedule meetings, and stay in touch with groups of people all at once. Whether you want to create a group for your coworkers, classmates, or family members, it's easy to do in Outlook. Here are some simple steps to follow to edit a contact group in Outlook:

  1. On the Navigation Bar, choose the "People" icon, which looks like a small silhouette of a person and is usually located in the lower-left corner of the screen.
  2. Select the "Home" tab and choose "New Contact Group" from the toolbar.
    new contact group
  3. In the Contact Group box, type the name of the group.
  4. Select "Add Members," and then choose an option, such as "From Outlook Contacts," "From Address Book," or "New E-mail Contact."
  5. To add people from your address book or contacts list, select the option that applies and choose the contacts you want to add by holding down the Ctrl key and selecting multiple members.
  6. Once you have selected the members you want to add, choose "OK."
  7. Finally, choose "Save & Close" to save your changes to the contact group.

How to Import Contacts to Microsoft Outlook

If your contacts are stored in other programs, you can easily import them into Outlook. It's a great way to save time and keep all your contacts organized in one place. Here are some simple steps to follow to import contacts into Outlook:

  1. Open Outlook and click on the “File” option in the top left corner of the screen.
  2. Select “Open & Export” > “Import/Export” to start the import wizard.
  3. Choose "Import from another program or file" and click Next.
  4. Select "Comma Separated Values" and click Next again.
  5. Browse to the location of your contacts file and select it. You can choose how you want Outlook to handle duplicate contacts: replace duplicates with items imported, allow duplicates to be created, or do not import duplicate items.
  6. Click Next and select the “Contacts” folder as the destination folder.
  7. Click “Finish”, and Outlook will start importing your contacts immediately.
  8. When the Import Progress box closes, your contacts will be available in the People section of Outlook.

By following these steps, you can quickly and easily import your contacts into Outlook and have all your contact information in one place.

Conclusion

Managing your contacts and calendar in Outlook can help you stay organized and keep track of important dates. By taking advantage of features such as contact groups, reminders, email sorting, and linking accounts with different devices, you can maximize the efficiency of your daily tasks.

Whether you are importing contacts from another program or editing an existing contact in Outlook, these tips will help you stay on top of your emails and prioritize the tasks that matter most.

We hope you have found this article useful in learning how to manage your contacts and calendar events in Outlook. With a bit of practice, you’ll soon be an Outlook pro!

One More Thing

We’re glad you’ve read this article. :) Thank you for reading.

If you have a second, please share this article on your socials; someone else may benefit too. 

Subscribe to our newsletter and be the first to read our future articles, reviews, and blog post right from your inbox. We also offer deals, promotions, and updates on our products and share them via email. You won’t miss one.

Related Articles 

» How to Optimize Your Outlook Inbox in 5 Easy Steps
» Outlook E-book [Ultimate Guide] | Outlook training
» How to Fix Unable to Download Attachments From Outlook Web App

]]>
http://oktec.kr/?big=blogs/product-guides/how-to-create-and-save-word-documents 2023-04-10T18:46:00-07:00 2024-04-03T01:39:24-07:00 How To Create and Save a Document in Word Rick Akura More

]]>
Microsoft Word is an indispensable tool for creating and saving documents. Whether you're a student writing an essay or a business owner preparing a report, Word has got you covered. But for beginners, creating a new Word document can be daunting. That's why we're here to help you. In this article, we'll guide you through the entire process of making a new Word document, including different options for starting your work.

This is a beginner-friendly guide that covers newer versions of Word, as well as older releases. From creating a blank document to using templates, we'll show you how to make the most out of Word's word-processing capabilities.

How To Create and Save a Document in Word

In addition to creating and saving documents, we'll cover how to edit them. From simple text editing to more advanced features like editing text in pictures, we'll show you how to get the most out of Word's editing tools. Whether you're a beginner or an advanced user, this article has everything you need to know about using Microsoft Word for your word processing needs.

Table of Contents

  1. What is a Word Document?
  2. How to Create a New Word Document
  3. How to Create a Word Document From a Template
  4. Writing and Formatting Your Document in Word
  5. How To Add Text to Your Document
  6. How To Add Shapes, SmartArt, Charts, and Pictures in Word
  7. How To Save Your Document in Word
  8. How To Save Your Document to OneDrive in Microsoft Word
  9. Frequently Asked Questions

What is a Word Document?

A Word document is a digital file created using Microsoft Word or other word processing software. It is a type of electronic document that is designed to be viewed and edited on a computer. A Word document can contain text, images, tables, charts, and other types of multimedia content. It is a versatile tool for creating a wide range of documents, from simple letters and memos to complex reports and academic papers.

Word documents are designed to be easily edited and formatted, which makes them a popular choice for document creation. The software lets you change fonts, colors, sizes, margins, and other formatting options to create visually appealing documents.

Additionally, Word provides several features that enhance document creation, such as spell check, grammar check, and thesaurus. Overall, word documents are a versatile and powerful tool for creating professional documents quickly and efficiently.

How to Create a New Word Document

Creating a new Word document is a straightforward process that can be done in just a few clicks. A blank document is the starting point for any document created in Word, whether it's for personal or professional use. You can write anything from an article, report, or even a book with a new doc. Microsoft Word is a popular document creator that many people use for its user-friendly interface and features.

A blank Word document is a white space where you can write anything you want. It is the most basic form of document creation that you can customize to suit your needs. You can choose from different fonts, sizes, and colors to create a unique look for your document.

Creating a document in Microsoft Word is an essential skill that anyone who uses a computer should know. There are different ways to create a new document in Word. You can use the menu bar, a keyboard shortcut, or double-click the Word icon on your desktop. Here are the steps to create a new document from the menu bar:

On a Windows Computer

  1. Launch Microsoft Word by clicking the icon or searching for it in the Start menu.
  2. Click on the "File" menu at the top left corner of the screen.
    file menu in word
  3. Click on "New" in the menu that appears.
  4. Select "Blank Document" to create a new document from scratch.
    blank document in word for windows

Windows Tip: You can use the keyboard shortcut "Ctrl + N" to create a new blank document.

On a Mac Computer

  1. To open Microsoft Word, click on the Word icon in the Dock or Applications folder.
  2. Click on "File" in the menu bar and select ”New” > "Blank Document."
    new blank document in word for mac
  3. Once you've created a new document, you can start typing.

macOS Tip: You can use the " + N" keyboard shortcut to create a new blank document in Word for Mac.

How to Create a Word Document From a Template

You don't have to create a blank Word document to get started. You can pick from various templates to quickly create documents for different purposes. This section will show you how to create a Word document from a template on Windows and Mac computers.

  1. Launch Microsoft Word by clicking the icon or searching for it in the Start menu.
  2. Click on the "File" menu at the top left corner of the screen.
  3. Click on "New" and select "From Template."
    new word document from template
  4. Choose a template to begin editing your document. Word has built-in templates for all purposes; you can also download new ones online. With millions of templates out there, you'll surely find one that suits your needs.
  5. Once you've chosen a template, you can edit it as you like. You can change font styles, add images, and more.

Using these steps, you'll kickstart your document in no time. Working with templates eliminates many of the early steps of creating a document. You can focus on creating impactful content instead of designing everything from scratch.

Writing and Formatting Your Document in Word

Once you have a new document open, you can start typing your content. You can change the font, size, and style using the "Home" tab formatting tools. Here are a few tips to help you write and format your document effectively:

  • Use clear and concise language. Avoid using jargon or complicated words that may confuse your readers.
  • Use headings and subheadings to organize your content. Reserve Heading 1 for your main title, and use Heading 2, 3, and 4 for subheadings.
  • Use bullet points or numbered lists to break up large chunks of content. This makes your document easier to read
  • Use bold or italic font to emphasize key points or important information.
  • Enable spell check to catch any typos or errors before saving your document.
  • Proofread your document before you save it. Even a small spelling mistake can greatly impact the quality of your work.

These tips will help you easily write and format your document in Word. With some practice, you'll be creating professional-looking documents in no time.

How To Add Text to Your Document

Now that you've created a new Word document, it's time to start adding text and formatting it. This section will cover the basics of adding and formatting text in Word.

  1. To add text to your Word document, simply start typing. You can also copy and paste text from other documents or sources.
  2. You can format your text using the formatting options in the Home tab on the ribbon. You can change the font, font size, color, and alignment.
    document in word

You can copy and paste text from an external source by right-clicking anywhere in the document and selecting "Paste." The keyboard shortcut for this is "Ctrl + V" on Windows and " + V" on a Mac.

How To Add Shapes, SmartArt, Charts, and Pictures in Word

In addition to text, you can also add various shapes, SmartArt, charts, and pictures to your Word document. This section will cover how to add these elements to your document.

insert menu in word
  1. To add a shape, click "Insert" in the menu bar and select "Shapes." Choose the shape you want to add, then click and drag to draw it on your document.
  2. To add SmartArt, click "Insert" in the menu bar and select "SmartArt." Choose the type of SmartArt you want to add, then click on the placeholder text to edit it.
  3. To add a chart, click "Insert" in the menu bar and select "Chart." Choose the type of chart you want to add, then click and drag to draw it on your document.
  4. To add a picture, click "Insert" in the menu bar and select "Pictures." Browse your computer to find the picture you want to add, then click "Insert."

How To Save Your Document in Word

Since you've created and formatted your Word document, saving your work is important so you don't lose it. Word supports various file formats, starting with its own proprietary file format, DOCX. However, you can also export your documents as PDF, HTML, and other popular formats. This makes it easy to store and share your documents.

When you save a document in Word, it's important to give it a descriptive name so you can easily find it later. You can also assign tags or even password-protect the file so it's not accessible to unauthorized users. With a vast selection of saving options, Word makes it easy to save, store, and share your documents.

To save your document in Word, follow these steps:

  1. Click on "File" in the menu bar and select "Save" or "Save As." The "Save" option will replace an old document with a new one. The "Save As" option creates a copy of the document and gives it a different name in different formats like DOCX, PDF, HTML or other file types.
    save options in word
  2. Choose where you want to save your document, then enter a file name.
  3. Choose the file format you want to save your document as. The default file format for Word documents is .docx, but you can also choose to save your document as a .pdf, .txt, or another file format.

How To Save Your Document to OneDrive in Microsoft Word

If you want to save your Word document to OneDrive, Microsoft's cloud storage service, you can do so directly from within the Word app. This section will cover how to save your document to OneDrive.

OneDrive makes accessing your documents from any device easy so you can work on them anywhere. It's a popular choice for backing up and sharing documents since files stored in OneDrive are secure and encrypted. It's worth noting that OneDrive is an online storage service, so you'll need to be connected to the internet when working with it.

To save your document to OneDrive in Microsoft Word, follow these steps:

  1. Click "File" in the menu bar and select "Save As."
  2. Choose "OneDrive" from the list of options.
    save to onedrive in word
  3. Choose the location where you want to save your document, such as "OneDrive - Personal" for personal files or "OneDrive - Business" for work or school files.
  4. Enter a file name.
  5. Click "Save" to save your document to OneDrive

Your document is now saved in OneDrive, and you can access it anytime from any device with an internet connection.

FAQ

How do I create a new document in Microsoft Word?

To create a new document in Microsoft Word, click "File" and "New" to choose a template or a blank document.

Can I save my Word document in different file formats?

Yes. You can save your document in different formats, such as DOCX, PDF, and RTF.

What is the difference between the "Save" and "Save As" options?

"Save" updates an existing document with the changes made, while "Save As" creates a new copy of the document with a new name or file format.

Can I save my Word document automatically?

Yes. Go to File > Options > Save in Word. Check the box that says AutoSave. You can also choose how often your document should be saved automatically.

Can I change the default file location in Word?

Yes. Navigate to File > Options > Save. The current location is in the "Default local file location" field. Click the "Browse" button to select a new default location.

Can I password-protect my Word document?

Yes. To make your document secure, go to the "File" menu. Choose "Info" and then click on "Protect Document." Click "Encrypt with Password," make up a password, and click OK.

Conclusion

Creating a new document in Word is a straightforward process that anyone can learn. With the right tools and techniques, you can write and format your document effectively and save it for future use. Remember to use clear and concise language, organize your content, and save your work often to avoid losing any progress.

Now that you know how to create and save documents in Microsoft Word, you’re well on your way to becoming a master of productivity! With these tips and techniques, you can write up professional documents quickly and securely without worrying about losing progress or compromising important information. So get typing - happy writing!

One More Thing

We’re glad you’ve read this article. :) Thank you for reading.

If you have a second, please share this article on your socials; someone else may benefit too. 

Subscribe to our newsletter and be the first to read our future articles, reviews, and blog post right from your inbox. We also offer deals, promotions, and updates on our products and share them via email. You won’t miss one.

Related Articles 

» Microsoft Office Word Cheat Sheet
» The Complete Guide to Formatting Text in Microsoft Word
» Microsoft Word Hacks You Need to Know in 2023

]]>
http://oktec.kr/?big=blogs/product-guides/text-formatting-in-word-complete-guide 2023-04-08T06:10:00-07:00 2024-04-03T01:38:23-07:00 The Complete Guide to Formatting Text in Microsoft Word Rick Akura More

]]>
Formatting text in Microsoft Word can be a daunting task, especially if you're not familiar with the various tools and features available in the program. However, with the proper knowledge and tools, you can create professional-looking, easily read visually appealing documents.

This guide will provide step-by-step instructions on formatting text in Microsoft Word. We'll cover topics ranging from simple formatting to advanced techniques to help you familiarize yourself with the tools and features of Word. Whether you're a Word newbie or a seasoned user, this guide has something for everyone.

The Complete Guide to Formatting Text in Microsoft Word

Table of Contents

  1. How to Design and Edit Text in Microsoft Word
  2. Formatting in Microsoft Word
  3. How to Change Font Size in Word
  4. How to Change Font Color in Word
  5. How to Change the Font in Word
  6. How to Make Text Bold, Italic, or Underlined in Word
  7. How to Highlight Text in Word
  8. How to Use Text Styles and Headings in Microsoft Word
  9. How to Align Text in Word
  10. How to Clear Formatting in Word

How to Design and Edit Text in Microsoft Word

Microsoft Word offers a wide range of tools that you can use to design and edit your text. These tools include formatting options, styles, themes, and more. In this section, we will guide you through the design tab in Word, where you can easily access these tools to make your text stand out.

Where is the Design Tab in Word?

The design tab in Word is located on the Ribbon at the top of the screen. It is situated between the Layout tab and the Page Layout tab. To access the design tab, click on it with your mouse, or use the Alt + P + G keyboard shortcut.

Using the Design Tab in Word

The design tab in Word is divided into several groups of tools. These include themes, document formatting, page background, and paragraph formatting. Let's take a closer look at each of these groups of devices and how you can use them to design your text.

  • Themes: The themes group contains a variety of pre-designed color schemes and font combinations that you can apply to your document. To access the themes, click the Themes button, and choose a theme you like.
  • Document Formatting: The document formatting group contains several formatting options for your text. These include font styles, font sizes, and font colors. You can also apply shadows and reflections to your text to make it stand out. To access these formatting options, click the appropriate button in the document formatting group.
  • Page Background: The page background group contains several options for changing the background color or adding a watermark to your document. You can also add a border or change the page color. To access these options, click on the Page Background button.
  • Paragraph Formatting: The paragraph formatting group contains several tools for adjusting the spacing and alignment of your text. You can also apply borders and shading to your paragraphs to make them stand out. To access these options, click on the Paragraph button.

With these tools, you can easily design and edit your text to create professional-looking documents that stand out.

Formatting in Microsoft Word

Formatting text is the foundation of any document and can be a challenge if you don't know how to do it correctly. To make editing text easier, Word offers a variety of tools that allow you to format your documents quickly.

When writing a document, you want to ensure that it's easy to read and that important information stands out. One way to do this is by formatting the text. Formatting text means changing how it looks, such as changing the font or size, making it bold or italic, or changing the color. These changes can help draw the reader's attention to specific parts of the document and make it easier to read and understand.

In Microsoft Word, there are several options for formatting text. You can adjust the font, which is the type of lettering used, to make it look more formal or casual, depending on the purpose of your document. You can also adjust the text size to make it larger or smaller, depending on how much space you have and how important the text is. Additionally, you can change the reader's color to make it stand out or match other elements in the document.

Another important aspect of formatting text is alignment. Alignment refers to how the text is positioned on the page. You can align the reader to the carrier's left, right, or center or justify it to align it on both sides. This can help make the document look more professional and organized. By using these formatting options in Microsoft Word, you can make your documents stand out and convey your message effectively to your intended audience.

How to Change Font Size in Word

Have you ever looked at a document and thought that the text was too small or too big? Reading something that is hard to see or takes up too much space on the page can be frustrating. Luckily, Microsoft Word makes it easy to change the font size of your text. So, let's learn how to adjust the font size in Word.

  1. Open Microsoft Word and open the document you want to work on.
  2. Select the text that you want to change the font size of by clicking and dragging your cursor over it.
  3. Once the text is selected, go to the "Home" tab at the top of the screen. Locate the "Font" section and click on the "Font Size" dropdown menu with a number next to it indicating the current font size.
    font size in word
  4. Select the desired font size from the list of available options, or manually type in the font size you want to use.

The text should automatically change to the new font size you selected. Alternatively, you can use keyboard shortcuts to change the font size quickly. Here's how:

  1. Select the text you want to change the font size of.
  2. Hold down the "Ctrl" key on your keyboard and simultaneously press the"]" key to increase the font size or the "["key to decrease the font size.
  3. The text should automatically change to the new font size.

Remember to use font sizes that are legible and appropriate for your document. Headings and titles can be larger, while body text should generally be smaller. By following these steps, you can easily change the font size of your text in Microsoft Word.

How to Change Font Color in Word

Changing the color of your text can be a great way to make your document stand out. Whether you want to highlight important points or add some flair, Microsoft Word offers several options that allow you to quickly and easily change the color of your text. So, let's look at how to change font color in Word.

  1. Select the text you want to change the color of by clicking and dragging your cursor over it.
  2. Go to the "Home" tab on the Ribbon at the top of the screen. Locate the "Font" group and click the down arrow next to the "Font Color" icon to open the color menu.
    font color in word
  3. Choose one of the pre-defined colors by clicking on it. If you don't see the color you want, click "More Colors" at the bottom of the menu.
    more font colors in word
  4. Enter the HEX or RGB values for the color you want to use. You can also use the color wheel or slider to create your custom color. Once you've selected your color, click "OK" to apply the new font color to your text.

Remember that changing the font color can affect the readability of your text, so be sure to choose a color that is easy to read against your background color. Also, remember that some printers may be unable to print specific colors accurately, so it's a good idea to test your document before printing it out.

How to Change the Font in Word

Changing the font in Microsoft Word is an easy way to give your text a new look. The default font in Microsoft Word is Calibri, a standard font that is easy to read. However, changing the font is a great way to make your document stand out if you want something more unique or exciting.

  1. Open the Word document you want to edit. To change the font style, you need to select the text first.
  2. Once you have selected the text, go to the "Home" tab on the Ribbon at the top of the screen. You should see a font section with a dropdown box displaying the current font style used in the selected text.
    change font in word
  3. Click on the dropdown box and scroll through the list to preview the available font styles. You can choose from the fonts installed on your device. If you want to use a custom font, you can download it and install it on your device.
  4. When you have found a font style, click on it to apply it to the selected text. The text will change to the new font style immediately.

When you install new fonts on your device, they'll become available in Word. If you're using Microsoft 365, you can also access many fonts from the Cloud fonts in Office.

How to Make Text Bold, Italic, or Underlined in Word

Formatting your text is an essential part of creating professional-looking documents. By making your text bold, italic, or underlined, you can draw attention to specific pieces of your paper and emphasize important information. Using bold, italic, and underlined formatting can also help highlight particular words or phrases in a document and make it easier for readers to scan through important information.

This section will guide you through making text bold, italic, or underlined in Microsoft Word. After you launch Word, open an existing document or create a new one from the welcome screen and start formatting your text.

How to Make Text Bold in Word

Making your text bold in Word is a great way to stand out. Here's how to do it:

  1. Highlight the text you want to make bold.
  2. Click on the "B" button in the "Home" tab of the Ribbon, or press "Ctrl + B" on your keyboard.
    bold font in word
  3. Your text will now be displayed in bold font.

How to Make Text Italicized in Word

If you want to change the text style to italicized, Word has an easy way to do this as well:

  1. Highlight the text you want to make italicized.
  2. Click on the "I" button in the "Home" tab of the Ribbon, or press "Ctrl + I" on your keyboard.
    italic font in word
  3. Your text will now be displayed in an italicized font.

How to Make Text Underlined in Word

If you want to add an underline to selected text, Word makes it simple to do:

  1. Highlight the text you want to underline.
  2. Click on the "U" button in the "Home" tab of the Ribbon, or press "Ctrl + U" on your keyboard.
    underline in word
  3. Your text will now be displayed with an underline.

How to Make Text Bold and Underlined in Word

If you want to combine the effects of bold and underline on your text, follow these steps:

  1. Highlight the text you want to format.
  2. Click on the "B" button and the "U" button in the "Home" tab of the Ribbon, or press "Ctrl + B" and "Ctrl + U" on your keyboard.
  3. Your text will now be displayed in a bold font with an underline.

How to Make Text Italicized and Underlined in Word

If you want to combine the effects of italicized and underlining on your text, follow these steps:

  1. Highlight the text you want to format.
  2. Click on the "I" button and the "U" button in the "Home" tab of the Ribbon, or press "Ctrl + I" and "Ctrl + U" on your keyboard.
  3. Your text will now be displayed in an italicized font with an underline.

Making your text bold, italicized, or underlined in Microsoft Word is a simple way to make your documents more visually appealing and emphasize important information. With just a few clicks or keyboard shortcuts, you can create text that stands out and communicates your message effectively.

How to Highlight Text in Word

Highlights in your document can draw attention to certain words or phrases and make it easier for readers to scan a document quickly. Microsoft Word offers several options for highlighting text. This is great if you want to create a document with multiple levels of emphasis or call out significant sections.

  1. Select the text you want to highlight.
  2. Once you've selected the text, click the "Home" tab in the top menu bar. Look for the "Font" group in the menu bar. There, you'll see an icon that looks like a highlighter. Click on it.
  3. You'll see a dropdown menu with several pre-defined highlight colors to choose from. Select the color you want to use for highlighting your text.
    highlight in word
  4. Once you've chosen your highlight color, click on it to apply the highlight to the selected text.
  5. To remove the highlight from text, select the highlighted text and click on the highlighter icon in the "Font" group. Then, click on "No Color" in the dropdown menu.

How to Use Text Styles and Headings in Microsoft Word

Text styles and headings can help make your documents look more professional and easier to read. Headings are particularly useful for breaking up longer documents into sections or chapters. They can also help the reader quickly locate specific information in your document.

How to Make a Heading in Word

Headings are an essential part of any document, as they help to organize your content and make it easy for readers to navigate. In this guide, we will show you how to make a heading in Word in just a few easy steps.

  1. Select the text that you want to use as a heading.
  2. On the Home tab of the Ribbon at the top of your Word screen, locate the "Styles" section. This section contains different styles that you can apply to your text.
  3. Hover over the different styles to preview how your text will look when you apply the style. The heading styles are at the top of the "Styles" section, numbered 1 to 9, with 1 being the largest size.
    headings in word
  4. Click on the heading style you want to apply to your text. The selected text will now be formatted as a heading.
  5. To add another heading to your document, select the text you want to use as the heading and follow steps 2-4 to apply a heading style.

Tips for Creating Headings in Word

It's important to create consistent, visually appealing headings for your documents. Here are a few tips to help you make the most of the heading styles in Word:

  • Use H1 for titles: H1 should be used for your document's or section's main title. This helps signal to the reader what the document is about and what they can expect to find.
  • Use H2 for subheadings: H2 should be used for subheadings that break up the main sections of your document. These can help to organize your content and make it easier to read and navigate.
  • Use H3 for subsections: H3 should be used for subsections within your subheadings. This can help to break down your content further and make it more digestible for your reader.
  • Use consistent colors and fonts: Using consistent colors and fonts for your headings can help to create a more professional and polished look. Choose a color and font that is easy to read and complements the rest of your document.
  • Keep it simple: When creating headings, it's essential to keep them straightforward. Avoid using too many words or complex phrasing; ensure your titles accurately reflect the following content.

How to Add Headings With Styles in Word

Adding headings in Word can help organize your text and make it easier to read. The best way to add headings is by using heading styles. With one click, you can format text and create a table of contents in your document.

  1. Start by opening Word and either creating a new document or opening an existing one. Once your document is open, select the text you want to turn into a heading by pressing the left mouse button and dragging it over the text.
  2. Next, go to the "Home" tab in the Ribbon at the top of the screen. Look for the section called "Styles," which contains different headings. The Styles section is longer than others, making it easy to find.
  3. Hover over each heading to see a preview of how it will look in your document. This makes it easier to choose the right one.
  4. When you find the heading you want, click on it to apply it to your selected text.

Using heading styles not only helps organize your text but also makes it easy to change the formatting of your document later on without having to adjust each heading manually.

How to Customize Text Styles in Word

Using text styles is an excellent way to format your document quickly without doing it manually. Now that you know how to use text styles for headings, you can learn how to use styles for different parts of your document. You can even customize a text style, allowing you to change the look of your entire file without manual edits.

  1. First, go to the "Home" tab in the Ribbon at the top of your Word screen. Look for the "Styles" section, and click the "More" button in the bottom right.
    more styles in word
  2. You'll see a new window with all the pre-made styles in Word. You can choose from formatting styles like emphasis, subtitles, quotes, or references. To apply a style, select the text you want to format and click on the style you want to use.
    styles in word
  3. To modify an existing style, hover over the style with your mouse pointer and click on the arrow that appears. Select "Modify" from the dropdown menu.
    modify styles in word
  4. Make the changes you want, such as font size, color, or spacing, and click the OK button.

With these simple steps, you can format your document easily and quickly using text styles in Word.

How to Align Text in Word

When creating a document in Microsoft Word, you may need to adjust the alignment of your text. Aligning your text correctly can make your document look more professional and easier to read. Here's a step-by-step guide on how to align text in Word.

  1. Select the text you want to align.
  2. Choose the "Home" tab in the Ribbon at the top of your Word screen.
  3. In the "Paragraph" section, you will see several alignment options: left align, center, right align, and justify.
    align text in word
  4. Click the alignment option you want to apply to your selected text.

How to Left Align Text in Word

To align text to the left in Word, follow these steps:

  1. Select the text you want to align.
  2. Choose the "Home" tab in the RRibbonlocated at the top of your Word screen.
  3. In the "Paragraph" section, click the left align button.
    align text to the left in word
]]>
http://oktec.kr/?big=blogs/product-guides/firefox-default-browser 2022-12-09T20:10:00-08:00 2024-03-29T06:46:30-07:00 Firefox's Default Browser Workaround Rick Akura More

]]>
Microsoft has made the choice to intercept certain web links and open them exclusively in their Edge browser, regardless of your preferred default. From Cortana hyperlinks to built-in help links - you couldn't escape Microsoft's attention if you tried!

Previously, tools like EdgeDeflector made it so you can redirect these links back to your preferred browser, but unfortunately, these tools can no longer be supported on the most recent versions of Windows. Back in 2021, Microsoft decided to block Edge browser competitors from opening links, leading to EdgeDeflector being discontinued.

Microsoft Forcing Edge

Table of Contents 

Why Is Microsoft Forcing Edge on Windows Users?

Microsoft is forcing edge on Windows users

Despite the best efforts of the marketing department, Microsoft continues to dominate the PC market. A recent Internet Explorer survey revealed that Microsoft still owns nearly 40% of the market. In some countries, Apple and Linux may have a bit more of the action, but Microsoft still has the upper hand. The company also boasts a massive user base, with Windows users comprising nearly 92% percent of the installed base.

However, Microsoft isn't exactly the most enlightened of companies. As a matter of fact, Microsoft has shown a history of anti-competitive behavior. Not to mention the fact that it is still actively trying to discourage people from downloading its competitor's browsers, like Vivaldi. This isn't even the first time Microsoft has tried to block its competitors from reaching their customers.

The company's latest incarnation of Windows 10, the October Update, requires users to manually assign which apps get which tile types. In addition, users can't even install the Chrome browser without first configuring Microsoft Edge. The company's anti-competitive tactics have been going on for years. However, the company's practices have taken a toll on its brand and its users.

Microsoft’s Tactics To Discourage Users From Switching Browsers

Microsoft is reportedly working on a new way to discourage people from downloading the Google Chrome browser. According to a report by Neowin, when trying to download Chrome using the Microsoft Edge browser, the company displays a prompt, asking users if they are sure they want to proceed.

Microsoft tactics to discourage users from switching browsers

Windows 10 and 11 users are reportedly being shown pop-up messages when they visit the Chrome download page using Microsoft Edge. According to Neowin, the prompts appear below the address bar on the page.

Vivaldi also made a report in 2021, showing that Microsoft also tried placing a large advertisement when users were to search "Vivaldi" using the Edge browser. The promoted message read "There's no need to download a new web browser". This active discouragement has caused thousands of users confusion and frustration.

Additionally, after successfully downloading and installing a new web browser, Forbes reports that Microsoft continuously tries to discourage users from changing the default browser from Edge. Making simple tasks like switching default browsers a hassle has caused many users to abandon Microsoft Edge in favor of other browsers.

Mozilla’s Solution to the Problem

Earlier this year, Mozilla released a method for users to set Firefox as the default browser. It was a major step forward in making switching to Firefox easier on Windows. But Microsoft has thrown a wrench in the works.

The new version of Windows has a new Default Apps interface. The new interface tries to keep the playing field level by making it easier to switch from browser to browser. However, it complicates things for rival browser makers.

Mozilla's solution to the problem

Mozilla has reverse-engineered the new Default Apps interface and created a way for users to set Firefox as the default browser. This works in the background and requires no input from the user.

Microsoft has responded to Mozilla by rolling out an optional cumulative update for Windows 11 earlier this month. However, the update broke the ability to set Firefox as the default browser. The Microsoft spokesperson said that the fix will be available in future Windows Updates. It is unclear how the company plans to prevent Firefox from being set as the default.

If you don't like the idea of Microsoft changing the default, you can always reinstall Firefox. You can do this through the Default Settings page. Another option is to use the Microsoft Store to download Firefox. However, you will need the MSIX package to install the browser.

Microsoft EdgeDeflector’s Problem With File Associations

If you're using a Windows release before Windows 11 build 22949, you can still install and enjoy the benefits of EdgeDeflector. However, using Microsoft Edge can be frustrating if you have problems opening certain links.

How to Fix EdgeDeflector

Most EdgeDeflector problems are related to file associations, but there is an easy way to fix them:

  • Change file association for specific file types
  • Disable file association web service
  • Change the default app for specific protocols
  • Make a Registry modification

You can change the file association for specific file types. If this doesn't work, you may need to disable the file association Web service. This can save you time and frustration.

The first thing you should do is go to Settings. In the Apps section, you should find Microsoft Edge. Then, go to the Default apps menu and select EdgeDeflector. This will redirect any microsoft-edge:// links to other browsers. It's similar to how Firefox handles the same problem.

If you're using Windows, you can also change the default application for certain file types. You can do this by right-clicking on the file. You will then see a list of your options. Then, select the application you want.

You can also change the default application for specific protocols. For example, if you need to open a PDF file, you can select Adobe Reader or Foxtana Pro. This should solve your problem.

Alternatively, you can go to the Registry. To disable the file association Web service, you need to delete a registry entry. This is the easiest way to do it.

Conclusion

While it's understandable that Microsoft wants people to use its default browser, its harsh tactics are largely seen as anti-competitive by many. Clearly, Microsoft needs to rethink its strategy for discouraging people from downloading rival browsers if it wants to continue being competitive in the tech world.

Luckily, even though Microsoft is making it more difficult to set Firefox as the default browser, there are still a number of ways to work around these issues. There are tools and methods available that can help you continue using Firefox without any problems. So if you're frustrated by Microsoft's latest tactics, don't worry – there are still plenty of options available.

One More Thing

Looking for more tips? Check out our other guides in the SoftwareKeep Blog and our Help Center! You’ll find a wealth of information on how to troubleshoot various issues and find solutions to your tech problems.

Sign up for our newsletter and get early access to our blog posts, promotions, and discount codes. Plus, you'll be the first to know about our latest guides, deals, and other exciting updates!

Recommended Articles

» What Is the “A Web Page Is Slowing Down Your Browser” Warning in Firefox?
» Discord Opening Links in Wrong Browser [Fix]
» Which Web Browser Should You Be Using in 2023?

Feel free to reach out with questions or requests you’d like us to cover.

]]>
http://oktec.kr/?big=blogs/product-guides/microsoft-365-apps-for-enterprise-what-is-safelinks 2022-12-06T09:18:00-08:00 2024-04-02T22:31:51-07:00 Microsoft 365 Apps for Enterprise - What is Safelinks? Rick Akura More

]]>
Using the Safe Links feature of the Microsoft 365 Enterprise E5 plan, you can protect your organization from inadvertent access to malware. This feature can help prevent malware from entering your organization's network and protect your users from installing malware, preventing your organization from losing valuable data.

microsoft 365

Microsoft 365 Apps for enterprise or Business Premium includes ATP

Designed for small and midsize organizations, Microsoft 365 Apps for enterprise includes safelinks to help protect the data that you care about. These features enable teams to collaborate in real time, sharing files with confidence and staying secure. In addition, Microsoft 365 Apps for enterprise includes device management features to help manage your IT environment.

Safe links help to protect your organization from malicious links in emails. These links are checked by Microsoft to make sure that they are safe. If the link is suspicious, it is blocked. Safe links are also a good way to protect against malicious embedded URLs.

Microsoft 365 Apps for enterprise uses the intelligence of the cloud to detect threats earlier and more efficiently. It also helps teams to work together and communicate more efficiently. For example, it can analyze email attachments in a sandbox environment to identify and remove potentially dangerous files. This process depends on the type of attachments that are being sent and the content of the attachments.

Designed for businesses with less than 300 employees, Microsoft 365 Business Premium includes a suite of security features to help protect your organization's data and identity. These features include message encryption, organized cyber threat defense, device management capabilities, built-in access rights, and anti-phishing policies. It also integrates collaboration tools from the Microsoft ecosystem.

Microsoft 365 Business Premium includes the features found in the F3 version, plus Conditional Access and Microsoft 365 Apps for enterprise. These features are tenant-wide, meaning that users must have the same license to use them. Microsoft 365 Business Premium is a good investment for businesses looking to protect their data. However, it is still difficult for SMBs to migrate their workloads to the cloud.

The Office 365 Advanced Threat Protection Plan (ATP) uses machine learning to detect malicious intent. The feature uses threat signals to protect organizations against phishing and other attacks. ATP uses sharing events and guest activity events to analyze files. If the file contains malware, it will be flagged and removed. It also includes automated investigations. The ATP feature costs $2 per user per month.

Enhancing the Safe Links experience with Native Link Rendering

Getting your hands on the latest edition to Microsoft's ubiquitous femtocelamicty is no small feat. The company's top of the line mobile and desktop products aren't exactly the same. It's no secret that most of the company's subscribers rely on Microsoft products to boot, especially when you factor in mobile and desktop synapses alike. That's why a well-rounded and well-researched employee is the perfect candidate to keep a watchful eye on your office's latest and greatest. As the eeeenst amongst the workforce attest, you are, the company has a lot of tricks up its sleeve, namely, a top notch security department and a stellar helpdesk.

Preventing inadvertent access to malware

Using Safelinks is a good way to protect your Microsoft Office desktop versions from malicious links. It is part of the Microsoft Defender platform and works to block unwanted links and attachments. It does this by checking the URLs and destination domains for maliciousness. It also scans the links and documents on them to identify and delete any malicious files that are embedded within them. It does this by running the link through a series of checks, including using the Windows Defender Advanced Threat Protection (ATP) service. It also checks to see if the link has been blocked by the destination domains' custom Block Lists.

However, it has a number of shortcomings. First, it can't be used in Outlook on the Web or in Outlook client on desktops. Secondly, it doesn't offer dynamic URL scanning, meaning that it can't protect against zero-day, unknown URLs. Lastly, it doesn't notify the administrator if there are any malicious URLs. This means that the administrator has to run a query to remove the threats.

Safelinks is a good way to prevent inadvertent access to malware, but it is not as effective as some other security solutions. However, it does offer a streamlined user experience and does help to identify and block malicious links and attachments.

]]>
http://oktec.kr/?big=blogs/product-guides/5-best-windows-10-features 2022-12-06T04:02:00-08:00 2024-04-13T09:06:59-07:00 5 Features That Make Windows 10 the Perfect OS Rick Akura More

]]>
Windows 10 has been out for a while now and it’s safe to say that it is still the best Windows operating system yet. Here are 5 features that could convince you to upgrade, switch, or purchase your very own copy of Windows 10!

When it comes to choosing an operating system, you want one that is stable, has a variety of features to increase productivity, and is easy to use. Windows 10 checks all those boxes and more. It's one of the latest releases from Microsoft and includes a number of new features that make it even more user-friendly and productive.

Windows 10 is designed to work seamlessly with a variety of devices, including PCs, laptops, and even tablets. As a result, it is an ideal choice for individuals and businesses that need to support a flexible workspace.

Let's dive in and explore some of the key features that make it so great!

What Makes Windows 10 the Perfect OS?

There are 5 key features that make Windows 10 the perfect operating system:

  1. User-friendly, accessible, and intuitive interface
  2. Enhanced security solutions
  3. Productivity tools, stability, and reliability
  4. Optimized for gaming
  5. Affordable pricing options

Want to know more about Windows 10? Keep reading and take a look at each of these features in detail.

1. User-Friendly Interface

Windows 10 is a huge improvement over previous versions of the Windows operating system. One of the best features of Windows 10 is its user-friendly interface. The Start menu is back, and it’s been improved with live tiles that provide updates on things like the weather and your calendar. You can pin apps to the Start menu or taskbar for easy access, and create groups to organize apps into convenient folders.

Navigate your computer effortlessly with Windows 10's intuitive interface and reach your device's full potential. Personalize your digital environment with customization options like desktop wallpaper, custom colors, and a variety of other options. Microsoft implemented accessibility options and tools too, making Windows 10 accessible to all users regardless of their experience level or physical abilities.

In addition, Windows 10 comes with a number of pre-installed apps to help you get started with the tools that you need to be productive. This includes a calculator, notepad, media viewer, and more. The new Edge browser is also much better than Internet Explorer, including features like reading mode and Cortana integration.

2. Security

Staying secure in today's digital world is more important than ever. With the rapid growth in online threats like hacking, viruses, and spyware, you need a reliable operating system that keeps your files and personal information safe without having to spend additional money on security software.

Windows 10 delivers on this front with advanced security features that help protect against both common threats and more sophisticated attacks. Of course, you still have access to classic protection like the Windows Firewall and privacy options, but Windows 10 takes safety to the next level.

As soon as you set up your system, the Windows Defender antivirus app begins working on keeping your computer safe from viruses and other common threats. Windows Defender is designed to detect and remove malware automatically, keeping your devices free from malware infection and other threats.

Windows 10 also introduces new security solutions like Device Guard, BitLocker encryption, and Group Policy management. These tools come together in order to create a comprehensive security solution that keeps your business safe from cyberattacks.

3. Enhanced Productivity

Windows 10 is for everyone. No matter if you're a student, a professional, or just a casual user, Windows 10 helps you be more productive and efficient in all fields.

One of the best features is the improved multitasking capabilities. Snap open windows side by side to maximize your screen space, utilize multiple monitors, and enjoy the benefits of touch-enabled displays on Windows 10.

There's also a new virtual desktop feature that lets you set up multiple desktops for different tasks, allowing you to keep your work organized and easily switch between tasks without having to clutter your taskbar with an abundance of open windows. With Windows 10, you can get more done in less time, no matter what you're working on.

And the best part? Windows 10 is lightning fast, providing a seamless experience to all users. It doesn't matter if you're just browsing the internet, playing video games, or working with heavy-duty apps that require a large pool of resources. Windows 10 can handle it all with ease and remain stable while you're doing it.

4. Great for Gaming

Video games and personal computers have always been great pairs. With Windows 10, you can enjoy the latest and greatest games that are available in both physical and digital formats. The system is compatible with both new and old titles, so you can keep playing your favorites while also enjoying new games as they come out.

In addition, Windows 10 comes with several built-in features that enhance your gaming experience and make it more immersive. For example, the Game Bar allows you to record videos of gameplay, take screenshots, and manage your settings from an easily accessible hub. Gaming Mode also optimizes your system for running games at the click of a button.

The Xbox app lets you manage your Xbox Live profile, join gaming sessions with friends, and more. But the most exciting feature is definitely the PC Game Pass. Get access to a large collection of constantly updated video game titles and enjoy them on your Windows 10 computer, wherever you are.

So if you're looking for a reliable operating system that supports all your gaming needs, look no further than Windows 10. With its superior performance and advanced features, it's the best choice for gamers today. It's the ultimate platform for gamers everywhere.

5. Affordable Price

Finally, one of the best things about Windows 10 is that it's extremely affordable. Whether you're running a small business or working on your personal computer, Windows 10 provides excellent value for your money.

Retailers like SoftwareKeep are offering great deals on Windows 10 licenses, and Microsoft also offers regular promotions where you can get the latest version of Windows at an even lower price. And if you qualify as a student or teacher, you can get Windows 10 at no cost through the many Microsoft programs.

New Deals: Buy Windows 10 for Cheap

So if you're looking for an affordable operating system that delivers premium performance, compatibility, and features, Windows 10 is perfect for you. With its amazing capabilities and low price, it's the ideal platform for individuals and businesses alike.

Watch: 10 Best Windows Apps for Students 

Conclusion

Windows 10 has it all - value, features, and performance that meets the needs of even the most demanding PC users. If you're looking for an upgrade from your current operating system, Windows 10 should be at the top of your list. With its great value, advanced capabilities, and gaming-ready features, Windows 10 is the perfect choice for all your PC needs.

The SoftwareKeep team is always available to answer any questions you have about making the switch to Windows 10, reach out today for assistance!

One More Thing

Looking for more tips? Check out our other guides in the SoftwareKeep Blog and our Help Center! You’ll find a wealth of information on how to troubleshoot various issues and find solutions to your tech problems.

Sign up for our newsletter and get early access to our blog posts, promotions, and discount codes. Plus, you'll be the first to know about our latest guides, deals, and other exciting updates!

Recommended Articles

» How to Cancel Windows 11 Update and Stay on Windows 10?
» How to Optimize Windows 10 for Gaming and Performance
» How To Speed Up Windows 10: Tips to improve PC performance

Feel free to reach out with questions or requests you’d like us to cover.

]]>
http://oktec.kr/?big=blogs/product-guides/office-for-mac-buyers-guide 2022-12-02T09:38:00-08:00 2024-04-02T23:14:49-07:00 Microsoft Office for Mac Buyer’s Guide Rick Akura More

]]>
If you’re in the market for Microsoft Office for Mac, you might be feeling a little overwhelmed by all the options. Do you need the Home and Student edition? The Home and Business edition? The Standard edition? Or maybe the Professional edition? In this buyer’s guide, we’ll break down the different versions of Microsoft Office for Mac so you can decide which one is right for you.

Microsoft Office has been the go-to choice for individuals and business users for many years. The software suite is comprehensive and easy to use, making it a popular choice for organizations of all sizes, as well as all kinds of people including students. While Microsoft Office used to be available only for Windows, it is now possible to get the suite on a Mac as well.

In this article, we will provide a buyer’s guide for those considering purchasing Microsoft Office for Mac.

Microsoft Office for Mac Buyer’s Guide

Pick the Perfect Office for Your Mac

When selecting your Microsoft Office for Mac suite, there are a few components to think about. Let's take a look at each one in detail.

  • Software Included: Different suites come with different sets of applications. For example, the Home and Student edition includes the essentials only; Word, Excel, PowerPoint, and OneNote. The Professional suite adds Outlook.
  • Features: Office for Mac has been around for a long time. There are many versions to choose from. The newest version is Microsoft Office 2021 for Mac. If you don't need the newest version, you could get Microsoft Office 2016 for Mac, which is an older version but might be cheaper.
  • License Type: It's important to consider the type of license you need. If you're getting Office for yourself, then a single-user license is probably the way to go. But if you need to install Office on multiple computers then a volume license may be better.
  • Price: The cost of the suite you choose will depend on which version you need. Home and Student versions tend to be the cheapest, while Professional editions tend to be more expensive.
  • Payment Type: Office for Mac is available as a one-time purchase, but you can also start a subscription plan via Microsoft 365. Consider which payment type is right for you.

These pointers should assist you in deciding which version of Microsoft Office for Mac is right for you. If you need help deciding, don't hesitate to contact us or complete the SoftwareKeep Office Quiz. With the right advice and guidance, you'll be able to find the perfect Office suite for your needs.

Is Microsoft Office for Mac Worth It?

If you're a student or professional who relies on Microsoft Office for Mac, then it's definitely worth the investment. Microsoft Office is incredibly versatile and allows you to easily create, edit, and share documents with others. So, if you produce a lot of documents, spreadsheets, or presentations, it's definitely worth the cost.

Office for Mac is compatible with your powerful Apple product, known for its reliability and ease of use. Be confident that you're getting a top-quality software suite when you buy Office for Mac.

What’s the Difference Between Microsoft 365 and Office for Mac?

Microsoft 365 vs Office for Mac

Microsoft 365 is a subscription service that gives users access to the latest version of Microsoft Office. It includes all of the same features as Office, but it also includes cloud-based storage and feature updates. It also allows you to access more advanced Microsoft products, like Microsoft Project and Microsoft Access.

In contrast, Office is a one-time purchase that does not include cloud storage or any updates. It's a perpetual license, meaning that you own the software for as long as you want, without having to pay a recurring fee.

In the long run, Microsoft 365 is more expensive than a perpetual Office suite, but it is also more convenient and efficient. For users who frequently use Office applications, a one-time purchase suite may be the better option. However, a Microsoft 365 subscription may be more cost-effective for users who only need occasional Office access.

Which One Is Better: Microsoft Office 2021 or Microsoft 365?

The answer to this question is dependent on your needs. Microsoft Office 2021 is a one-time purchase, while Microsoft 365 is a subscription service. This means that they'll be better for different types of users.

Microsoft Office 2021 has all the features that you need to create and edit documents, presentations, and spreadsheets. However, it doesn't include some of the collaboration features that are available in Microsoft 365.

Microsoft Office for Mac Comparison

If you want to get an overview of what features are included in Microsoft Office for Mac, here’s a quick look at the different editions:


Microsoft Office 2021 for Mac

Microsoft 365

License type

Perpetual license. You only have to pay once and get to keep your apps forever.

Subscription. When you stop paying, you lose access to the apps.

Applications

Word, Excel, and PowerPoint for Mac. Some versions include Outlook for Mac.

Includes the most up-to-date versions of all Office apps in your subscription tier.

Services

No additional services

Skype for Business and OneDrive

Users

1 User

1 User (Personal) or 6 Users (Family)

Updates

Only security updates

Feature updates, security updates, and access to the latest version of Office apps

Storage

No storage service provided

At least 1 TB OneDrive storage

Support

Office LTSC for Mac will go out of support on October 13, 2026.

Ongoing technical support is provided to all Microsoft 365 subscribers.

How To Buy Microsoft Office on Mac

How to Buy Office for Mac

The process of purchasing Microsoft Office for Mac is straightforward. Depending on what version and edition you choose, you have many options for purchasing the software, including an online subscription and a one-time purchase.

  1. Purchase Microsoft Office for Mac from Microsoft - You can head to Microsoft's website and purchase Microsoft Office for Mac. You will be able to select which version and edition you need and pay using one of the payment options available.
  2. Buy Microsoft Office from SoftwareKeep - Buying your software from SoftwareKeep is the best option if you want to get authentic software for the best price on the market. We offer multiple versions and editions of Microsoft Office for Mac, as well as 24/7 support.
  3. Find a retailer - You can purchase Microsoft Office for Mac at many retailers, including big box stores and online retailers. However, you should make sure to purchase from an authorized reseller in order to get authentic software.
  4. Subscribe to Microsoft 365 - If you don't need the full suite of Office applications, you can purchase a Microsoft 365 subscription. This includes access to all the latest versions of Microsoft Office for Mac, as well as cloud storage, feature updates, and more.
  5. Get Microsoft Office for Mac for free - There are a few ways you can access Microsoft Office for Mac without paying. You can get the latest version of Microsoft Office with a valid school email address, or you can sign up for a trial version.

There are many options available when it comes to purchasing Microsoft Office for Mac. No matter what your needs are, you can find a solution that fits them with the help of SoftwareKeep. Our team is here to help you make the best decision for your needs and budget – contact us today!

How Much Is Microsoft Office for Mac?

Microsoft Office for Mac is an essential tool for any Mac user, but the high price tag can be a deterrent. The official Microsoft website is notoriously expensive, but there are ways to get Microsoft Office for cheap.

SoftwareKeep is the best reseller to get genuine Microsoft Office for a fraction of the price. Our prices are unbeatable, and our products are guaranteed to be genuine. With SoftwareKeep, you can get Microsoft Office for Mac for as little as $74.99. That's a steal compared to the $149.99 price tag on the official Microsoft website.

Of course, more advanced editions and recent releases usually cost more, as they include more features and updates. At Microsoft, the latest Office 2021 for Mac, for example, starts at $149.99, while Microsoft Office 2016 costs $79.99. If you want to get the latest version of Microsoft Office on a budget, SoftwareKeep is the best place to shop.

The Cheapest Way To Get Microsoft Office for Mac

How to Buy Office for Mac

If you're looking for cheap Microsoft Office, your best bet is probably going to be a reseller. Keep in mind, though, that you need to be cautious when dealing with resellers. Many websites may sell Microsoft Office for Mac, but they may not be legitimate or authorized to do so.

If you are purchasing Microsoft Office from a third-party website, SoftwareKeep is the best choice. We are a trusted source for genuine Microsoft Office software, for both PC and Mac. When buying Microsoft Office from SoftwareKeep, you can be sure that your software is authentic and that you’re getting the best possible deal.

To purchase Microsoft 365, you can get a subscription for a discounted price at SoftwareKeep, or simply visit Microsoft’s website and make your purchase there.

How To Get Microsoft Office for Mac for Free

Did you know that you can get Microsoft Office for Mac for free? There are several working methods to get Microsoft Office completely free.

The best option is to sign up for a Microsoft 365 subscription. Microsoft regularly offers new users a one-month free trial of Microsoft 365, which includes all the apps you could need like Word, Excel, PowerPoint, Outlook, and more. If you're not satisfied with Microsoft 365, you can simply cancel your subscription before the trial period ends.

Another option is to download Microsoft Office for free is checking if you're eligible for a student discount. Microsoft may offer Microsoft Office free to some students and educators through its various programs. To get Microsoft Office for free as a student, simply visit Microsoft’s website, sign up for a Microsoft account, and verify your education status.

We encourage you to never download files that claim to grant access to Microsoft Office for free. These are either malware or illegal copies of Microsoft software, and you could be putting your computer at risk by using them. We recommend sticking to official Microsoft sources like Microsoft’s website or Microsoft 365 to get a free copy of Microsoft Office for Mac without any hassle.

Microsoft Office for Mac FAQ

What is the latest version of Microsoft Office for Mac?

As of 2022, the latest version of the suite is Microsoft Office 2021 for Mac. It was released on October 5, 2021, and includes all the latest features and updates, as well as accessibility and performance improvements.

Which versions of Microsoft Office for Mac are available?

There are four major versions of Microsoft Office for Mac that are available: Home & Student, Home & Business, Professional, and Microsoft 365.

What are the differences between Microsoft Office for Mac and Windows?

There are key differences between the Microsoft Office for Mac and Windows versions. The Mac version of Office typically has a different set of features than the Windows version. The Mac version of the software has some exclusive features, like full-screen Focus mode and Mission Control.

How do I purchase Microsoft Office for Mac?

To purchase Microsoft Office for Mac, you can visit the Microsoft website or an authorized retailer. However, if you want to get the best price on Microsoft Office software, we recommend purchasing it from SoftwareKeep. We offer a wide selection of software titles at discounted prices, and our customer service is top-notch.

What are the system requirements for Microsoft Office for Mac?

Answer: The system requirements for Microsoft Office for Mac are a Mac computer with an Intel processor and Mac OS X version 10.10 or later, 1 GB of RAM, 3.5 GB of available disk space, and a broadband Internet connection for product activation.

Conclusion

If you are looking for a powerful and comprehensive office suite, Microsoft Office for Mac is a perfect choice. Whether you need professional tools like Word, Excel, and PowerPoint or just an easy-to-use software tool for everyday tasks, Microsoft Office has everything you need.

With options like Microsoft 365 and student discounts available, you can get Microsoft Office for Mac at a great price. Get started today and take your productivity to the next level!

One More Thing

Looking for more tips? Check out our other guides in the SoftwareKeep Blog and our Help Center! You’ll find a wealth of information on how to troubleshoot various issues and find solutions to your tech problems.

Sign up for our newsletter and get early access to our blog posts, promotions, and discount codes. Plus, you'll be the first to know about our latest guides, deals, and other exciting updates!

Recommended Articles

» Microsoft Office 2019 Vs. Office 365 Comparison and Insights
» MS Word: The Definitive Microsoft Word user Guide
» Windows 365: Ultimate Guide

Feel free to reach out with questions or requests you’d like us to cover.

]]>
http://oktec.kr/?big=blogs/product-guides/microsoft-word-user-guide 2022-10-28T06:29:00-07:00 2024-03-19T23:47:49-07:00 MS Word: The Definitive Microsoft Word User Guide  Rick Akura More

]]>
This is your ultimate Microsoft Word guide, the world’s most widely used word processor from Microsoft. Learn how to use MS Word, its top features, and more.

Microsoft Word user guide

This is your ultimate guide to Microsoft Word, the world’s most widely used word processor. And it’s right. Why?

It’s simple and easy to use, advanced and feature-rich, and works with almost all operating systems and platforms, including Word online. And since we sell Microsoft Word, we’re rightly placed to tell you how it works.

So, we made this Microsoft Word user guide for you.

In it, you’ll learn:

So, without much ado, let’s dive in. 

What is Microsoft Word?

Microsoft Word is the world’s most widely used commercial word processor designed by Microsoft. 

Word is a component of Microsoft Office suite, the widely used productivity software. But it’s also available as a stand-alone product.

Microsoft Word is often called simply Word or MS Word.

After numerous updates, Microsoft Word is no longer just a word processing tool but supports improved writing, document design, and collaboration with others.

What is Microsoft Word used for?

Microsoft Word lets you create professional-quality documents, reports, letters, résumés, and more. Unlike plain text editors, MS Word has advanced features, including spell check, grammar check, text and font formatting, HTML support, image support, and more.

Where to find or download Microsoft Word

You can find or download Microsoft Word from different places. 

You can download Microsoft Word as a stand-alone app, as part of the Microsoft Office suite, or as part of a Microsoft 365 subscription.

Download Microsoft Word:

  • Online from the Microsoft website 
  • Microsoft Store
  • AppStore
  • Google Play
  • Download Microsoft Word from a Software retailer like Softwarekeep.com.

Where can I use Microsoft Word?

Microsoft Word is available as an app for different platforms and operating systems, as follows: 

  • Download Microsoft Word for Desktop (Windows and macOS) apps
  • Download Microsoft Word Mobile devices  (iOS and Android) on Word mobile app
  • Download Microsoft Word Tablets (iOS and Android) on the Word app
  • Online on Microsoft 365 or Word online 

Is Microsoft Word free?

Microsoft Word can be free or not, depending on where you get it, your license, and your Office version

You can download a one-time purchase of MS Word as a standalone version, get Word as a component of Microsoft Office one-time purchase, or use Word as part of Microsoft 365.

Note: Microsoft Word app is now known as Microsoft 365 app.

Here are different ways to use Microsoft Word for free:

#1. Stand alone Word app and Word on Microsoft Office are not free 

If you get a stand alone MS Word app or buy a perpetual Microsoft Office app (now Microsoft 365 app), you pay a single, up-front cost to get Office apps ( Word, Excel, PowerPoint, and more)for one computer. 

One-time purchases are available for PCs, Macs, and Androids. But they lack upgrade options. This means if you plan to upgrade your MS word or MS Office suite to the next major release, you must buy it at full price.

#2. Word app on Microsoft 365 may be free … or not

You can get MS Word for free as part of the free but limited edition of Microsoft 365 (formerly Office 365). You can pay for the different versions of Microsoft 365 (personal, family, education, business/enterprise) for better editing and increased productivity.

#3. Microsoft Word is free on Office 365 Education

In addition, students and educators at eligible institutions can sign up for Office 365 Education for free and get Office apps, including Word, Excel, PowerPoint, OneNote, and MS Teams. Plus, Microsoft Word Student helps you access additional classroom tools. But you must use your valid school email address

#4. Free Word app on the Web

Use Microsoft Word for free Microsoft Word online. Microsoft makes a free version of Microsoft Word available for anyone to use on the web. You have to register a Microsoft account, but that's free too. This version works entirely in a web browser, allowing you to access it on any computer, and your files are synced and saved in the cloud. There are some limitations, but Word on the web might be all they ever need for many users.

#5. Free Microsoft Word on Mobile

Download the Microsoft Word app for Android and iOS and use it for free. Like the web version, you’ll just need a Microsoft account. 

But there is a caveat: If you want to use the Word app for mobile on an Android device with a screen size of fewer than 10.1 inches, you need to pay for a Microsoft 365 subscription. 

The Microsoft app free edition is limited to cell phones.

Recommended Article: Read this elaborate article about how to get Microsoft Word for free.

Microsoft Word versions

Microsoft Word has had several versions throughout its history, with different releases and upgrades:

  • Microsoft Word in Microsoft Office and Microsoft Office for Mac (different versions)
    • Microsoft Home and Student
    • Microsoft Home and Student for Mac
    • Microsoft Home and Business 
    • Microsoft Home and Business for Mac
  • Microsoft Word in Microsoft 365 (Office 365)
  • Microsoft Word Web
  • Microsoft Word iOS app
  • Microsoft Word Android app
  • Microsoft Word stand alone App (Microsoft currently only supports only Word 2013 and later)
    • Word 2021
    • Word 2019 
    • Word 2016
    • Word 2013
    • Word 2010
    • Word 2007
    • Word 2003
    • Word 2002
    • Word 2000
    • And more
  • Microsoft Word for Mac (Microsoft currently only supports Word for mac 2016 and later)
    • Word 2021
    • Word 2019
    • Word 2016
    • Word 2011
    • Word 2008
    • Word 2004
    • And more.

Microsoft Word key features

Stand alone or part of the Microsoft Office Suite, MS Word is one of the world's most popular MS Office productivity tools.

With Microsoft Word, you can elevate your writing, create beautiful documents, and collaborate with others—anywhere, anytime. Why?

Because of the following Microsoft Word features:

Home

This feature has options like font color, size, style, alignment, bullets, line spacing, etc. All the basic elements that one may need to edit their document are available under the Home option.

Insert

When you click insert, you get tables, shapes, images, charts, graphs, header, footer, page numbers, etc. The “Insert” category is a great feature for document editing.

Design

Select the template or design in which you want your document to be created under the Design tab. Choosing an appropriate tab that will enhance the appearance of your document.

Page Layout

Word has a Page Layout tab where you get options like margins, orientation, columns, lines, indentation, spacing, etc. It’s a document editing feature.

References

This tab is the most useful for those who are creating a thesis or writing books or lengthy documents. Options like citation, footnote, table of contents, caption, bibliography, etc., can be found under this tab.

Review

The review tab can track the spelling check, grammar, Thesaurus, word count, language, translation, comments, etc. This is an advantage for those who get their documents reviewed on MS Word.

Write like a pro with Microsoft Editor

Write documents and check spelling, capitalization, grammar, and punctuation in all your Word documents with Microsoft Editor.

OneDrive to access your documents anywhere

Save your documents to OneDrive and access them from any device, knowing your files are protected against digital attacks with built-in ransomware detection.

Collaboration - Create and edit together

MS Word allows you to share your documents with anyone and edit them together (collaborate), adding comments and suggesting changes in real-time. Collaborate on work or school projects.

NOTE: There are more features based on your word version and usage. Learn these 20 Secret Functions of Microsoft Word!

How to Use Microsoft Word: Complete Microsoft word user Guide 

Do you know how to operate Microsoft Word?

Whether or not you’ve used Microsoft Word, there’s always something new to learn. This Microsoft Office user guide will give you basic MS Word and advanced-level utilization. 

We’ll divide them into sections/categories for easy referencing and to Explore Word in depth.

We’ll assume you’ve installed Word on the device. 

Let’s get started with this Microsoft word user guide.

Where do you find or start Microsoft Word?

If you have MS Word or the entire Microsoft Office package installed on your device (Mac or Windows PC), you can access Microsoft Word in your Start menu.

If you’re using Windows:

  1. Press the Windows button
  2. Type Word
  3. Click on the Word application
  4. Voila! You’ve accessed and opened MS Word on your device.

If Microsoft Word is installed on your PC, but your Start menu can’t find it, use the following steps to launch Microsoft Word manually.

  1. Open My Computer or File Explorer.
  2. Click or select the C: drive. If Microsoft Office is installed on a drive other than the C: drive, select that drive instead.
  3. Find and open the Program Files (x86) or Program Files folder.
  4. Open the Microsoft Office folder.
  5. In the Microsoft Office folder, open the root folder. Then open the OfficeXX folder, where XX is the version of Microsoft Office (e.g., Office for Microsoft Office 2016) installed on your computer.
  6. Find and double-click the file named WINWORD.EXE to start the Microsoft Word program.

Note: New computers don’t include Microsoft Word. If you have a new computer, you must purchase and install MS Word on your PC before running it. But if you don’t want (or cannot afford) to buy Microsoft Word, you can use Microsoft Word free at the Microsoft Office website, but it’s limited.

How to Create a Document in Word

To create a document in MS Word,

  1. Open Word.
  2. Select Blank document.

If Word is already open,

  1. Select File > New.
  2. Double-click a template to open it.

If you want to use Microsoft Word Template

  1. In the Search for online templates box, enter a search word like letter, resume, or invoice. 
  2. Or, select a category under the search box like Business, Personal, or Education.
  3. Click a template to see a preview. Click the arrows on the side of the preview to see more templates.
  4. Select Create.

Read this detailed how to create a document in MS Word for more information or this article on How to Design and Edit Text In Microsoft Word for more Word tips. We also have a guide for if you want to start a Word document on Mac.

How to Save a Word Document 

There are two ways to save a Word document:

Method 1. Use Keyboard shortcut:

  1. After typing words in the document, press Ctrl + S. 
  2. If you hadn't saved the document with a name, Word would ask you how you want to save it and where.
  3. Type file name in the file name box.
  4. In the save as type, select the file type you want to save the document with.
  5. Press Enter.

Method 2. Use the long option for Save As option 

  1. Click on File > select Save as.
  2. Select the location (Browser location).
  3. Type file name.
  4. Select file type.
  5. Press enter.

For a more detailed guide, learn how to save a Word document.

How to Collaborate In Microsoft Word

There are 3 ways to collaborate on Word documents

  • Share a document
  • Co-edit a document
  • Track and review changes

To share a Word document:

  1. Select “share” on the top ribbon of the page. Or, select File > Share.
  2. Select who you want to share with from the drop-down. Enter a name or email address into the field, or select a contact from the drop-down menu. 
  3. Enter a message if you want and press "send".

To co-edit a Word document:

There are no specific steps to co-edit a Word document. It uses the track changes feature and the sharing methods mentioned above. 

When multiple people work on a given document, you’ll see on-screen flags of varying colors (one for each author) and the person’s name.

You can also edit a document offline.

To co-author, a Word document:

You can co-author a document on Microsoft 365 when someone has shared the document with you or a group of people. 

To Track and review changes on a Word document:

  1. Go to the “review” tab > then to “track changes”.
  2. To review changes made by other users, set the cursor before a change and either:
    1. Hit “accept” to accept the changes or
    2. Hit “reject” the change

Learn more about Word collaboration in this How to Collaborate In Microsoft Word for more information. 

Change the Default Font in Microsoft Word

To change and use your favorite font in Word all the time, set it as the default.

  1. Go to Format > Font > Font. You can also press and hold. + D to open the Font dialog box.
  2. Select the font and size you want to use.
  3. Select Default > then select Yes.
  4. Select OK.

These steps may differ depending on your Word version. We have a more detailed guide here to change your default font in Word.

How to Delete a Page in Word

To delete a page in MS Word that contains text, graphics, or empty paragraphs, you can select the content to delete and press Delete.

Or you can also do this:

  1. Click/tap anywhere on the page you want to delete > press Ctrl+G.
  2. In the Enter page number box, type \page.
  3. On your Keyboard, Press Enter > then select Close.
  4. Verify that a page of content is selected > then press Delete on your keyboard.
  5. Voila! You've deleted a page!

This article is dedicated to the different methods to delete a page in Word.

Check Spelling and Grammar in Word

  1. On the Review tab, click Spelling & Grammar. 
  2. If Word finds a potential error, the Spelling & Grammar dialog box will open, spelling errors will be shown as red text, and grammatical errors will be shown as green text.

This article is a detailed guide on checking spelling and grammar in Word. Learn more.

Learning Microsoft Word from articles in our Help Center 

Here are some more content to help you learn Microsoft Word:

» How To Change Your Apple ID Password on Any Device
» How to Print Black and White on Word (With Images)
» MS Word Hacks: 5 Word Functions You Never Knew Existed
» How to Edit Your Word Documents Faster
» 7 Microsoft Word Hacks You Need to Know in 2022
» MS Word Features: 20 Secret Functions Revealed
» How to Create a Hanging Indent in Microsoft Word
» How to make columns in Microsoft Word
» How to Fix the Spell Check Not Working in Word
» How to Install Fonts to Word on Mac
» How to Unfreeze Word on Mac Without Losing Work
» Top 14 Microsoft Word Tips and Tricks for Productivity 

Final Thoughts 

This guide has been about Microsoft Word. We hope you’ve learned how to use Microsoft Word and more tricks. 

We’re glad you read the article up to here :) Thank you :)

As we’ve shared above, there are more articles you can read about Microsoft Word and Microsoft Office in our Help Center and Blog

Please share this article on your socials or with your friends. Someone else may benefit from it too.

One more thing …

Subscribe to our newsletter and be among the first to receive these documents in your inbox. We also share deals, promotions, and more through email. Don’t be left out. 

FAQ Questions 

How much is Microsoft Word?

The cost of the Microsoft Word stand alone app depends on the version and platform. For example, For example, Microsoft Word 2021 currently retails at USD 114.99 for PC, while Microsoft Word 2021 for Mac retails at USD 89.99. Compared to Word 2019, which is now USD 94 and USD 69.99 for PC and Mac, respectively. The costs reduce as you go down to earlier versions. These costs may also differ based on where you buy them.

How to get Microsoft word for free?

There are 3 ways:

Microsoft Word online. Microsoft has a free version of Microsoft Word on the web for anyone to use. To use Microsoft Word online free, you have to register a Microsoft account, but that's free too. This version works entirely inside a web browser, you can access it from any computer, and your files are always synced and saved in the cloud.

Microsoft 365 Education. You can use Microsoft 365 Education for free if you're a student or educator. The catch? You must register to Microsoft account with your school email address. Otherwise, you won’t get any access.

Microsoft Word app on Phone (Android and iOS). The Microsoft Word app on android and iPhone is free to use. All you need is a Microsoft account, and you’re done.

How to delete a page in Microsoft word

To delete a page in Word:

  1. Click or tap anywhere in the page you want to delete > press Ctrl+G.
  2. In the Enter page number box, type \page.
  3. Press Enter on your keyboard > then select Close.
  4. Verify that a page of content is selected > then press Delete on your keyboard.

To delete a page on Word macOS

  1. Click or tap anywhere in the page you want to delete > then press Option+⌘+G.
  2. In the Enter page number box, type \page.
  3. Press Enter on your keyboard > then select Close.
  4. Verify that a page of content is selected > then press Delete on your keyboard.

Why does Microsoft Word keep freezing when it saves?

Many factors can lead to MS Word freezing. The MS Word keeps freezing issue is mostly caused by the corruption of Word’s Normal Template. Also, MS Word freezes when there is damage to MS Office settings associated with the Word application. Another issue that can cause the MS word frozen issue is third-party add-ins in the Word application. MS Word may also get unresponsive or frozen if there are software conflicts in the system while editing documents.

Other than these mentioned, MS Word freezing issues may also occur in the following situations:

  • Improper termination of Word.
  • Malware invasion.
  • Incorrect installation of Word application.
  • Presence of bad sectors in the location where the Word program and documents are stored.
  • Word corruption.
  • Improver MS Word activation key.
  • Large files in Word. You’re working on a very large file or document in Word.

What are Microsoft Word alternatives?

Unless you specifically need Microsoft Word, you’ll find that there are plenty of great word processors that won’t cost you a penny. Here are three common Microsoft Word alternatives:

  • Google Docs - a perennial favorite as the web-based software is free and easy to use. You won’t find incredibly advanced features like those on the full-blown Microsoft Word, but for most people, it’s all they’ll ever need.
  • LibreOffice Writer - an open-source word processor that's completely free yet offers a complete solution for those who want the functionality of MS Word.
  • Apple Pages: This is a word processing and page layout application developed by Apple and is included in the iWork productivity suite. It is compatible with Microsoft Word files, and it offers many similar features, such as text formatting, document templates, and collaboration tools.
  • Google Docs: This is a free, web-based word processing application from Google. It allows users to create and edit documents online, and it also offers collaboration tools, version history, and the ability to export documents in various formats.
  • Scrivener: This is a popular word processing application designed specifically for writers. It offers a wide range of tools to help with the writing process, such as outlining, corkboard, and document organization.
  • AbiWord: This is a free and open-source alternative to Microsoft Word. It is available for Windows, Mac, and Linux, and it offers basic word processing features, such as text formatting, spell checking, and the ability to import and export documents in various formats.
  • Bean: This is a free, open-source word processor for Mac OS X. It is simple and lightweight, but it still offers many of the same features as Microsoft Word, such as text formatting, spell checking, and the ability to import and export documents in various formats.
]]>
http://oktec.kr/?big=blogs/product-guides/best-christmas-wallpapers 2022-10-25T05:49:00-07:00 2024-03-18T23:41:32-07:00 Get Into the Holiday Spirit With Festive Christmas Wallpapers 2024 Rick Akura More

]]>
Get Merry Christmas Wallpaper, live Christmas wallpaper, 3D Xmas wallpapers, adorable Christmas wallpapers iPhone, Christmas wallpaper desktops, etc.

Christmas Wallpapers

Behold, it’s Christmas - a time for joy and festive - be jolly and merry. And a time for Christmas decorations with Christmas trees, Christmas lights, songs, and dances. One more thing we’re decorating this year is our devices with Christmas wallpapers.

Each year, more and more users are interested in Christmas live wallpapers, Christmas screensavers for Windows 11/10, and Christmas wallpapers for iPhones.

So, in preparation for the festive holiday, we've gathered some of the best Christmas wallpapers to get into the Christmas spirit.

Whether you're looking for something cute and festive, or an aesthetic winter landscape, these beautiful Christmas wallpapers and screensavers will immediately get you in the holiday mood.

Merry Christmas from us at SoftwareKeep! TL;DR: Summary 

  • For iPhone users, we've found some adorable wallpapers featuring Santa Claus, reindeer, and Christmas trees.
  •  If you're looking for something a little more festive, try Christmas wallpaper with lights or snowflakes. 
  • And for those who want an aesthetic winter landscape, we’ve included wallpapers of frosty forests and snowy mountains.
  • If you prefer classic Christmas symbols, we give you, among others, a live wallpaper depicting a Christmas tree next to a fireplace.
  • We've also included examples of beautiful Christmas wallpapers featuring traditional scenes like Santa Claus in his sleigh or reindeer pulling a sled for desktop and laptop users. 
  • We've also included more modern designs, like geometric patterns and abstract light displays.
  • You’ll also find 3D Christmas live screensavers telling you that Christmas is knocking on your door.
  • No matter your taste, you will find a Christmas wallpaper or wallpaper category you love!

What is a Wallpaper?

What is a wallpaper?

A wallpaper, or desktop background, is a background image that covers a computer's or other device's screen. Simply it's the image (decorative) that fills your gadget’s background screen when all programs are closed. 

A wallpaper is also called a background, screensaver, desktop background, desktop picture, or desktop image on computers.

It’s usually a digital image (photo, drawing, gif, etc.) used as a decorative screensaver/background of a graphical user interface on a computer, smartphone, tablet, or other electronic device screens. These can be realistic images or computer-generated images and graphics.

There are different types of wallpapers and wallpaper themes. Here we’ll talk about Christmas wallpapers.

What is a Christmas Wallpaper?

Christmas wallpaper

A Christmas Wallpaper is a decorative and colorful wallpaper with Christmas themes.

Wallpapers are usually any type of image, with most users preferring a clean, not-too-busy background to allow easy viewing of icons on the device screen. 

But to people who prefer realistic backgrounds and images, Christmas wallpapers are more appealing, especially around the time of the year when Christmas is around the corner.

Where do you get Christmas Wallpaper?

There are various ways to get wallpapers based on your preference, device type, and more.

Basically, most devices come with pre-set wallpapers. 

Where do you get a wallpaper

Some people may leave their device’s background blank or fill it only with color. Others use a default background provided by the device's manufacturer or operating systems, such as an abstract design, a logo, a stock photograph, live wallpaper, etc. For example, Windows desktops come with the default Windows logo wallpaper, while iPhone wallpapers are abstract designs, some live wallpapers. 

But many people prefer to set custom wallpapers from images, personal pictures, online images, and more. This is where Christmas wallpaper falls.

If you want a Christmas wallpaper, you will have to get it online or from a selection of wallpapers your device provides (if your device provides Christmas wallpapers).

Virtually any image found online can be used as a wallpaper or background image, provided it fits the device's required sufficient resolution.

You can also download Christmas wallpaper by visiting wallpaper websites and apps that provide wallpapers and background images - some free, others paid. They’ve stunning photographs and imagery available for the taking based on your preference, such as:

  • Cute Christmas wallpaper
  • Christmas Wallpaper iPhone
  • Animated wallpaper
  • And more!

How many days until Christmas wallpaper?

How many days to Chriistmass

If you want to start counting the number of days to Christmas, get an app! The app will start a “How many days until Christmas wallpaper?” countdown.

Here are some suggestions for days until Christmas Wallpaper Countdown Apps:

Christmas Countdown with Carols – FREE

If you’re excited about Christmas, you’re not alone. We all are! The Christmas Countdown with Carols brings the Christmas countdown live with 3D Christmas Live Wallpaper. It has decorative effects, awesome snowflakes falling, snow falling, and carols as its background music.  The app is quite interactive with its users. You can also change the Christmas Carols by tapping once on the screen or stop the carols by tapping the screen twice. It’s on GooglePlay. Awesome!

Christmas Countdown 2024 – FREE

Christmas countdown

It was initially Christmas Countdown 2020, but now Christmas countdown 2024. It gives you the freedom to choose from their Christmas wallpaper background. You can choose whether you want to have the classic timer or the modern timer for the countdown. The new features for Christmas Countdown make everything better than its outdated app version. It’s available on GooglePlay, AppStore, and MicrosoftStore.

You can enjoy the following with their new update:

  • Daily Christmas Quotes
  • Wish List for Christmas
  • Share Button
  • Premium Christmas Wallpapers
  • Free of ads

Christmas Countdown Wallpaper

Wish you all a Merry Christmas! As the winter night of Christmas eve is approaching with every passing moment, what is better than having a live wallpaper installed on your computer or phone that continuously reminds you of the time left for Christmas? Get the Christmas All-In-One (Countdown, Wallpapers) for FREE in Microsoft Store.

Christmas Countdown – FREE

This Christmas Countdown app is one of the best Christmas wallpaper apps to track the days until Christmas: it’s the perfect how many days till Christmas countdown wallpaper. It gives you the exact number of days, months, and seconds until Christmas. Surely, you will not have any problems tracking the time to buy some presents for your loved ones. You also get daily Christmas themed HD images for wallpaper, Santa Claus, reindeer, Christmas tree, snowman themes, and classic Christmas music and carols.

Best  Christmas Wallpapers Websites for any device 

If you want the best Christmas wallpaper, just search the internet with the team you want, such as “winter Christmas wallpaper,” or just “Christmas wallpaper.” You’ll get a ton of images and pictures related to Christmas wallpapers.

If you want to be more specific about your type of Christmas wallpaper, visit the websites below.

Pinterest

Christmas & New Years' phone wallpapers or desktop wallpapers. On Pinterest, you’ll see many ideas about Christmas wallpaper, holiday wallpaper, iPhone Christmas wallpaper, and more. 

Pinterest gives you a collection of Christmas wallpapers of whatever description you want. You can even get a real Christmas Tree. Pinterest even suggests Ideas you might love, such as the following:

  • Wallpaper iPhone Christmas
  • Christmas phone wallpaper
  • Holiday wallpaper
  • Christmas pictures 
  • Xmas wallpaper
  • And more

Wallpapers.com

There’s a website called wallpapers.com dedicated to providing wallpaper designs. You can find Christmas Wallpapers on this site. It invites you to explore and download free, high quality Christmas wallpapers and backgrounds and Customize your desktop, mobile phone, and tablet. The website has a wide variety of cool and interesting Christmas wallpapers and Christmas backgrounds.

Unsplash 

From Unsplash, you can choose from hundreds of free Christmas wallpapers. Choose and download HD and aesthetic Christmas wallpaper for your desktop or mobile screen for free on Unsplash. Choose your favorite Christmas wallpaper from a curated selection of Christmas wallpapers on Unsplash.

Pixabay 

This is another wallpaper special website. Pixabay has Christmas photos and images that look perfect for any device or desktop’s Christmas wallpaper. Most images are in HD, and you can download them for free. Download Christmas Wallpaper, Christmas wallpaper aesthetic, or Christmas background for your phone or desktop.

Pexels 

Download Christmas Wallpaper Pexels, a collection of 60,000+ Christmas Wallpaper stock photos, for free and high-quality videos. Pexels offer the best free stock photos, royalty-free images, and videos shared by creators. Just a quick search term like “christmas wallpaper” can give you thousands of Christmas wallpapers to select from.

Getty Images

Get Christmas Wallpaper Premium High Res Photos in Getty Images. Find Christmas Wallpaper stock photos and editorial news pictures from Getty Images. Select from 70238+ premium Christmas Wallpaper of the highest quality.

Note: Other websites to get Christmas wallpaper images are Shutterstock, FreePick, Wallpaper Access, and more! Normally, larger photographs and pictures work very nicely. Just right-click on the image, choose to Save the image, and give the file a name. It’s handy to keep all images you might like to use as desktop wallpaper in a single folder.

Best Christmas live wallpapers & screensavers for Desktop Windows 10/11

Best Christmas live wallpapers

The festive energies of Christmas have begun spreading throughout the country. Everyone is fully immersed in the holiday atmosphere. And almost everything in your home should express a Christmas spirit - including your Christmas tree and other beautiful decorations.

Choose the following best live Christmas wallpapers for your Windows desktop:

Snow Village 3D Live Wallpaper and Screensaver

Get beautiful live wallpapers for your PC in 3D. Make your PC filled with rapture in such a joyful environment by installing Snow Village 3D Screensaver and Wallpaper, which can change your PC’s desktop into a gorgeous snow-covered village. You’ll love the festively decorated houses, streets, snowman, Christmas trees, etc., transforming the rural landscape into great scenery. It would transmit the essence of the Christmas spirit throughout your home, and it would undoubtedly fill you with the excitement and joy of the holiday.

Christmas HD Live Wallpaper

Get this app to launch in full-screen mode as a screensaver. It’s time to look a lot like Christmas on your Windows 10 and 11 PC with the Christmas HD Live Wallpaper. This cute wallpaper will showcase a small Christmas tree with lovely red ornaments in a frozen foreground. And the snowflakes fall realistically, bringing the magic of Christmas into everyone’s house.

Christmas Cottage 3D Screensaver

 The Christmas Cottage-themed 3D Screensaver brings you to a charming cottage in a picturesque winter setting. Use it to envision yourself relaxing in a nice cottage near a river, with a view of a bridge with water gently flowing beneath it.

Fireside Christmas Wallpaper

Spread the yuletide spirit and increase the Christmas pitch remotely from your computer throughout Christmas and the holiday season. This 3D wallpaper, features a beautifully adorned fireplace waiting for Santa Clause to leave presents in each sock. 

Christmas Snowman

Do you want a traditional Christmas screensaver? This is where you can get it with a dancing snowman that sets off fireworks, decorates the Christmas tree, and turns the lights while listening to vinyl records.

Santa’s Castle Screensaver and Wallpaper

The Christmas castle is bustling with activity! As we buzz with activity in our homes in preparation for Christmas, the North Pole is also busy preparing presents. Elves, Santa’s devoted and diligent workers, are preparing the presents. This app is calm, snowy, and full of light environment to make the perfect Christmas gifts!

The Christmas Slideshow

This Christmas Slideshow is a slideshow of 7 lovely winter and Christmas wallpaper images with subtle motion and transitions - the perfect backdrop for winter storytelling at home. Get beautiful genuine winter sceneries, Christmas tree ornaments, and warm candlelight to fill your home with joy and warmth.

Christmas Evening live wallpaper and screensaver

 This is a Christmas live screensaver from 3PlaneSoft, with animated Christmas screensavers. It has a countdown that lets you know that Christmas is knocking on your door. The bright colors cheer you up and make your friends ask you where you got the screensaver. Magical music in the background with clock ticking and angels standing high above the little house, it’s a perfect lullaby for kids on Christmas Eve. Jingle bells announce Santa Clause’s arrival!

Christmas Live Wallpaper

Watch Christmas live on your desktop with this Christmas Live Wallpaper. This is an all-in-one live Christmas wallpaper from Steam for the holiday season. Get 4 Christmas trees and multi-colored dazzle mode in 6 animated camera motions! Also, you can create your own unique countdown dates for birthdays and anniversaries, a Christmas countdown, and a New Year’s Countdown scenario. Marvelous! 

Night Before Christmas 3D

This 3D animated Christmas screensaver features three Christmas-themed living rooms, with an atmosphere reminding us of the cookies and warm milk we’ll offer Santa when he arrives. Plus, the kids are sleeping, and the cat is watching over the Christmas tree! It depicts every detail of Christmas’s beautiful moments, including a decorated Christmas tree, stockings hung from the mantelpiece, flickering candles, and wrapped gifts. By default, the screensaver chooses a scene randomly when it starts up, but you can choose one from the options menu, change the music and sound effects, and even hide the house cat. 

Best Christmas Wallpaper Apps for iPhone and iPad

Here are the best Christmas Wallpaper Apps for your iPhone and iPad:

Christmas Wallpapers & Photos (4.3/5 starts on AppStore)

Decorate your screen with beautiful photos of Christmas, and let Christmas shine off your screen. Use your beautiful Christmas iPhone wallpaper to put yourself into a Christmas mood each time you unlock your phone/tablet. You’ll get different wallpapers, including new years wallpapers with many high-resolution images!

Wallpapers True 4K and Full HD

Here’s a Christmas wallpaper app, but one that will also serve you well before and after holidays - whole year-round. Get the feel of the vast array of categorized wallpapers - for free with high quality, which are aesthetically pleasing and gorgeous. Choose from many styles that will fit your style perfectly.

Everpix Cool Wallpapers HD 4K

This app gives you unique, awesome backgrounds. And there’s something for everyone, including Christmas wallpapers, nature, cars, etc. Select a Christmas wallpaper that fits your needs and supports your holiday mood.

Wallpapers HD

This is a well-established wallpaper app boasting impressive quality pictures with invasive adware. It has a great search function, allowing you to search for any type of wallpaper you want. Search “christmas wallpaper” and find wonderful Christmas themed for your holiday mood - fresh, beautiful, and free.

Live Wallpapers and Backgrounds +

This is your go-to app if you want live Christmas wallpaper. This app has everything: a great Christmas tree or winter Christmas wonderlands, fireplaces, candlelights, landscapes, etc. Get your aesthetic Christmas wallpaper and install it on your iPhone at a small cost. Just $0.99/month.

New Year HD Wallpapers

Merry Christmas! Get you and your phone into the mood for joyous Christmas and new year beginnings with this New Year-themed wallpaper app. It’s for your iPhone and iPad to help you add something special to your screen.

This app also has a new year countdown to get you in the party mood! 

You can also use this app to send seasonal greetings to your loved ones from its large variety of free festive quotes and images.

In Conclusion 

Merry Christmas, dear reader :) And a Happy New Year! From us at SoftwareKeep!

We hope you found your perfect Christmas wallpaper or Christmas Wallpaper app. And we hope you’ve started your 'how many days till Christmas countdown!'

We found one“how many days till Christmas wallpaper app” and started our countdown. We thought it right to share with you how to start your countdown too.

Please, share this on your socials because someone else may also benefit.

Thanks for reading :)

One more thing...

Be the first to receive our blogs, articles, product updates, coupons, and more by signing up to our newsletter. 

Also, Read Related Articles

> How To Use an Animated GIF Wallpaper As Your Desktop Background on Windows 10
> Different Backgrounds on Dual Monitors [Best Method]
> How to Personalize Windows 10
> Black Friday 2021 Shopping Guide
> The best Black Friday deals 2021: Top offers from SoftwareKeep
> Best Cyber Monday Deals

]]>
http://oktec.kr/?big=blogs/product-guides/excel-tips-productivity 2022-06-29T09:18:00-07:00 2024-04-02T22:30:58-07:00 Excel Efficiency: 11 Excel Formulas To Increase Your Productivity Rick Akura More

]]>
Master the following 11 Microsoft Excel Formulas and use them to increase your productivity and Excel efficiency.

Microsoft Excel is the most useful productivity tool in the Microsoft Office toolkit, both personally and professionally. The models of useful Excel functions and formulas are nearly endless and few people, if not one, can exhaust all of them. You can use Excel for all types of purposes, including managing data, creating budgets, extrapolating data, creating graphs and charts, planning, programming, and more. This also means Excel has specific formulas for particular functions and situations. 

So, in this gude, we take a look at 11 new and essential Excel formulas that will make you more productive. We'll be brief and succinct.

Note: These functions and formulas are available in the latest Excel versions including Excel 2021 and Microsoft 365.

Excel Formulas To Increase Your Productivity


Table of Contents 

  1. XLOOKUP Function
  2. LAMBDA Function
  3. LAMBDA Function
  4. CONCATENATE Function
  5. COUNTIF Function
  6. FILTER Function
  7. SORT Function
  8. FILTER Function
  9. SORT Function
  10. IF Function
  11. SUMIF Function
  12. SUMIF Function
  13. UPPER, LOWER, PROPER Functions
  14. FLASH FILL Function
  15. FLASH FILL Function
  16. Convert to Stocks Function 
  17. Watch: #quicktip 2 Excel Formulas To Increase Your Productivity

Excel Functions To Increase Your Productivity

XLOOKUP Function

Use the XLOOKUP function to find things in a table or range by row. If no match exists in your search, XLOOKUP will return the closest (approximate) match.

This is an upgrade compared to VLOOKUP.

For example, if you're looking for revenue for a given company product for multiple years, unlike Excel VLOOKUP, adding a column using  XLOOKUP won't break the formula.

The formula: =XLOOKUP(A11,A2:A8,B2:H8)

XLOOKUP Function Example:


XLOOKUP

LAMBDA Function

Use Excel LAMBDA function to create custom, reusable functions in Excel and call them by a friendly name. This is one of Excel's powerful functions that can help you create your own calculations.

Once you create and, define and name, a LAMBDA function is applicable anywhere in an Excel workbook. 

LAMBDA functions can be simple or complex, combining various Excel functions into one formula. 

In the example below, we intended to calculate income after tax deduction.

The formula: = LAMBDA(x,y,x*(1-y))

LAMBDA Function Example:

LAMBDA function

CONCATENATE Function

Use the CONCATENATE function to join two or more Excel text strings into one string.

In the example below, I'm trying to combine the first and last names in one cell.

There are two ways to use it:

  1. Add double quotation marks with a space between them:" ". For example: =CONCATENATE("Hello", " ", "SoftwareKeep!").
  2. Add a space after the Text argument. For example: =CONCATENATE("Hello ", "SoftwareKeep!"). In this example, the string "Hello" has an extra space.

The formula: =CONCATENATE (A2,“ ”,B2)

CONCATENATE Function Example: 

CONCATENATE FUNCTION

COUNTIF Function

Use COUNTIF, an Excel statistical function, to count the number of Excel cells that meet a predefined criterion. For example, use it to count how many times a given city appears in your customer list.

The example below counts the times the companies have been the best in different years.

The formula: =COUNTIF(A2:B22,A25)

COUNTIF Function Example: 

COUNTIF FUCNTION

Read: How To Use “If Cell Contains” Formulas in Excel

FILTER Function

The Excel FILTER function allows you to filter a data range based on a defined criterion, such as a Boolean (True/False) array. Use it to filter a range with given criteria.

Notes: In Excel, an array can be a row of values, a combination of rows and columns of values, or a column of values. 

In the example below, we filtered to return only people who made more than $50,000 after we sorted their yearly salary in descending order.

The formula: =SORT(FILTER(A2:B11,B2:B11>E1),2,-1)

FILTER Function Example: 

FILTER FUNCTION

SORT Function

The SORT function helps you sort the contents of a range or array of data (Text, numbers, dates, times, etc., in one or more columns.

For example, to Sort text.

  1. Select a cell in the column you want to sort.
  2. On the Data tab, in the Sort & Filter group, do one of the following: 
    • To quickly sort in ascending order, click. (Sort A to Z). 
    • To quickly sort in descending order, click. (Sort Z to A).

In the example below: we first sorted the table by name (the first column), then we sorted by date and income, respectively by adding the 2 and 3.

The formula: =SORT(A2:C11,3)

SORT Function Example: 

SORT FUNCTION

IF Function

Use Excel's IF function to make logical comparisons. The IF function is a popular Excel function that allows you to make logical comparisons - between a value and what you expect. 

An IF statement can have two results: True and False, or return predetermined values.

  • The first result is if your comparison is True
  • The second is if your comparison is False.

In our comparison, the logical comparison should return the word adult if the age is above 18. Otherwise, it will return a child.

The formula =IF(A2<18,"Adult","Child")

IF Function Example:

IF FUNCTION

Learn: How to Separate First and Last Name in Excel

SUMIF Function

Use the SUMIF function to sum the values in a range that meets specified criteria.

For example, if in a column with numbers, you want to sum only values larger than 5, the SUMIF formula can help you out. An example formula is =SUMIF(B2:B25,">5").

In the example below, we're trying to figure out the number of sales for a given model of car.

The formula: =SUMIF(A2:A16,A18,B2:B16)

SUMIF Function Example: 

SUMIF FUNCTION

UPPER, LOWER, PROPER Functions

The Excel Upper function converts all letters to their respective uppercase (capital letters). Use the lower function to convert all letters to lowercase and the Proper function to capitalize the first letter in each word and make all other characters lowercase.

  • =UPPE: Convert text to uppercase (capital letters)
  • =LOWER: Converts text to lowercase
  • =PROPER: Converts text to proper case (sentence case)

For each of the formulas here, we use the information from (A2:A10)

UPPER, LOWER, PROPER Functions Example: 

UPPER, LOWEE, PROPER FUNCTIONS

FLASH FILL Function

Use FLASH Fill to fill your data when it senses a pattern automatically.

For example, use Flash Fill to separate first and last names from a column or combine them from two different columns. It senses a pattern and completes the job.

Note: Flash Fill is only available in Excel 2013 and later.

In the example below, we typed the first name, the last name, and the initials, and excel recognized the pattern and reproduced the desired result.

FLASH FILL Function Example: 

EXCEL FLASH FILL

Convert to Stocks Function 

In 2019 Microsoft released a new Excel feature in Office 365 Excel that allows users to pull real-time stock prices into their spreadsheets. 

The Convert to Stocks Function converts company names or ticker symbols to get current stock information.

It allows Excel to pull data related to stocks, bonds, currency, or cryptocurrencies through Linked Data Types.

This provides financial metrics for companies of your choice. Read more here.

Convert to Stocks Function example 

CONVERT STOCKS

Watch: #quicktip 2 Excel Formulas To Increase Your Productivity

Final Words

We hope these Excel Functions will be of great help to you. Excel can make you highly productive and improve your function levels.

We're glad you've read the article up to here :) Thank you :)

Looking for more tips? Check out our other guides in our Blog or visit our Help Center for a wealth of information on how to troubleshoot various issues.

Sign up for our newsletter and access our blog posts, promotions, and discount codes early. Plus, you'll be the first to know about our latest guides, deals, and other exciting updates!

Need more help?

» 13 Tips To Master Excel Without Breaking a Sweat
» Excel Tutorial for Beginners: Tips You Need to Know
» How to Manage Your Finances With Microsoft Excel
» How Do You Insert Line Breaks in Excel?
» How To Make a Pareto Chart in Excel
» excel scroll lock

]]>
http://oktec.kr/?big=blogs/product-guides/safe-and-secure-passwords-guide 2022-05-27T02:08:00-07:00 2024-04-03T00:59:59-07:00 The Ultimate Guide to Keeping Your Passwords Secure Rick Akura More

]]>
The Ultimate Guide to Keeping Your Passwords Secure

There's no getting around it – passwords are a necessary evil in today's online world. But that doesn't mean you have to make your passwords easy for hackers to guess! Follow these simple tips to create strong, secure passwords that will keep your personal information safe.

According to experts, people who use easy passwords are more likely to have sensitive information stolen or their accounts hacked. You're more susceptible to cyberattacks than you realize. Every day, thousands of cyberattacks occur, and if your passwords aren't strong and optimal, you might become a victim. ExpressVPN's infographic on common passwords shows that "123456" and "password" are still the most popular passwords, while "qwerty" and "letmein" are also in the top 10.

To keep your online accounts safe, you need to create passwords that are impossible to crack. But with so many password requirements these days, it can be challenging to come up with something secure and easy to remember.

In this guide, we will share some tips on how to create strong passwords and protect them from hackers. So, whether you're looking to create a new password or change an old one, read on for some helpful advice.

How To Securely Store Passwords – Tips for Managing and Storing Passwords

To ensure your passwords are as secure as possible, you need to take a proactive approach to managing them. This includes both creating strong passwords and storing them in a safe place. Here are some tips for doing both.

1. Keep Your Passwords in a Secure Place

The first step to managing your passwords is to store them in a secure place. Never write your passwords down on paper or store them in a text file on your computer. These are both easily accessible to anyone who knows where to look.

Instead, you should use a password manager program to store your passwords. This will encrypt your passwords and keep them safe from prying eyes. There are many different password managers available, so take some time to research the options and choose one that best meets your needs.

Keeping your passwords in the notes of your phone isn't secure either. Anyone that has access to your device could easily open up the note's app and view all of your passwords. So even if you're using a simple password like "1234" for a site that isn't important, it's still a good idea to keep it stored in a secure password manager instead.

2. Use an Encrypted Password Manager

Use a password manager to generate and securely store passwords. Many people like to use digital password managers because they offer an extra layer of security. And if you're worried about losing your notebook, you can always back up your passwords online.

The best password managers will encrypt your passwords using AES-256-bit encryption. This is the same level of encryption used by the US military and is virtually impossible to crack. Even if the database is compromised, the hackers would not be able to read the passwords.

When choosing a password manager, look for one that offers two-factor authentication. This adds an extra layer of security by requiring you to enter a code from your phone in addition to your password when logging in.

Most password managers allow you to generate random passwords for each of your accounts. These are much more secure than using the same password for multiple accounts. If you're worried about forgetting your passwords, you can always install the browser extension and turn on auto-fill passwords.

3. Create Backups of Your Passwords

Create backups of your password manager data in case of loss or theft. This way, you'll always have a copy of your passwords and won't have to start from scratch if something happens to your device.

There are a few different ways you can back up your passwords. One is to export them to a USB drive or another external storage device. Another option is to use the cloud storage feature of your password manager. This will keep a copy of your passwords in the cloud so you can access them from anywhere.

What Is a Password Manager and How Does It Work?

A password manager is a software program that helps you generate, store, and manage your passwords. Many password managers include features like two-factor authentication and password recovery, which can further help to protect your accounts.

When choosing a password manager, look for one that offers robust security features and is compatible with your devices and operating system. Some popular password managers include LastPass, Dashlane, and 1Password.

Once you've chosen a password manager, setting it up is easy. Simply create an account and add your passwords to the software. The program will then encrypt your passwords and store them in a secure database. When you need to log in to an account, the password manager will autofill the username and password for you.

The Best Password Managers in 2022

Some of the most popular password manager applications include:

  • Bitwarden Open Source Password Manager: Bitwarden is a free, open-source password manager that offers both individual and business plans.
  • LastPass: LastPass is an excellent password manager that offers free, premium, and family plans.
  • Keeper Security: The Keeper app is a great way to get all your passwords in order. They offer free versions for individuals, families, and businesses, as well as paid plans that can suit any budget.
  • Dashlane: Dashlane has a free plan for one device and paid plans that range from two to six devices. The family account offers access to up eight different premium versions with easy management under one login!
  • Zoho Vault: Zoho Vault is a comprehensive password manager with free and paid plans.
  • 1Password: 1Password is one of the most popular password managers on the market and offers a variety of features for both individuals and families.
  • RememBear: RememBear is a clever and creative way to keep track of your passwords. It offers free plans for one device, but if you want more than that, it has premium service with sync capabilities as well!

It's worth comparing these and other password managers to see which one provides the greatest combination of features at a reasonable price for you.

Two-Factor Authentication: What It Is and How to Set It Up

Two-factor authentication (2FA) is an additional layer of security that can be used to protect your online accounts. With 2FA enabled, you'll be required to enter your password and a second code when logging in. This code can be generated by an app on your phone or sent to you via text message.

Adding 2FA to your accounts is a good way to help keep your passwords safe, as it makes it much more difficult for hackers to gain access to your accounts. To set up 2FA, simply go to the security settings for the account you want to protect and look for the option to enable 2FA.

How To Create a Strong Password in 5 Steps

When it comes to creating a strong password, there are a few key things you should keep in mind:

1. Use Uppercase and Lowercase Letters, Numbers, and Symbols

The best passwords mix uppercase and lowercase letters, numbers, or symbols. These make your password more difficult to guess, so it will take longer for someone else to try to figure out what you've got going on!

When creating a password, use a mix of uppercase and lowercase letters, numbers, and symbols. This will make it much more difficult for hackers to guess your password.

2. Make Your Password at Least 8 Characters Long

Many cyberattacks are carried out by computers trying to guess passwords using algorithms. There are called brute force attacks, and they're very common.

To make your password more resistant to these kinds of attacks, aim for passwords at least 8 characters long. The longer your password is, the more time it will take for these attacks to succeed. The longer your password is, the more difficult it will be to guess through social engineering or phishing attacks.

3. Avoid Using Easily Guessed Words

Certain words are more easily guessed than others when it comes to passwords. Common English words and phrases such as "password," "iloveyou," or "letmein" are all very easy for computers and hackers to guess.

Passwords are being hacked and defaced more frequently as technology advances. Taking care of your passwords is as vital as ever to safeguard your online identity and valuable information. One of the most important aspects of a strong password is its uniqueness. However, some passwords fall short of meeting this criterion.

The following are just some of the most popular passwords and phrases used in passwords by people all over the world:

  1. 123456
  2. password
  3. 12345678
  4. qwerty
  5. 12345
  6. 123456789
  7. letmein
  8. password123
  9. 1q2w3e
  10. abc123

To make your password more secure, avoid using easily guessed words like these. Also, avoid including personal information that could easily be guessed or found online, such as your name, relatives, celebrities, or hobbies.

Instead, use a combination of letters, numbers, and symbols to make it more difficult to guess. If you don't want to create your own password, you can also use a secure password generator such as LastPass Password Generator to create a unique, strong password in seconds.

4. Don't Use the Same Password for Your Accounts

One of the worst things you can do regarding passwords is to reuse them. If you use the same password for multiple accounts, then a hacker only needs to figure out that one password to access all of your funds.

To keep your passwords safe, it's important to use different passwords for each of your online accounts. This way, even if a hacker does manage to figure out one of your passwords, they'll only have access to that one account and not all of them.

5. Enable Two-Factor Authentication (2FA)

By following these tips, you can create strong passwords that will help to keep your online accounts safe from hackers. However, you can take one additional step to protect your accounts further, and that's to enable two-factor authentication (2FA).

2FA is an extra layer of security that requires you to enter a code from your phone in addition to your password when logging in. This makes it much more difficult for hackers to gain access to your account even if they have your password, as they would also need to have your phone.

Most online services such as Facebook, Google, Twitter, and Instagram offer 2FA, so be sure to enable it on your accounts if available.

Tips for Protecting Your Passwords

In addition to following the tips above, you can do a few other things to help keep your passwords safe from hackers.

  • Use a VPN: A VPN encrypts your internet traffic, making it more difficult for hackers to intercept your data.
  • Avoid public Wi-Fi: Public Wi-Fi networks are often not as secure as private ones, so it's best to avoid using them if possible. If you must use public Wi-Fi, connect to a VPN first.
  • Keep your software up to date: Hackers often exploit security vulnerabilities in outdated software, so it's important to keep all of your programs up to date.

By following these tips, you can help keep your passwords safe and reduce the risk of them being compromised.

TL;DR

To protect your passwords and personal information online, follow these tips:

  1. Don't use the same password for multiple accounts. If one account is hacked, all of your other accounts are also vulnerable.
  2. Avoid using easily guessed words like your name, birthday, or spouse's name.
  3. Use a mix of upper and lowercase letters, numbers, and symbols.
  4. Make your passwords at least 8 characters long – the longer, the better!
  5. Change your passwords regularly, especially if you suspect they may have been compromised.
  6. Use an encrypted password manager to keep track of all your different passwords. This way, you only need to remember one master password, and the manager will do the rest!

You can create secure passwords to keep your personal information safe from hackers by following these simple tips. So don't take shortcuts when it comes to your security – a little effort now can save you a lot of headaches down the road!

Conclusion

It's really important to keep your passwords secure. Passwords are the gateway to your personal information, user accounts, and sensitive data. By following the simple tips provided in this article, you can secure your online identity and browse in peace, knowing your passwords are safe.

Be sure to check out our Blog and Help Center for more articles on password security and other important topics like cybercrime prevention. Thanks for reading!

One More Thing

Sign up for our newsletter and get early access to our blog posts, promotions, and discount codes.

Recommended Articles

» 3 Security Apps You Didn't Know You Needed
» How to View Your Saved Passwords in Microsoft Edge
» Password Protect a Zip File on Windows 10 (With Images)

Feel free to reach out with questions or requests you'd like us to cover.

]]>
http://oktec.kr/?big=blogs/product-guides/11-must-have-chrome-browser-extensions-you-need-to-stay-productive-in-2022 2022-04-22T23:51:00-07:00 2024-04-02T22:50:53-07:00 11 Must-Have Chrome Browser Extensions You Need To Stay Productive Rick Akura More

]]>
Just as the saying goes, "time flies." It seems like only yesterday we published the best Chrome extensions for 2024. As we settle in 2024, we’d like to let you know about the best extensions for 2024 because technology advances rapidly, and it's hard to keep up with all the new changes.

This list of 11 must-have browser extensions is for you to stay productive in 2024. From staying on top of your schedule to managing your tabs, these extensions will help you work smarter, not harder.

chrome extensions

What is a Chrome Extension?

Chrome extensions are small tools that add new features or enhance existing ones to Google Chrome. They are built on web technologies such as HTML, JavaScript, and CSS.

Extensions can range from a simple button to complex tools that improve your productivity. There are extensions for almost everything for almost all web browsers. Today, we're tackling the best productivity Chrome extensions that offer the best features, boost productivity and help you manage tasks.

chrome extensions

Tired of seeing ads everywhere? An ad blocker Chrome extension can help you with that. Want to keep all of your login information safe? Install a secure password manager. Keeping track of your tasks on the fly has never been easier with a to-do list Chrome extension.

These integrated tools make Chrome one of the most popular browsers.

The best part about using a browser extension is that they are easy to install and usually free. You can find them in the Chrome Web Store. Most extensions only take a few seconds to set up.

With so many great options available, it can be hard to know which ones are worth your time. We've put together a list of 11 must-have Chrome extensions that will help you stay productive in 2024.

The Best Chrome Extensions for Productivity

Whether you're looking for tools to help with your work or just some extra convenience, these Chrome productivity extensions will be perfect.

  1. Dashlane Password Manager. Save time with your passwords.
  2. Toggl – Track the time you spend on which tasks.
  3. Ad Blocker. Block distractive ads to stay focused.
  4. Airstory. Free copywriting application/extension for bloggers, writers, students, and subject matter experts to write more, better, and faster. 
  5. Noisili. Improve focus and boost productivity. Create your perfect sound environment to work and relax
  6. Todoist for Chrome. Save webpages as tasks.
  7. RescueTime. Track how much time you spend on which websites.
  8. Grammarly.  Get writing suggestions across an array of desktop apps and websites.
  9. Forest Chrome Extension. Stay focused, be patient.
  10. Scrnli. Take screenshots and screen recordings with ease. It's perfect for when you need to create tutorials or give presentations.
  11. Wordtune. Express yourself perfectly through AI-driven writing. Make your sentences clear and concise, and adjust the tone and formality of your text.

Using these tools will help you in various ways and make your online life simpler! We've got everything covered, so there's something for everyone. The best Chrome productivity extensions offer a free version, productivity tools, and a great solution to many of your online problems.

Essential Chrome Extensions for Staying Productive

Let’s discuss these11 Google Chrome extensions for productivity in detail now:

1. Dashlane - Password Manager

Dashlane is a free Chrome extension. It's a secure, free password manager that keeps your login information safe. It's perfect for anyone who has trouble keeping track of their passwords or forgets them often.

dashlane extesnion

With Dashlane, you'll only need to remember one master password to access all your passwords from the same place. The browser extension will do the rest by filling in your login details for you. It works with most major websites and apps to use almost anywhere. If you're willing to get the premium plan, you'll also be able to sync all your passwords across your mobile devices, tablets, and PCs.

Most password managers are hard and complex to use, but Dashlane makes it easy to create secure passwords and keep them safe.

Plus, Dashlane comes with a digital wallet feature to securely store your credit card information. This makes online shopping a breeze! No more fumbling around for your wallet every time you want to make a purchase. You're also safe from cyber-criminals looking to steal your financial information.

2. Todoist for Chrome

Todoist for Chrome assists you in task management and project management on your own. If you're not the best at managing tasks that have to get done, this browser extension is perfect for you.  It's super simple and efficient.

todoist for cherome

The Todoist for Chrome extension has a sleek design that won't get in your way as you work. You can access it from the toolbar or right-click on any web page. The extension will show you the to-do lists you've created and allows you to view a list of your tasks, due dates, and progress. You can also add new tasks with the click of a button.

Create to-do lists, and then create tasks with time tracking. Each to-do list you make is another step to staying focused on the task at hand. Especially if you work in remote teams where you can't always consult with your coworkers, Todoist will definitely boost your productivity!

Todoist for Chrome also has some great features for power users. You can use natural language processing to add new tasks. For example, you can type "Call Mom tomorrow at 6 PM" and Todoist will create a task for you. The extension also integrates with other web apps like Gmail and Google Calendar so that you can turn emails into tasks with just a few clicks. Task management and time tracking has never been easier!

3. Toggl Extension – Track the time you spend on which tasks

If Todoist had a distant sister, it is Toggl. Toggl picks up where Todoist’s task management leaves off, letting you track the time you spend completing each task. I

f you do a lot of your work on the web, the Toggl Button extension makes remembering to track your time 10x easier.

toggle chrome extesnions

While you’re working, click on the Toggl extension's icon will direct you to a mini-version of Toggl. Here, you can see your more recent time entries and start and stop the timer. 

But the real magic is that a Toggl Button to start and stop the timer will automatically appear in several web tools – including the Todoist web app!

Here’s the trick: After installing the Toggl extension, sign into the Todoist web app. Now, you’ll have a Toggl button appearing next to any task you hover over. Fun right?

If you click on the button to start the timer, the time entry will automatically be populated with the task name. If you click on the button again to stop the timer, you’ll know how much time you spent on the task. More fun!

4. AdBlock — Best Ad Blocker

Do you want an ad-free browsing experience? Your digital life will definitely become easier if you install a Chrome extension capable of blocking advertisements and other clutter. While not all ads are dangerous or intrusive, removing these from the web pages you visit allows you to view web content easier while you stay focused.

adblocker

How often do people try to surf online and end up on distracting websites? Your daily tasks might become harder to complete if the web pages you visit are littered with ads. Online advertisements range from genuine product offers to partnered ads, but malicious, fake graphics may show up and lead you straight to malware.

If you click something incorrectly, it could distract or disturb the material, wasting precious time or bandwidth. In addition, ads can attempt to open more than one tab simultaneously, which can freeze the web browser and may cause malware and viruses to invade your system.

With AdBlock, there is no problem deleting and blocking ads from your website. It's even possible to remove video ads on YouTube and Twitch. AdBlock protects you from malware, fake advertisements, or any other malicious activity that could affect the browsing history of any user.

AdBlock also helps reduce page load times.  It speeds up your web experience by not having to load all of the ads on a page. This also uses less data if you're on a mobile device or have a slow internet connection.

5. Airstory

Airstory is an experiential, cloud-based word processor with features that simplify delivering material where it needs to go, including a WordPress plugin that allows you to publish directly to a site.

With Airstory, you can save your favorite online research as a note no matter where you are online. Manage your notes and import them into any space to make it easier to find the source material. Benefit from having all information at their fingertips in one place by easily having access to everything you need.

airstory

Airstory is card-based. Cards are containers for material, such as notes, photos, or whole posts/articles. You might find this Google Chrome extension similar to the OneNote Web Clipper, available in Office Online. While the web clipper works if you're using Microsoft Word, Airstory isn't linked to just one web app or desktop apps. You can use it to save web content from anywhere!

The Airstory Researcher Chrome Extension allows you to highlight and add any text you encounter to an Airstory project. Another fantastic feature is that you can easily include any images you discover that fit your text. To use the text functionality, log in to Airstory after installing the extension and add whatever you discover there to a project.

6. Noisli

Do you feel frustrated about noise in the workplace? Or do you just need to create background noise to help you focus on the job at hand? With Noisli, you can silence outside noise by playing calming music and soothing sounds.

nosisili chrome extsnsion

Just click on the extension icon and start Noisli to listen to the rain, thunder, white noise, or even the sound of a forest. This productivity extension will help you relax while getting your work done.

Noisli has many features that make it an excellent addition to your Chrome browser. You can set a timer for how long you want the music or noise to play. The extension will automatically stop when the timer reaches zero. In addition, you can control the volume of the sounds and music. You can also create a custom mix of different sounds to help you focus on your work.

7. RescueTime for Chrome

If manual time tracking with the Toggle extension isn’t your jam, you may want to automate it with RescueTime. They're sisters from different mothers. 

rescuetime for chrome

RescueTome is a handy app that runs in the background on your computer, logging exactly where all your time goes.

The RescueTime Chrome extension brings automated time tracking to your web browser, tracking how much time you spend on which sites. It then auto-categorizing those sites from Very Productive to Very Distracting and helps you understand your work habits to find ways to be more productive. 

At the end of each day, week, or month, you'll get a report showing how you've spent your time. The extension will also give you a "productivity score" to see how productive you've been. In addition, RescueTime can block distracting sites so you can focus on your work.

8. Grammarly for Chrome

How many times have you questioned your writing ability? When writing emails, articles, research papers, or even your own to-do lists, it's important to have proper grammar. Grammarly is a grammar checker and much more. It's one of the most recommended Chrome extensions for productivity, as it's easy to use and helps you stay focused while being productive.

grammarly for crome

The best features of the Grammarly browser extension include correcting grammar mistakes, spelling errors, and typos and giving you suggestions for word choice and punctuation. You can even use it on Google Docs!

Grammarly will also give you suggestions on how to make your writing better. The premium version offers other services as well. For example, if you're using passive voice, it will suggest you use active voice instead. The extension can also help you improve your vocabulary by suggesting different words.

9. Forest: Stay Focused, Be Present

We couldn't list the best productivity extensions without mentioning Forest. How often do you catch yourself opening the new tab page and hopping on social media to check your Facebook Newsfeed when you should be working? It might be more often than you're willing to admit.

But don't worry. Productivity Chrome extensions have you covered even for this problem!

forest chrome extesnion

Forest is a great Chrome productivity extension for people who have trouble staying focused on their work. It helps you stay present by planting trees. A tree will be planted every 30 minutes so that you stay on task.  The more you stay on task, the more trees you'll plant, and eventually, you'll have a whole forest!

So, the more trees you "plant," the more your "forest" grows. You can also see how long you've been working and how many days in a row you've stayed focused.

The app also has a "Focus Mode" that blocks distractions and focuses on your work. In addition, Forest has a " Pomodoro Timer" to help you break down your work into manageable chunks. And if you need some motivation, the extension will give you badges as you reach milestones.

10. Scrnli Screenshot & Screen Video Recorder

Out of all the Google Chrome extensions listed on this page, Scrnli might become the one you use the most if you're a content creator or writer. Scrnli is a great Google Chrome extension for taking screenshots and recording videos of your web pages, open tabs, and it can be used for screen sharing. It's perfect for when you need to create tutorials or give presentations.

scrnli chrome extension

The extension lets you capture your browser window in full resolution, complete with the ability to record audio and your screen movements. You can also annotate your screenshots and videos with text, arrows, and shapes. Scrnli includes a "select" option that allows you to pick exactly what you want to capture when you click the extension icon if you need to capture a specific section.

Export your screenshots and videos as GIFs, MP4s, or WebMs. You can also save them to your computer or share them online. You can also annotate your screenshots and videos with arrows, text, and shapes. And if you need to blur out sensitive information, Scrnli can do that.

Once you're done, you can save your screenshots and videos locally or share them online. You can even upload them directly to Google Drive or Dropbox!

11. Wordtune - AI-powered Writing Companion

The last Chrome productivity extension we have to showcase is Wordtune. Wordtune is a great extension for writers who want to improve their writing skills. The extension uses AI to analyze your writing and suggests ways to improve it.

wordtune chrome extension

It can help you with grammar, style, clarity, and even tone. You can also use it to get feedback from others on your writing. Wordtune offers real-time suggestions as you write so that you can make changes on the fly. And if you're not sure about a suggestion, you can always click "explain" to see why the extension is suggesting it.

You can also use Wordtune to set goals for your writing. Wordtune is perfect for writers of all levels, from beginners to professionals. It's also great for students who need help with their writing assignments.

How To Install and Manage Chrome Extensions

Installing a Chrome extension is a pretty simple process. Just head over to the Chrome Web Store and find the extension you want to install.

Once you've found it, click "Add to Chrome" and follow the instructions. The extension will be added to your browser and appear in your toolbar. Some extensions may need to access your data in order to work properly.

If an extension asks for permission to access your data, make sure you read what it plans to do with that information before you permit it.

You can always change or remove an extension by going to chrome://extensions in your Chrome browser. Here, you'll see a list of all the installed attachments. To remove an extension, simply click the Remove button next to it.

chrome extensions

If you want to disable an extension without removing it, click the toggle switch next to it. This will turn the extension off without uninstalling it. You can always come back and enable it later if you need to.

So, if you want to install any of the extensions below, just follow these steps:

  1. Open the Chrome Web Store in your browser.
  2. Search for the extension you want to install.
  3. Click "Add to Chrome."
  4. In the pop-up window, click "Add extension."
  5. The extension will now be downloaded and added to your browser.

After getting geared up with some of the best chrome extensions, you can manage your arsenal by going to chrome://extensions in your address bar. Here, you can enable or disable an extension, delete it, or open its details.

Final Thoughts

That’s it: These are Chrome’s best extensions for saving time, getting organized, and eliminating distractions while browsing the web.

Did you enjoy our list of the best Chrome productivity extensions? Share this content with your friends, colleagues, and acquaintances by clicking the social media share buttons. 

If you have any unanswered questions or problems not addressed, please feel free to reach out to our team of experts.

Also, follow our Blog and Help Center for more great articles like this one! You’ll get a wealth of information on how to troubleshoot various issues.

One More Thing

Sign up for our newsletter and get early access to our blog posts, promotions, and discount codes. Thank you for reading! We hope to see you again soon.

Recommended Articles

» Save Hundreds of Dollars With These Google Chrome Extensions
» Which Web Browser Should You Be Using in 2024?
» 10 Ways to Speed Up Your Firefox Browser and Boost Performance
» How to Use Google Chrome Extensions in Incognito Mode
» Google Chrome Extensions: Best Chrome Extensions in 2024

Feel free to reach out with questions or requests you’d like us to cover.

]]>