From simple objects such as labels, birthday cards, thank you notes, and greeting cards to more complex items like newsletters and brochures, Microsoft Publisher has got you covered.
MS Publisher is a simple yet versatile desktop publishing program for creating all sorts of simple and professional print publications, you’ll need to use Microsoft Publisher.
In this article, you’ll learn how to create and design your publications like a Pro using simple tips and tricks.
What Is Microsoft Publisher?
Microsoft Publisher is a desktop publishing application. It’s a great app that allows you to create visually rich and professional-looking publications right on your desktop.
It has an easy-to-use desktop publishing features such as mail merge, Professional-level effects for texts, shapes, and pictures, etc., which anyone can use. You don't need any professional knowledge or graphic design backgrounds to use Microsoft Publisher.
Who is it for?
MS Publisher can be used by everyday users who need to design publications such as;
- Students,
- Educators,
- Parents, or,
- Businesses.
What Is Microsoft Publisher For?
What are the things you can do using Microsoft Publisher?
The answer is almost anything you need to professionally design and publish. For instance;
- Event posters.
- Yearbooks, and catalogues.
- Postcards and brochures.
- Greeting cards and labels.
- Personalized birthday cards.
- Professional business cards.
- Brochures, Flyers, and programs.
- Newsletters for small businesses and organizations.
The application can also allow you to create branding and sales material that looks professional.
Creating these publications is just the beginning. You can also use it to edit and customize any publication of your choice. You can work with it from scratch, from templates, or from existing content you may already have.
Here are some important Microsoft Publisher basics.
Microsoft Publisher Basics
You can never GET lost when you don’t know where you’re going, RIGHT? Well, to get that stunning publication up in seconds.
How to Create a New Publication in Publisher
The trick is to find a pre-designed template that looks like your intended final publication.
To create a new publication from a template follow the procedure below.
- Go to Publisher’s Start page by clicking File > New. The available templates will appear.
- For publisher 2016 or Publisher 2013, choose Featured to find individual templates, and click Create, or
- Choose Built-in to use one of the templates installed in Publisher, or the categories of templates such as flyers, brochures, or greeting cards, and click create, or
-
Use the search box to find online templates, and click Create.

- For Publisher 2010, click Installed and Online Templates under Available Templates, select the template you want, and click create.
-
Select the type of publication you wish to create (for example, if you want to create a card, click on card). In Ms Publisher 2010, you will type cards in the search box.

-
Select the card design you want to create, for example, Thank you, Card
-
Click create (in Publisher 2010, you will click download).

If you don’t like that specific greeting card design Click Page Design > Change Template to find another card design. -
Replace the template’s graphics or text by right-clicking a graphic or text box and then clicking Change Picture or Delete Text.

-
Use the options on Page Design to keep customizing the card (In Publisher 2010, click Format on the Drawing Tools tab.):
- Try out a new color theme.
- Change the font.
- Apply a background.
After you’ve made the changes to the tune of your interest, click File > Save
Creating a Blank Publications
If you opt not to use a template or can't find a template for the publication you want to create, you can create a blank publication.
To create a blank publication you will have to set up page margins, add guides, and make all layout and design on your own.
To create a blank publication in MS Publisher, Click the New tab in Backstage view, then select a blank page size in the Available Templates pane.

How to Add or Edit Text in Publisher
To Add text to your publication you need to first insert a text box first. If you use a template, it probably contains a text box you can just fill in. But, you can also add your own text boxes.
Step 1: Add a Text Box
-
Click Home > Draw Text Box, then drag the cross-shaped cursor to draw a box where you want to place the text.


- You can now type text in the text box. (If you realize that the text you are typing is too long for the text box, you can make the text box bigger. Alternatively, you can link it to another text box).
Step 2: Link Text Boxes
Linking text boxes will make texts flow from one box to another.
-
When there is too much text in a text box, you’ll see a little box with ellipses in the text box's lower right.

- You will need to create a new text box.
-
Then click the overflow indicator and your cursor will become a pitcher. Now move to the new text box (the one you just created) and click.

- The overflow text will show up in the new text box.
How to Edit Existing Text in Publisher
Apart from adding text in MS Publisher, you can edit already existing text.
How to Change Font Attributes in Publisher
To change a Font, Font Style or Size do the following:
- Highlight the text you want to change (drag the cursor across),
- Click Home.
-
Select one of the Options in the Home ribbon that appears to change the Font, Font Size, Font Color, and even apply Italics, Bold, or Underlines.

Using Styles
- Go to the Home menu > Click the Styles icon to change/edit multiple aspects of the font at once (including the font style, size, and color).
-
If you want to create your own style that you can use over again in other documents. Click the New Style at the bottom of the Styles drop-down menu.

How to use Spell Check in Publisher
MS Publisher offers the same Spelling feature (including spelling check) as other Office apps.
To check the spelling of a publication, click the Review tab then select Spelling. The MS Publisher built-in Spelling tool will go through every word in the document and prompt you for action whenever necessary.
- Ignore - prompts you to ignore a single instance of a word.
- Ignore All - prompts you to ignore every instance of a word found in the document.
- Change - lets you change the word to the other words (suggestion you click or a new word that you type yourself).
- Change All - automatically changes all instances of a word with the particular change you specify.
Note: By default, the AutoCorrect feature is enabled in Publisher.

How to Find and Replace Words in Publisher
Just like in other MS Office Apps, you can find a word, or find and replace words.
- Click the Home tab > then click the Editing menu.
- Select either Find or Replace > then a new window opens on the right.
- Toggle between Find and Replace by clicking the Radio buttons at the top of this window.
- Type the word you want to find in the Search field and click Find Next. Publisher will find all the words that you have typed on the search field.
-
If you want to replace a word with another, type the word in the Search field and its replacement in the Replace field > then click Find Next and decide. You can replace one by one or Replace All.

How to Add Pictures to a Publisher Document
To add pictures to your publication, follow the below steps:
- Click Home > Pictures.
-
Use the provided options in the Insert Pictures dialog box to find the picture you want to use.

Using the Design Checker in Publisher
You can use the Design Checker in Publisher for Microsoft 365, as well as in Publisher 2019, Publisher 2016, Publisher 2013, Publisher 2010, and Publisher 2007.
The Design Checker reviews your publication’s elements and objects for design and layout problems. It helps find empty frames, font problems, improperly proportioned pictures, and other design problems. It identifies all potential problems and provides options to fix them.
You should run the Design Checker before you publish your publication on a desktop printer, pack it to go to a commercial printer, publish it on the web, send it in email, or after you convert one type of publication to another type.
You can specify the types of problems that you want the Design Checker to correct in the Design Checker Options dialog box.
For instance, if you want to print your publication at a commercial printing service and you want it to have more than two spot colors, you will:
- Open the Design Checker
- Click the Checks tab
- Clear the More than two spot colors option so that it will not check for more than two spot colors in your publication.
Generally, to use the Design checker:
- Open the Publication for which Design Checker is to be run
- Click File (Info) Tab to open the Backstage view.
- Click the Info Tab > then Click the Run Design Checker.
-
The Design Checker Task Pane will appear.

- In the Design Checker Task Pane, select from the following options.
- Run general design checks – Select this option to look for design problems, such as empty text boxes, that may adversely affect the publication.
- Run final publication checks – This option should be selected to identify problems that may impact the printing of the publication.
- Run web site checks – Use this option to check for problems that may adversely impact Website publication.
-
Run email checks – To check for problems, such as text that contains hyphenation, which may cause gaps in the message when it is viewed in certain email viewers, select this option.

- When the Design Checker Task Pane is displayed, items with problems will appear under, Select an item to fix. You will then click any of the items > then Click the arrow on the right side of the item and choose one or more of the options from the list, which are:
- Go to this item – To move to the item in the publication, click this option.
- Fix ____ (item name) – Click this option to fix the item in the publication.
- Never run this check again – This option is used when there is not an issue with the item in the publication.
- Explain – When this option is selected, the Help window will display with an explanation of the problem.
- Click Close Design Checker to close the Design Checker Task Pane.
- To open the Options dialog box, click Design Checker Options.
- Click Help with Design Checker to obtain assistance with any of the Design Checker features.
How to Save a Publication in Publisher
To save your publication the first time follow these steps.
- Click File > Save As.
- In Save A, you will choose where to save your publication such as:
- OneDrive (or OneDrive-Personal),
- Computer (or This Computer),
- Add a Place, (web place),
-
Browse among your folders.

- Enter your publication’s name and click Save.
Note the following:
- After you’ve saved your publication once, on another next save you can simply click File > Save each time you want to save or ctrl+S.
- If you want to change your publication's file name or location, click File > Save As, and repeat the process of Save As.
How to Print Your Publication
To print your publication carry out the following steps:
-
Click File > Print

- In Print, enter the number of copies to print in Copies of print job box.
- Ensure you’ve selected the correct printer.
- Under Settings, do the following:
- Ensure the correct range of pages or sections is selected.
- Select the layout format for printing.
- Set the paper size.
- Set whether to print on one side of the paper or on both sides.
- If your printer can color print, choose whether you want to print color or grayscale.
- Click the Print button when you are ready to print.
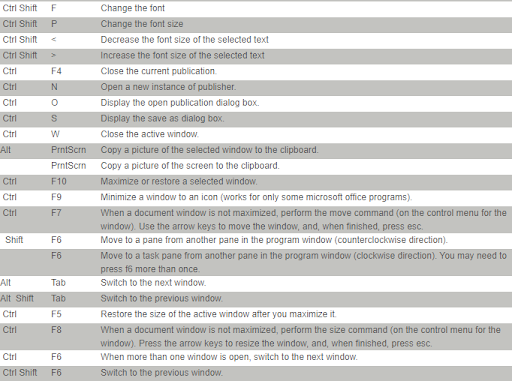
Important Ms Publisher Shortcut Keys
You can also use shortcut keys when crying out a publishing work. Below is a list of the most popular Microsoft Publisher keyboard shortcuts.

We believe this article has provided educational information to you with regard to the tips and tricks you can use on Microsoft Publisher. We aim to increase your user knowledge of Microsoft Apps among other information.
Next Reads:
> Top Ten Powerpoint Tips and Tricks you need to know
>Top 14 Microsoft Word Tricks and Tips that you Should Know
> Expert Tips, Tricks, and Shortcuts to help you Maneuver Microsoft Office
> Work From Home Guide For Small Businesses